Welding work sometimes involves less effort and time than preparing for it. Their main share is the assembly of the welded structure, during which it is necessary to fix the elements in the required position. This work requires attention from the master, because the quality of the products depends on it.
If, after careful alignment and installation of the workpieces, the structure falls apart from the touch of the electrode, it will be annoying, you will have to collect it all over again. It also happens that the element is welded, but not in the position that is needed. This can occur with imperceptible shear or deformation after cooling of the metal. That is why before starting welding work, it is necessary to stock up on all the necessary devices.
Solution
In order to avoid such errors, special devices for welding are used. They allow you to save time and energy, providing high quality products at the exit. To date, there are many mechanisms and devices that can be used for welding. If people work in industrial conditions, where mass and mass production is established, they use automated and mechanized equipment, this should include laying mechanisms, transport devices, technological assembly devices, etc. If the master has to work at home, then they can be used welding equipment, which is quite realistic to make on their own. They will reduce the deformation of parts.
Clamp making
Without a clamp, which you can make yourself, no welder will be able to cope with the work. In addition, this tool helps to solve problems during metalwork and carpentry. This device can have different options - specialized and universal. Recently, another modification has appeared, which is Using it, you can provide a compression force of up to 450 kg. However, the main task of such tools is to fix the blanks for connection between themselves.
Work on a corner clamp: preparation

Welding fixtures are offered for sale today in a wide range, but you can make yourself. As tools and materials for the work are:
- steel corner;
- threaded studs;
- nuts
- drill;
- steel plates;
- rods for gates;
- welding machine;
- tap.
Work

At right angles, the corners must be attached to steel plates. A worm structure is fixed on each side by welding. This is a corner with a welded nut or a thickening, in which you should cut the thread taking into account the stud pins. It is also important to pay attention to the potential workpiece, because it determines the width of the working gap. If the size range of the parts is wide, it is best to prepare several clamps.
The pin-screw is screwed into the working nut, at the end then the emphasis is collected. This design consists of two metal washers of different sizes. It is important to ensure that the stop on the stud is turned. The back of the gate must be provided with a hole in which a steel bar is installed. He will act as a lever. Such welding fixtures are assembled correctly if they can be used to securely fix steel parts. The design is very simple, and it can be made from improvised materials.
A rather difficult task is the welding of pipes at the end. In this case, the workpiece will need to be accurately oriented in space. If a piece of pipe is welded to the finished system, the task will be simplified. But free-lying workpieces need to be welded, having enlisted the help of others or using a special device. It is necessary to apply steel plates and a metal corner in the process of work. Halves of the clamp are traditionally attached, it is necessary to use threaded studs for this. As a result, it will be possible to obtain an effective and simple design.
Tick \u200b\u200bMaking

Homemade welding fixtures also include tongs. You can collect them, but for this you need to be patient. For work, a copper dart should be prepared, the length of which is 2 m. Its diameter should be equal to 30 mm. This workpiece may be slightly longer, in which case it will be possible to bend. The element bends to create a horseshoe-shaped blank. 18 mm holes are made at the ends, after you need to make a turn and make a cut.
The result is clamps for the electrodes. Two transformers are connected in parallel, in them the secondary and primary windings must be connected directly. The current supply can be adjusted independently. Such homemade welding fixtures should be cooled, and water should be used for this. Using the foot pedal, you can remove the electrodes.
From the foregoing, it can be concluded that the pincers have a lever for turning the electrodes, a transformer, and also a handle with a pusher. The lever is held by hinges, the axes of which are located opposite. Sometimes pliers are made, between the pushers of which there is a spring. However, such a device for welding pipes cannot be called convenient. After all, compressing the spring during rotation will be quite difficult.
Making a magnetic holder

If you are interested in fixtures for assembly and welding, you can make them yourself, refusing to purchase factory options. This also applies to the magnetic holder, for which you need to prepare the following materials:
- sheet metal;
- dry board;
- magnetic fasteners.
When preparing the metal, it is necessary to be guided by certain parameters, the thickness of the sheet can vary from 1 to 3 mm. Creating a template for future designs, it is better to complete a monolithic version, the dimensions of which will correspond to the needs of the master. The template must be attached to sheet metal and cut the same workpiece in the amount of 2 pieces. It is important to preserve their geometry.
Drawings of welding fixtures are best prepared independently, some of them you can find in the article. The next step on the path to fixtures will be the preparation of the central part of the magnet. To do this, you need to cut a blank of wood in the form of metal plates, but its size should not completely repeat the pattern. 2 mm should be offset from the edges. The thickness of this element should be 2 mm larger than the width of the magnets.
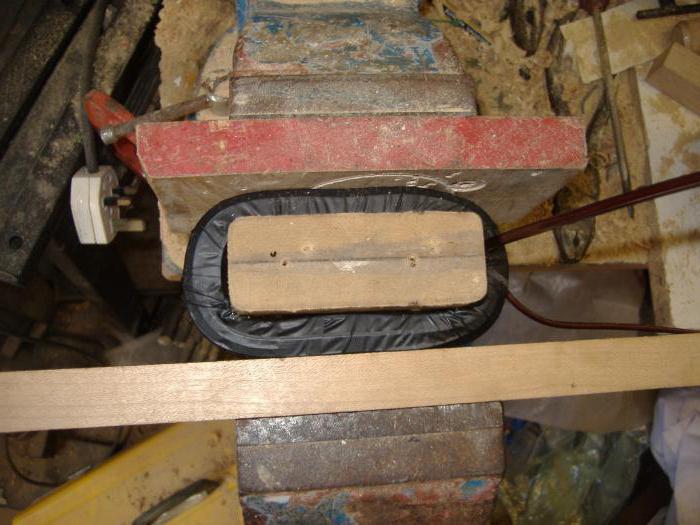
The external part of the product is ready at this stage, now you need to create the internal content. In this case, you should start from magnets. They will be located between the plates, and the thickness can vary from 10 to 50 mm. When such a fixture for welding at an angle is made, it is better to use round magnets, each of which will have holes in the central part. However, for work, you can use other workpieces that are pre-prepared by cutting holes for mounting fasteners. The final step will be drilling and assembly. Steel plates are mounted on both sides with a wooden blank, magnets are fixed in the grooves. On this, we can assume that the product is ready, it should be tested in practice.
Making a jig for welding
If you need manual fixtures for welding, you can do the manufacture of a conductor. It is used when making frames and complex patterns. The design has cone-shaped supports, which must be placed on the sides. A rotating plane is fastened between them. It should have adjustable longitudinal beams with several screw clamps.
There will be holes in the beams, which is why the clamps can be installed along the entire length, which will depend on the size of the product. The width of the assembled structure can be adjusted due to the introduction of beams and their dilution. The sliding mechanisms of the described device can be used as a universal tool for welding small and large products. If you decide to use stainless steel, it is important to eliminate scratches during operation that can occur from screw clamps. That is why the latter should be supplemented with felt stickers that are installed on the lips. Such an apparatus can be assembled from the need for long bolts and bearings, the penultimate of which are needed for mounting mobile parts.

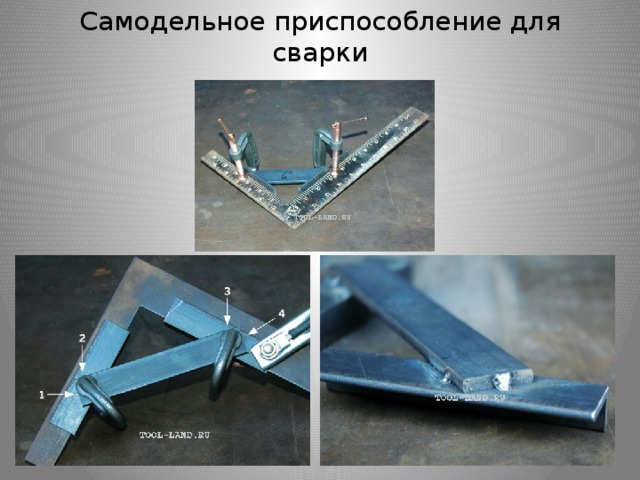
90 degree welding fixture
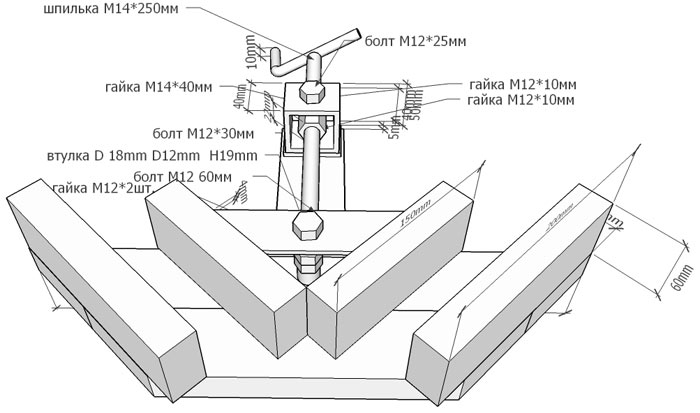
Some fixtures allow you to avoid problems when you need to connect parts at right angles. To carry out manipulations on the assembly of the structure, it is necessary to prepare a metal square, bolts, nuts, a piece of a square pipe, a bolt, a small metal cylinder, a drill, a drill, a holder, a welding machine.
When preparing a square, you should take into account that its side will be 20 cm. When choosing a thick bolt, you must prefer one that has 4 cm in diameter. When choosing a metal cylinder, you should prepare one that is the size of a ballpoint pen.
Methodology
In the manufacture of the above-mentioned device for welding with your own hands, you must weld on a square pipes that are 15 and 20 cm long. You need to install them at the corners so that the ends of the pipes are on opposite sides of the square. Now you can start manufacturing auxiliary parts. To do this, a figure is prepared from the pipe in the shape of the letter P, its length should be 10 cm. The second part is made of the same pipes, however, the elements are welded together in the form of an isosceles trapezoid.
An isosceles triangle is made on the sides of the square. A U-shaped figure is welded to it, in which a hole is made in the center in the center for a small bolt. A 4-centimeter bolt should fit in the gap between the figure and the square. A handle is attached to the latter; a nut with a hole can play the role of it. In a small cylinder, thread for the small bolts. It runs along the end of a large bolt. At the intersection of the diagonals of the trapezoid, you need to make holes in both parts. A cylindrical element will be installed between them, in which the thread is preliminarily performed.
Conclusion
To facilitate the welding work on sale today you can find a huge number of fixtures and devices. A separate place among them is occupied by those that can be performed independently. Given the information that was presented above, it can be argued that such designs are made from improvised materials, you don’t have to purchase anything else, which is why you need to be patient and prepare drawings.
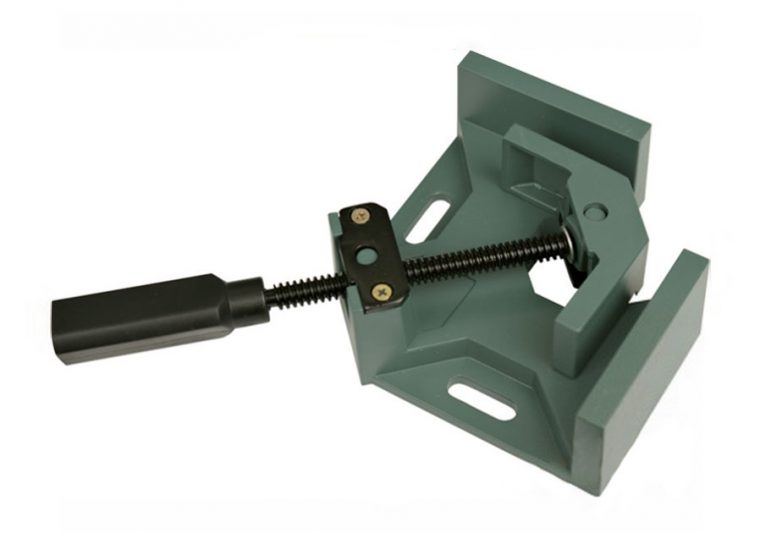
The seemingly simple welding work, as a rule, requires a fairly professional and responsible approach. Since to perform high-quality and reliable work, you will need special tools. An angular clamp for welding can become such a tool, which makes it possible to carry out welding work much easier and faster.
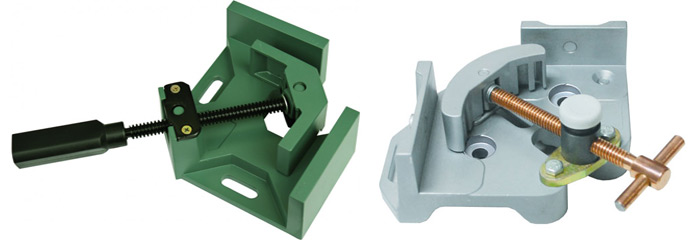
An angular clamp is a kind of universal fixture that fastens machined surfaces during welding. Such a fixture firmly compresses the necessary elements at a certain angle and thereby makes the welding and processing of materials more convenient. This is the first important equipment for any welder, without which it is impossible to do without causing damage to productivity and extreme inconvenience in work. Clamps can be of different sizes and shapes. Keyless options are considered particularly convenient. In general, for the continuous implementation of welding work, professionals recommend having a set of clamps of different configurations.
Weld Angle Clamp Design
Clamps are often available in several versions and are designed for welding. metal pipes at a certain angle (from 30 to 90 degrees). They can be made in different forms depending on the width of the pipes, their number and the angle of welding.
Distinctive features of any angular clamp are:
- sponge thickness - the clamping jaws are thicker to increase the degree of stiffness of the joints. As a result: weld does not bend during welding;
- clamping screw material - in the process of welding, there is often a spray of molten metal particles that settle on nearby surfaces. If they get on the threaded parts, their adhesion can occur and, as a result, the clamp will fail. To avoid this, copper or copper-plated clamping screws are installed on them. Copper, in turn, prevents spatter from sticking and extends the life of the welding equipment;
- working surface - for working with electrodes at the required angles in the places of joining of parts, the clamp increases the working area.

The clamp itself consists of a movable element and a main frame. The moving part is usually equipped with additional special clamps - a screw or a lever that regulates the degree of compression of the parts. Using a movable element, the distance between the tool and the jaws is controlled.
Due to the maximum mobility of the device structure, the clamp can hold materials of different sizes and cross-sections. And when using several angular devices, you can form any arrangement of structures for a more comfortable and efficient welding. The majority of clamping elements are designed for welding material with a maximum diameter of 390 mm.
The angular clamp for welding has a T-shaped handle, which allows you to transfer the clamping force generated during operation to the workpiece. And cast iron staples during welding can withstand even the highest heat.
Choosing an angular type clamp, it is necessary to take into account the type of planned work. So, for example, G-clamps are usually used to fix workpieces of small thickness. If it is necessary to carry out the installation of metal products having a large thickness, it is worth using an angular F-shape clamp equipped with an adjustable clamping element.
The clamp can be installed in all types of rooms in workshops or garages on the desktop with a flat surface.
Do-it-yourself clamp
Most models have a standard mounting angle of 90 degrees, but devices with the ability to change the angle are also available. Their cost on the market is an order of magnitude higher, so sometimes it makes sense to make a design with your own hands.
The angular type clamp is quite simple in design and for many it will be easy to assemble it even at home.
The optimal material in the manufacture of home-made clamp is considered iron.
For independent production of clamps, you must do the following:
- Create the foundation of the structure - to form the base of the device, it is desirable to use sheet metal with a thickness of 8 mm to 10 mm. The fixing element will be the corner of the desired size. The fastening of parts is best done using electric welding, since a threaded fastener will be less reliable.
- Install clamp - to make a screw clamp, it is recommended to use 2 or 3 nuts that are welded together. In this case, it is better to make a bracket with a central threaded hole with a thickness of 30 mm to 40 mm. It is fastened with bolts so that in cases of thread breakage it could be changed.
- Form a corner - special attention in an angular type clamp must be paid to the location of the clamping brackets. When welding, the corners should ideally fit one to the other. For this purpose, one of the corners is welded to the clamp, on which the second corner is then superimposed, pressed and welded to the bracket.
- Check base movement - along the side surfaces of the structure, it is necessary to install guides that will allow the internal base of the clamp to be moved. To do this, cut a groove with a width of 8 mm to 10 mm along the bisector of the corner device.
- Drill holes - using a drill in the upper base of the clamp, into which a bolt is installed, which is tightened with a nut and washer. The movement of the bases in relation to each other should be free, therefore it is better that the thread on the bolt does not reach the head. The head can also be mounted on the base with a bracket.

During the operation of such a standard version of the clamp, in view of limiting the position of the device at right angles, sooner or later, the question of its narrow focus in work may arise. This can be corrected by placing a detachable bolted connection in place of a previously fixed element. As an option, a clamping adjustment screw can be installed, thanks to which it becomes possible to select the desired angle with its subsequent fixation.
Given all of the above, it should be remembered that in order to obtain a professional welding joint, a high-quality tool is needed to simplify the work and prevent the occurrence of non-joining and fitting.
Lesson topic: assembly - welding devices The purpose of the lesson: the study of the types, devices and purposes of assembly - welding devices

The main types of assembly and welding devices
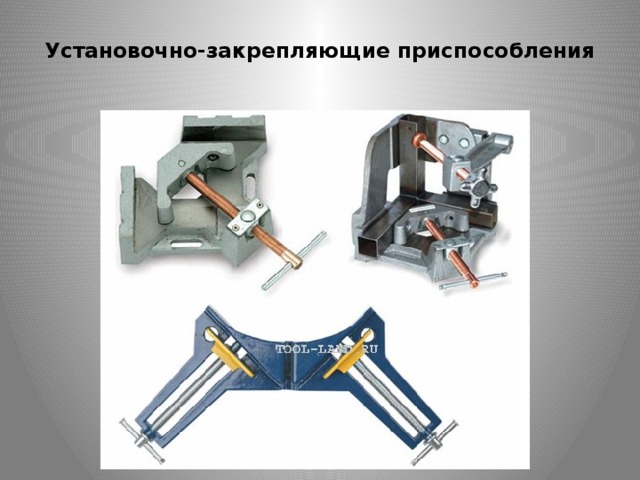
All assembly and welding devices can be divided into two main types: installation and fixing. Especially convenient mechanisms that combine both of these functions.

Adjusting devices . Installation fixtures are designed to install the part in the desired position - exactly in that in which it will be in the finished product.

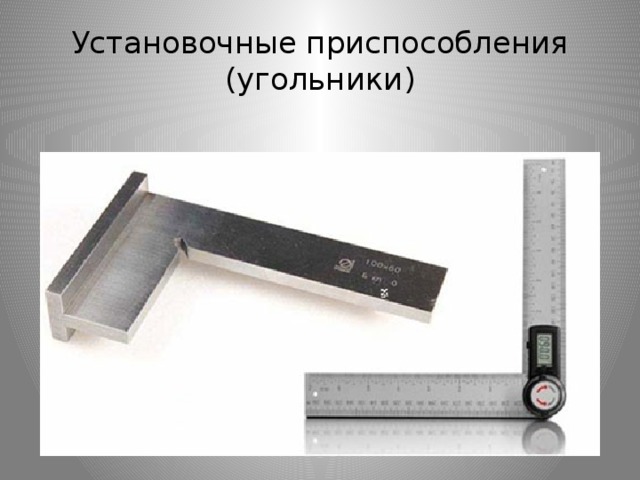
Squares serve to install parts at a specific (90 °, 60 °, 30 °, 45 °) angle to each other. The angles are convenient to use, the faces of which are made rotary and allow you to set any desired angle between them.

Emphasis serve to fix parts on base surfaces and can be permanent, removable or folding (tapping, swiveling). Permanent stops, which are usually ordinary plates or bars, are welded or screwed to the base. Removable or tilting stops are set when their constant presence in the part is structurally unacceptable.

Patterns designed to fix parts installed during assembly on other parts in this unit or along any supporting contours of the product. In this case, the product itself is the supporting element of the device.
Fastening devices .
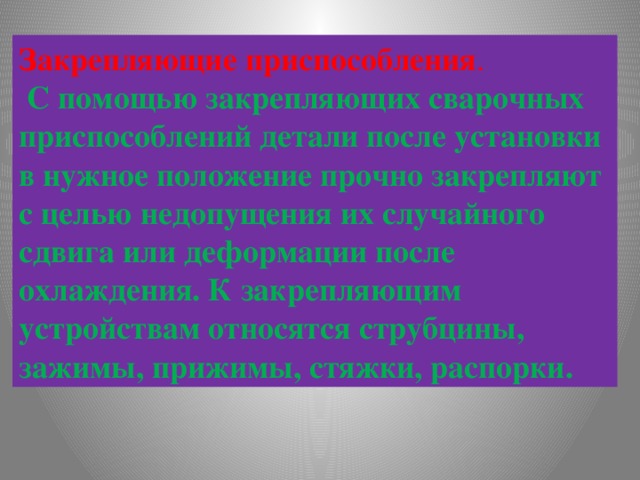
Using fixing welding fixtures, the parts are firmly fixed after being installed in the desired position in order to prevent their accidental shift or deformation after cooling. Fixing devices include clamps, clamps, clamps, ties, spacers.

A universal tool used in almost any metal work. For the welder, it is the first important tool, which, if possible, can be dispensed with only at the cost of extreme inconvenience and to the detriment of productivity


Spacers allow you to align the edges of the assembled parts, give the parts the desired shape, correct local defects.


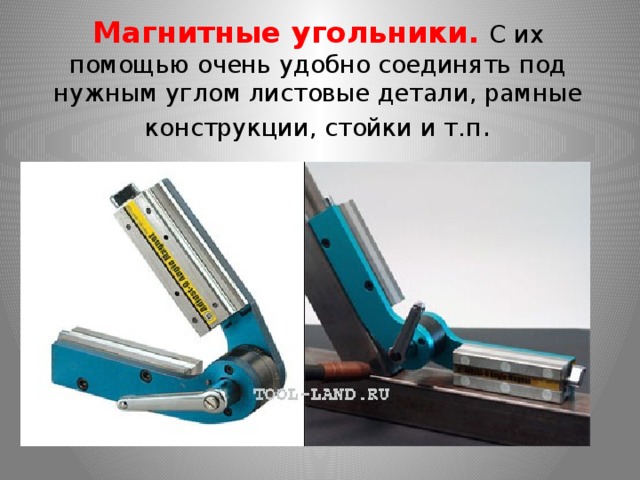
Magnetic squares. With their help, it is very convenient to connect sheet parts, frame structures, racks, etc. to the desired angle.


Clamps. These are elements that determine the position of the welded part relative to the entire fixture
Pockets (a),
Emphasis: permanent (b), removable (c) and folding (g);
Installation fingers and pins: permanent (e), removable (e); prisms rigid and adjustable (g) and patterns (h).
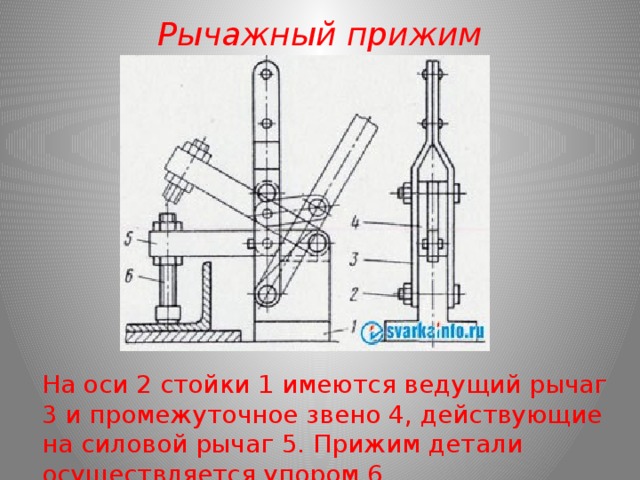
Lever clamp
On the axis 2 of the rack 1 there is a leading lever 3 and an intermediate link 4, acting on the power lever 5. The workpiece is clamped by a stop 6.

Pneumatic clamps Compared to mechanical ones, they have a number of significant advantages, including speed, the ability to control a number of clamps from one place, the ability to supply compressed air to clamps that occupy different positions in space, etc. The pneumatic clamp has a certain elasticity, which compensates for the deformation of the welded parts .

Magnetic clamps differ in speed, simplicity and maneuverability. They are used to align the edges and press them against the flux pad
a is a general view of a magnet; 1 - magnet body; 2 - core; 3 - bottom; 4 - winding; 5 - switch; bd - application patterns; 6 - bracket; 7 - electromagnetic stand; 8 - emphasis; 9 - screw clamp

Clips on the hydraulic device. Such clamps exist, but are rarely used, since the compressive force of such clamps is huge from 500 kg. per square meter.

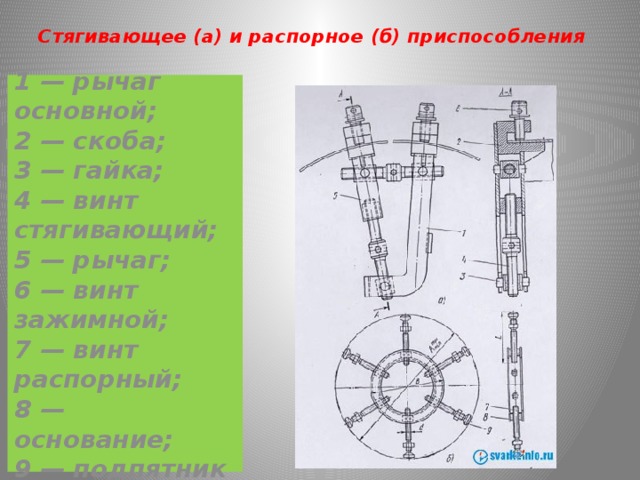
Tightening (a) and expansion (b) devices
1 - main lever; 2 - a bracket; 3 - a nut; 4 - tightening screw; 5 - lever; 6 - clamping screw; 7 - spacer screw; 8 - base; 9 - thrust bearing


Every welder knows that for quality work it is necessary to prepare for it correctly. A variety of devices for welding will help to correctly install and secure both the entire structure and individual parts. The final quality of your work directly depends on this. But it’s not always possible to take ready-made devices or right now it’s easier to make or repair it yourself than to look somewhere.
- Installation;
- Fastening.
The installation tool is designed to install parts in exactly the same position in which they will be in the final work. Depending on the functions and design, they are divided into stops, angles, prisms, patterns.
Fixing devices are designed to fix parts in the desired position, in which random shifts or deformations are not allowed. Such devices include clamps, clamps, clamps, ties and spacers.
Do it yourself
Some tools used by the craftsman during welding work break down quite often or have the wrong functionality. Yes, most things can be bought at the store, but sometimes it’s easier to do it yourself and specifically what you need.
Electrode holders
To make a homemade electrode holder, you need to take three pieces of wire ten centimeters in diameter with eight millimeters. Bend two of them to the side (it will look like a plug) so that the parts of the wire are directed in opposite directions (left and right). Between them should be the remaining wire, bent to the top from the connection with the metal rod, to approximately 0.5 of its length. First of all, the side parts are caught by welding, after which the central part is applied, then everything is completely welded. You may need to add an additional winding of the wire, which will protect it from overheating.
Clamps
The clamp is a fixing device. The need to make them yourself can be caused by insufficient strength of those models that are sold in stores. For example, when welding twood or other metal things, sufficiently strong clamps are needed. And store models may not withstand the required load.
For manufacturing you will need:
- Steel sheet 10 mm thick;
- Three nuts
- Washers of large diameter;
- Pipe with external thread in the size of nuts.
Manufacturing process:
- Cut a strip of steel sheet with sides of 50 cm and 4 cm;
- Cut a strip for static holding below 25 cm long;
- Cut a mobile bar 10 cm long;
- To fasten the mobile part, cut two 5 cm rectangles;
- Cut the part to support the static part of the clamp (1);
- Weld the auxiliary part to the clamp base. They must form among themselves the letter G;
- Weld the part flat on a short edge (1);
- Weld three nuts together;
- Weld washers with each other;
- Weld the nuts edge with respect to the movable part so that the screw-in rod runs parallel to the base of the clamp itself;
- If necessary, a handle can be attached to the shaft, secured with a nut on top;
- Weld parts along the outer edge;
- Insert between parts of the clamp;
- Weld along the inner edge of the parts by attaching a bar;
- Weld washers on the edge of the rod.
For assembly, you can use the rod from the magazine clamp, if any.
An angular clamp, like a regular one, secures parts for their subsequent welding. However, parts of the product should not always be located directly. Sometimes at an angle. It is for such moments in the arsenal of the welder that there should be an angular clamp. They are sold in stores, but have the same disadvantages. You can easily make a tool for welding at right angles yourself. The set of materials is the same as for ordinary clamps, plus nuts and studs.
Non-consumable electrode welding
A device for connecting metal wires, twists or the manufacture of thermocouples is often often made independently with their own hands. But keep in mind that the price of the finished product purchased in the store may be lower than the total amount of all components if you buy them. However, as a rule, parts can also be found at disassemblies, and maybe they can be obtained by disassembling old equipment.
For the manufacture of the device you will need one transformer for 20-50 V, the connecting wires are four pieces (two for connecting, for connecting the electrode and connecting to the network). The electrode can be graphite, which can be easily obtained by removing the rod from the pencil. Everything that you can adapt for this is suitable for the role of holder.
The assembly of such devices is carried out according to the standard scheme, which can be easily found in many sources and, by and large, consists in the correct connection of the wires and packaging of all this in a case.
Justification
Options for homemade welding fixtures can and have practical applications in real work. However, one should keep in mind the feasibility of manufacturing self-assembled fastening mechanisms or other devices. You must clearly understand what you want to achieve: increased strength, higher rigidity of fixation, or make the most convenient option.
The fixture for welding allows you to do quality work quickly. And the more convenient you make or pick up a tool, the faster you will achieve the required quality of work.
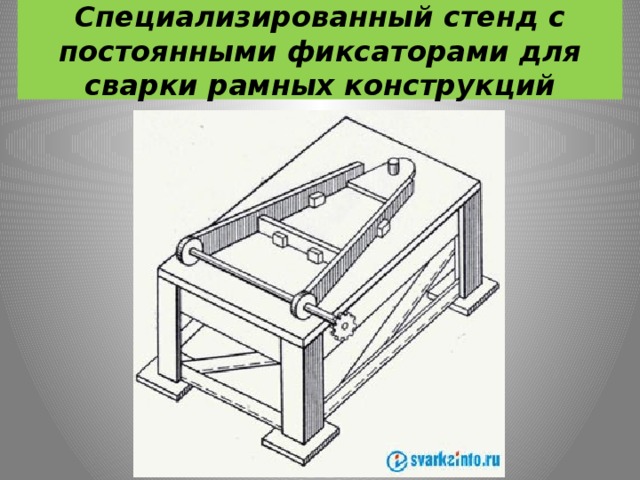
Depending on the type of structure being assembled, the welder needs to constantly monitor the dimensional tolerance. This includes: observing the equality of diagonals, the distance between the axes (racks), the longitudinal and transverse planes, the angles of individual elements not included in the main perimeter. If you miss any of these indicators, the design will be defective and the product will have to be redone. Practical welding fixtures have been created for quick repetitive work, which ensure that the structure is fixed in position with observance of pre-set dimensions. This optimizes the whole process and allows you to produce more quality products in a short time.
Conductors are devices for assembly and welding, which are used in the manufacture of towel rails, complex patterns of forged elements, and frames with doors from industrial safes.
The metal structure has two cone-shaped supports on the sides, between which a rotating plane is fixed. On the last there are adjustable longitudinal beams, with a number of screw clamps. Due to the numerous holes in the beams, the clamps can be installed along the entire length, depending on the size of the product. Thanks to the divorce or the reduction of the beams themselves, the width of the assembled structure is regulated.

Thanks to the conductors for welding, the distance between the sides of the product, its longitudinal and transverse plane, is set and held immediately. Only the diagonal is checked by the welder, and you can begin to work. The device rotates, so there is easy access to the welding of both external and internal seams. To fix the tilt during rotation, a circle with numerous holes on one side of the plane is used. The emphasis is inserted into it. More complex mechanisms contain an electric motor and gearbox.
The sliding mechanisms of the jig allow you to use it as a universal tool for welding large and small products. When working with stainless steelsto prevent scratches from screw clamps, the latter are supplied with felt stickers on the “lips”, and the mass is broadcast directly to the product. Such a conductor apparatus can be assembled from the profile pipe itself. You will need bearings and long bolts to secure the moving parts.
Patterns
More simple devices for at right angles are installed in the form of templates on a flat plane. The exact angle of future products is determined in advance. This is done by welding the stops, two pieces on each side of the corner. The element to be welded is laid in the template, tacks and welding are made.
The “advanced” versions of the templates have folding stops that facilitate the extraction of the welded structure. To prevent the product from driving when exposed to high temperature welding arc, instead of stops on one side, screw clamps are added, which firmly fix the sides in the template and prevent them from rising up. After welding, the screws loosen and the structure loosens. So, you can weld at an angle profile pipes, corners with different widths of shelves. It is convenient in the production of frames on doors and gates.
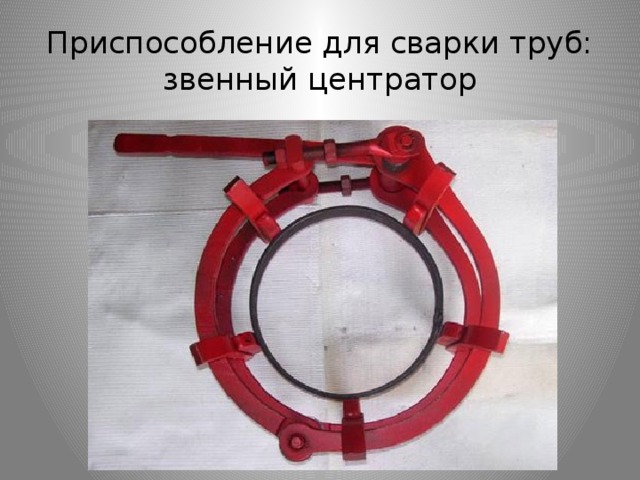
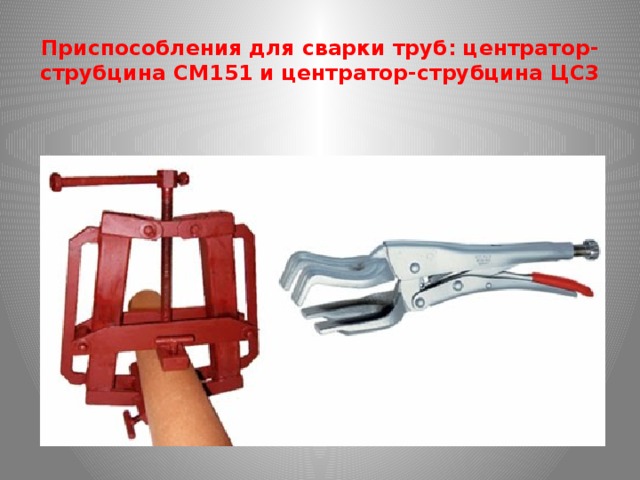
Centralizers
Assembly is not a lot of welding. The main feature of working with such details is to ensure the alignment of the parties. If the difference is more than 1.5 mm, then it will be noticeable to the naked eye. On critical products where aesthetics are important, this is unacceptable.

Centralizers bring welded sides together, aligning them either mainly along the upper and lower parts, or along the entire circumference. They are screw, the girth of which reaches all sides of the pipe, and clamping - with semicircular legs. The equipment centers the pipe and welding is in progress. After which the device is removed.
Magnetic Inventions
It is very easy to set the sides of the product in the desired position. The simplest is a magnetic square. It rigidly fixes two parts of the product due to the force of attraction, and sets an angle of 90 degrees between it. There are more universal versions of the device, where a different degree is set. So you can weld the sides at sharp and obtuse angles.

Even more versatile magnetic frequency inventions allow you to capture a metal element and attach it to either side of the surface. This helps a lot when there is not enough third hand, but there is no one to help. A home-made fixture for welding with similar functionality can be made of two squares of metal 30 x 30 mm, to which one magnet is attached. On the squares, “ears” are welded to which, through a bolted connection, two or more “elbows” can be attached (metal strips with a wall thickness of 3 mm and dimensions of 100 x 20 mm). Such an invention can be bent and bred as you like. On one side, it will stick to the main product, and on the other, grab and hold the welded element.
Clamping and sliding devices
Among the fixtures for welding, there are many small assistants that provide fixation, mixing, or the separation of parts for welding. Here are the main ones.
Clamp
This is a C-shaped frame, on one end of which there is a “lip” for gripping the product, and on the other a moving emphasis. This device is used to clamp the sheets to the base, in compliance with the general plane of the product. The emphasis moves on the screw or on the cam mechanism along the gear rack. The latter option is more practical, as it saves time for sliding under different thicknesses of the structure. The pharynx (C-frame size) can be small and large, depending on the dimensions of the materials being welded.
Square
The easiest element to help set 90 degrees between profile pipes - this is a square. If manipulations are regularly performed that require quick installation of 90 degrees and fixing the position, then you can make a simple design for DIY welding. Two clamps are needed, the fixed “lips” of which are welded from below to a strip of metal. Two small corners are attached to the top of the strip. Using the angle set the desired degree and they are scalded. This is the emphasis. It is not necessary to bring the corners close to each other so that access remains to fillet seam on future products.
Spacers
To squeeze out the sagging sides of the structure, bursting devices are used. This may be the edges of the side sheets diverging in the plane, or the sunken side of the joint of large capacity. To bring the edges to the same plane, a cylinder is used, inside which a large thread is cut. Large bolts are screwed into its edges, and on their hats are fixed stops suitable in shape to the inside of the product (if the tank has even walls, then the stops are flat, if the walls of the tank are round, then the stops are rounded). The cylinder has several holes for mounting the lever and rotation. In this case, the bolts are unscrewed and the total length of the device increases. This pushes the sagging side out to the desired level. If the spacer length is not enough, a wooden insert is placed under one of the stops.
Clamps
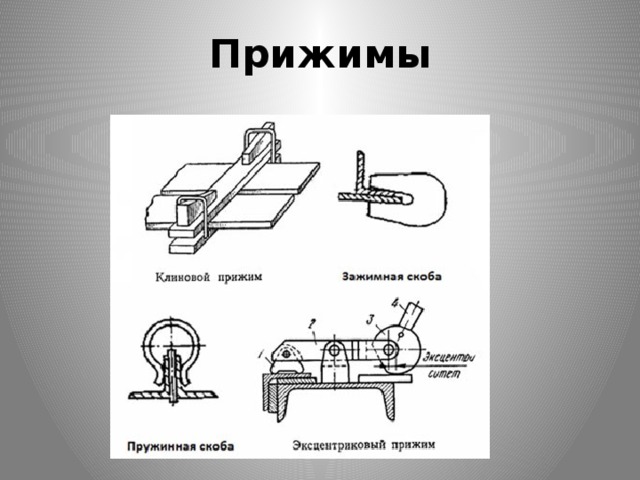
Sometimes, you have to work very quickly, and there is no time to press the product with clamps. If the thickness of the parts to be welded is small, clamps can be used. These are small claws with a spring attracting both halves. The “lips” of such devices can be wide or curved for specific products. They have a small range for adjusting the working width, but unlike clamps, they are set in one second.
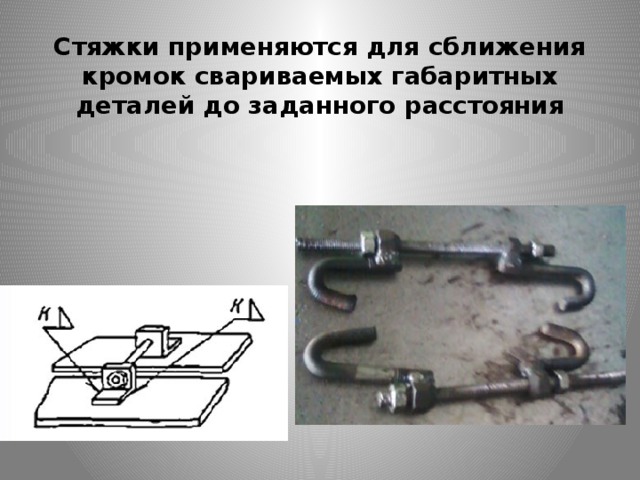
Screeds
When it is required to reduce the sides along the joint line to cook without a large gap, then use ties. In the case of flat products, these can be two corners with holes that grasp opposite each other and reduce the sides with a long bolt, tightening the nut. The device will fully realize its constricting effect if the bolt has a long thread (under the head). If the design has bumpers for which you can catch, then instead of welding corners, hooks with holes at the top are used.
Various accessories greatly facilitate and speed up the welding process. By making these elements yourself, you can save some money.