- The surface of the wall is cleaned of dust, then slightly moistened.
- The solution is taken on a trowel (putty knife), then sprayed onto the prepared surface. The layer as a result is uneven, and this is exactly what is necessary for better adhesion between the layers.
- The second layer is thicker. It is applied with a trowel over the entire surface of the channel, from the very beginning to the end.
Covering with asbestos-cement sheets
This method allows you to save twice as much heat. Its essence is in the decoration of brick walls of the canal with asbestos-cement slabs. Gluing is performed on a plastering solution, which is prepared according to the above technology.
- After reinforcing the surface with a metal mesh, the first layer of plaster is applied by spraying.
- A second layer is applied to the dried first layer and asbestos-cement sheets are cut onto it, cut into appropriate sizes.
On a note
Given the insufficient environmental friendliness of asbestos, this method of thermal insulation of the chimney is more suitable for cold attics. It allows you to partially balance the thermal regime inside and outside the pipe, which significantly reduces the formation of condensate, as well as improves fire protection.
For finishing brick structures, sheet metal can be used. Such lining is performed on a layer of insulation.
The creation of an insulating casing
A single metal pipe that is not protected by insulation is the most dangerous option, in terms of fire. In addition, it poorly saves heat, given the high thermal conductivity of the metal. Between it and structures made of wood and plastic, you need to maintain a distance of at least 60 cm. But even then you can get burned if you accidentally touch it. Therefore, the issue of isolation still remains relevant.
The simplest method of isolation in such a case is the creation of a multilayer sandwich construction.
- The chimney lap is wrapped with non-combustible basalt cotton mats that are thinner than 50 mm. The melting point of this insulation is close to 1000˚, and this is much higher than the temperature of the smoke.
- On top of the insulation, a knitting steel wire is laid and fixed.

- Then apply the plaster according to the above technology using cement-lime or clay-sand mortar.
- Instead of plaster, you can use a casing of sheet iron. The sheet should have a width of at least 1 m. The metal billet is rolled along the diameter of the pipe with a layer of insulation and riveted along the line connecting the edges. The corners are rounded manually or using rolls for this.
On a note
The isolation process is continued by repeating the procedure the required number of times. In this case, the next sheet is laid with an overlap, fixing its lower edge.
Chimney insulation in the ceiling

The sections of the smoke channels at the passage through the ceiling are perhaps the most critical, and therefore require special attention. This event is required when installing any type of chimney. It involves the construction of a box.
When making passes, the following conditions must be met:
- The edges of the holes made on the roof and in the ceiling should be at least 0.25-0.35 m further from the edges of the chimneys.
- This space is tightly filled with non-combustible heat-insulating material. As a rule, this is stone or basalt wool.
- Wooden structures located near the aisles are treated with flame retardants.
Even when insulated, the chimney also needs proper operation. In particular, it needs to be cleaned of soot at least three times during the year, timely to remove the ash from the furnace, use materials designed exclusively for these purposes for the furnace.
When fuel is burned, carbon monoxide is produced in stoves and fireplaces. They are removed through the chimney. Despite the apparent simplicity, this design is complex. Chimneys are arranged in order to provide the necessary traction, so they should be correctly brought to the roof, determine the height and dock with the roof covering. Properly made insulation for chimneys is also important.
Reasons for Insulating Chimneys
The furnace gases leaving the furnace to the outside have a high temperature. When they rush up the chimney channel, condensation forms on its inner walls. This leads to the following problems:
- if moisture is absorbed into the chimney material, then it collapses over time;
- sometimes water droplets settle on the surface of the outlet channels, because of which their permeability decreases and smoke seeps into the room;
- in the event that condensate constantly flows down the walls of the chimney, smudges, hanging drops and an unpleasant odor appear.
Thermal insulation of the chimney helps to avoid these troubles and extends its service life.
Note! Chimney insulation is done in order to prevent its rapid cooling. If you make it illiterate, then you can’t count on a positive result.
Chimney heat insulation provides good traction
Methods of insulation of furnace channels
How to isolate the kiln channel depends on the material from which it was made. You can make insulation with:
- chipped bricks;
- slag;
- expanded clay;
- basalt or mineral wool;
- kaolin and others
After the containment device is constructed, the smoke exhaust structure is faced. For this purpose it is used:
- brick;
- slag concrete and reinforced concrete slabs;
- galvanized metal casings;
- wooden shields;
- profiled sheet, etc.
On a note! The easiest way is to buy a ready-made insulated sandwich pipe and install it at the stage when the chimney is made.

The method of insulation depends on the material of construction
Let's get acquainted with some insulation options separately.
Basalt wool insulation
This method of protecting chimneys is attractive because it is used more often than others. Basalt cotton wool has a thickness of 20-100 mm and can withstand temperatures up to 750 degrees. This fire-resistant material is wrapped in several layers around the pipe and fixed with a wire. A layer of plaster is applied on top.
Facing the chimney with sheets of of stainless steel done in the following order:
- measure the perimeter of the pipe, including insulation;
- cut a piece of sheet steel up to one meter long and a width equal to the size of the structure perimeter plus an allowance for fastening;
- round the sheet and treat the edges with a roller;
- put the resulting form on the stove chimney, pull it and fasten it with metal screws;
- in the same way, install several more metal casings on top of each other (make sure that the seams run apart at an angle of 120 °).
On a note! If you do not use steel cases, the insulation will not last long, and you will have to replace it. Even if you insulate the chimney with foil or film, they will not be able to protect against penetration of moisture into the basalt cotton wool.
When insulating steel chimneys, a finished metal case is used
The use of kaolin
Another method of thermal protection of chimneys is the use of kaolin. The material is characterized as:
- not combustible;
- lasting;
- flexible;
- frost resistant;
- non-toxic.
Work on the installation of non-combustible thermal insulation for chimneys is carried out in the following order:
- first plaster the stove channel;
- then glue kaolin sheets to wet plaster;
- sew the chimney flue at the end with the facing material.

Kaolin for insulation of the chimney
Mineral wool insulation
Thermal insulation using mineral wool is done as follows.
- Build a metal profile crate around the chimney. The profile size is selected depending on the thickness of the insulation, and the step of the crate depends on the width of the insulating sheets.
- Attach mineral wool to the profile in several layers (do not forget to make a run of seams).
- Wrap the finished structure with vapor barrier film and glue the joints with tape.
Note! Sheets of metal corrugated board can be used as a finish. They are fixed to the crate using special screws with rubber gaskets.

Insulation of a steel chimney with mineral wool
How to isolate the chimney also depends on the material from which it was made.
Chimneys - the nuances of insulation
Thermal insulation of steel pipes
A chimney made of a round steel pipe is insulated with a finished metal case. In this quality, a galvanized pipe of large diameter is suitable. The difference in the diameters of the chimney and insulation is 16-20 cm. Thermal insulation is mounted in this way.
- Put the cover on the steel chimney.
- Pour expanded clay, broken brick or slag into the space formed between the elements. You can also tamp between mineral pipes, basalt cotton wool or fiberglass.
- Top fill the open area with cement mortar, waterproof it and install a protective cover on top.
On a note! The profile steel pipe is sheathed using wooden panels or metal sheets (corrugated board). The distance between the components of the structure is 8-10 cm. The space is filled with insulation and reliably sealed from above.

DIY chimney insulation
Brick chimney insulation
In this case, preference is given to mineral wool, which is attached as follows:
- cut pieces from the heater, the size of which corresponds to the area of \u200b\u200bthe side walls of the pipe;
- attach the blanks to the brick using plastic dowels with round heads, or use adhesive tape (this option is lightweight, but not reliable);
- clad the attached material with asbestos cement slabs, corrugated board or brick.
Important! To reduce heat loss, plaster the brick on the outside of the channel, and then cover it with a frost-resistant composition.

Brick chimney insulated with mineral wool
Thermal protection of asbestos-cement pipes
The isolation of chimneys from asbestos cement is done like this.
- First clean the outside of the chimney from dust and dirt.
- Make a folding metal casing, consisting of two halves. When assembled, its diameter should be 12-16 cm greater than the diameter of the pipe. The height of the case may vary within one meter.
- Put the lower galvanized casing on the chimney.
- Fill or tamper the protective material into the resulting space.
- Install the next case and reinstall the insulation.
- Cut the upper casing together with the asbestos-cement pipe at a slight angle.
- Cover the insulation with a thin layer of cement mortar.
On a note! If you do not install a metal case, mineral wool will get wet, become heavy, crumple or fray in the wind. The insulation is also taken away by birds, rodents or cats.

Asbestos-cement pipes are protected by galvanized casings
Chimney insulation in the ceiling
When a metal chimney passes through a wooden floor, the distance between them should be at least 30 cm. If the chimney is bricked, this value decreases to 10 cm. The opening is laid with basalt wool, and is closed with a metal sheet from above and below. Make sure that the chimney is firmly fixed to the ceiling.
Video instruction for chimney insulation
These are just some of the options for warming chimneys. Each stove-maker uses his own method. Let your chimney work smoothly!
Add to bookmarks
Reliable chimney insulation
The construction of your own home, as a rule, is associated with the arrangement of a fireplace or stove. This raises the problem of removing the chimney to the roof. Proper and reliable insulation of the chimney is very important in terms of fire safety, durability of the building and the comfort of residents.
Chimney insulation includes: insulation of the chimney from combustible roof materials and waterproofing.
The main tasks of chimney insulation:
- Protection of the elements of the roof frame and roof from fire at the point of contact with the pipe.
- Sealing of the roof at the place of output of the pipe to the roof (waterproofing).
The construction of the chimney insulation is simplified by the correct arrangement of the pipe outlet on the roof. It must be foreseen immediately when designing a building. For best performance, the chimney should be straight and long. The best place for its exit on the roof is the area of \u200b\u200bthe slope next to the ridge. This arrangement allows you to minimize the possibility of snow pockets in the winter, and also does not complicate the construction of the rafter system.
Fire safety rules require that the temperature of the chimney at the point of contact with the roof elements does not rise more than 50 degrees.
When erecting a brick pipe, this is due to the sufficient thickness of its walls. According to regulatory documents, the wall thickness of a brick chimney at the passage through the roof should be at least one and a half bricks, i.e. 35-40 cm. The construction of a pipe of such thickness and the corresponding size of the hole in the ceiling and roof is not always convenient. Therefore, most often equip a chimney from a metal pipe and isolate it from combustible elements of the roof.
Chimney fire insulation
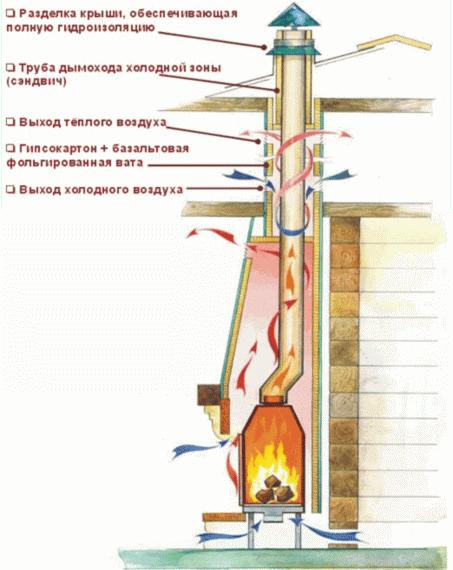
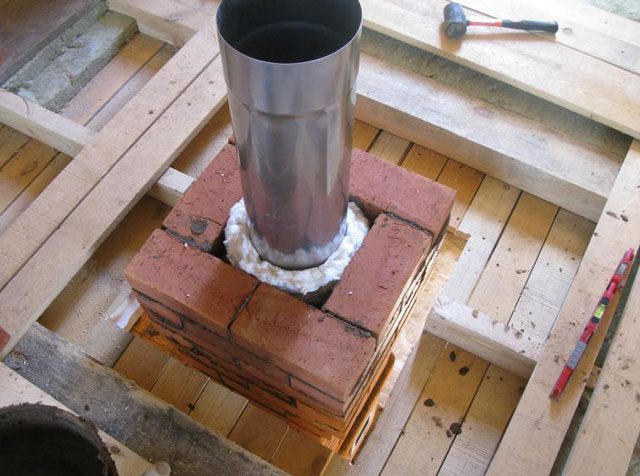
For this purpose, between the pipe and the roof, a wooden box is constructed from the elements of the rafter system. The chimney should be located inside the duct at a distance of at least 15 cm from its walls. The space between the chimney and the walls of the duct is filled with non-combustible material with low thermal conductivity (usually mineral wool).
Instead of wood, you can make a welded box made of galvanized steel roofing, guided by the same principles.
The inner layers of the roof (vapor barrier, thermal insulation, waterproofing) in the place of passage of the pipe is cut and fixed with brackets or nails to the transverse beams and rafters. The waterproofing layer is fixed around the roof passage using a frame. In this way, reliable isolation of the chimney from combustible roof elements is ensured.
There are already ready-made modular chimneys, the design of which provides thermal insulation. The modules consist of a ceramic core, a layer of basalt wool and an outer casing of lightweight concrete. Installation of a chimney from modular blocks is simple. First, an asbestos gasket is installed between the furnace and the chimney, then a layer of mortar is applied to it, the module is placed and leveled. Each subsequent modular unit is fixed with a layer of mortar. After the construction of the modular chimney, it is necessary to isolate the chimney from leaks in the place of passage through the roof.
The following method of insulation of chimneys is mainly used in the construction of baths. A metal chimney at the passage through the roof is wrapped with several layers of mineral wool and fixed with wire. Then, clay-sand mixture is applied. The pipe thus prepared is wrapped with a layer of galvanized steel roofing, fixed with self-tapping screws and a chimney is mounted on the roof.
Modern industry produces finished multilayer chimneys from thermally insulated pipes, with an outer layer of stainless steel. To pass through the roof of such structures, there are special roof passages that perform the function of waterproofing.
Chimney waterproofing
In the place where the pipe passes through the roof, conditions for leaks are created, so reliable waterproofing must be provided.
First of all, at the junction of the pipe to the roof, an internal apron is built. Usually it consists of the lower levels of abutment. Their installation begins with the bottom wall of the pipe. If the material of the pipe allows, at the junction of the upper edge of the plank perform a strob. The upper edge of the plank is inserted into the shtroba and sealed, the lower edge of the plank is cut and secured with self-tapping screws. The abutment strips along other pipe walls are also made, overlapping between them about 15 cm.
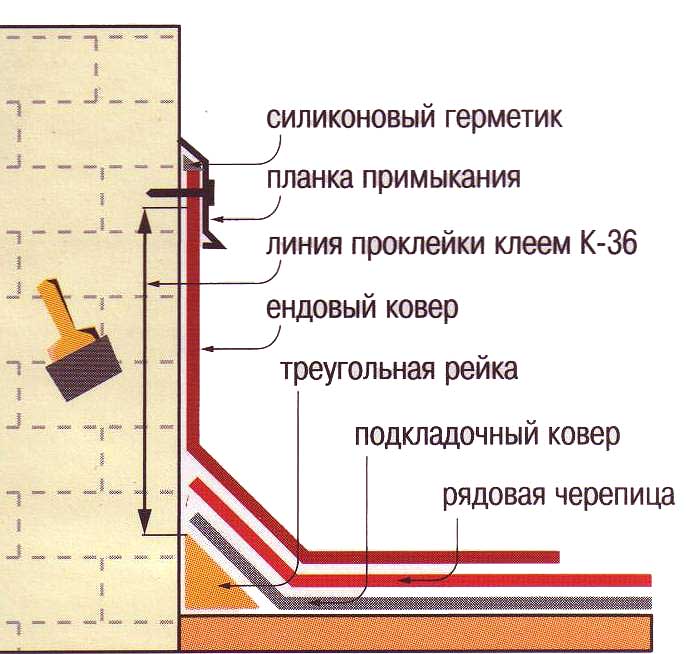
Next, a tie is mounted - a flat sheet of roofing metal designed to drain water. The upper edge of it is placed under the lower apron, and the lower is led out into the valley or cornice. At the edges of the tie bend the side to improve the direction of flow.
On top of these elements equip the top layer of the roofing carpet. At the end of its installation around the pipe, an external decorative apron is built last. It is fixed in the same way as the internal one, only without the help of the strobes.
Many builders recommend avoiding rigid fastening of the apron to the pipe so that the structure is not damaged by thermal expansion. You can use a steel clamp (skirt) equipped with a heat-resistant elastic gasket.
For the convenience of passing chimneys and other elements through the roof, ready-made roof passages are produced, the main function of which is sealing the holes in the roof. They are a base and an apron made of a single sheet of material. Passages can be made of galvanized or stainless steel, as well as flexible materials: heat-resistant rubber and silicone. Metal roof passages are a more traditional solution and have a lower cost. However, they can not always provide a snug fit to the roof made of profiled materials (tiles, slate, ondulin). Passages made of flexible materials are not deprived of this drawback; they provide a tight fit to any surface. Due to its elasticity, roof passages made of rubber and silicone can isolate roofs of any shape from leaks with different angles of inclination and without it. Several colors of the product are available, allowing you to choose the roof passage to the color of the coating.
Chimney insulation must be carried out in strict accordance with fire safety rules and building codes. It will provide your home with reliability, comfort and durability.
Almost everyone private house has a stove or fireplace, which are necessarily equipped with a chimney for the removal of combustion products. The temperature of this element can reach several hundred degrees, and the only thing that separates it from the room is the wall of the chimney.
Mounted on top steel apron by the size of the chimney for special grooves. Then all joints are filled with sealant. Sometimes the apron of the chimney is part of the insulating steel wall, which is necessary in some cases (during the formation of condensate, during installation). At the same time, the steel sheet at the bottom is bent at a slope and has no joints, which increases the level of reliability from leakage. Metal aprons are also worn on round pipes, if the temperature of the combustion products at the outlet over 100 degrees.
Cuff apron
Insulate round pipes You can use the finished apron cuff ( master flash) made of rubber or silicone. He dresses on top of the pipe and attaches to the corrugated board with a special clamp that adjusts to all the bends. Its feature is that it is corrugated onto rings of different diameters, the desired opening cut by hand and it can be mounted directly on the roof.
Also, this element is suitable for installation at any angle of inclination of the roof (corrugated board). Due to the nature of the material, the master flash can withstand small temperatures up to 260 degrees. Installation is quick: an opening of a smaller diameter is cut than the diameter of the pipe (by 20%), stretched to the pipe, a flange is used for crimping, or the edge is attached to the corrugated board using sealant and screws.
The article will discuss how and how to isolate the chimney pipe. Several practical methods are presented.
Insulation of the chimney pipe is required to prevent leaks, as well as cases of overheating. Simply put, it allows you to increase the life of the structure. Experts recommend performing complex work, which includes hydro and fire insulation.
Bath chimney
When performing insulation of a chimney in a bathhouse, safety of people should be a priority. The main indoor threat comes from open flames. Therefore, it must be protected by first making the ceiling resistant to high temperatures.
Basically, baths are built from wood, flammable material. A very common misconception is the opinion that the sheathing of the ceiling with metal sheets will be a sufficient measure. But in reality, such protection is not enough. After all, the upholstery will still heat up, which can lead to ignition. A popular solution to the problem is to insulate the chimney with red brick. But this is not suitable for every bath design.

Now there are two good options for chimney insulation:
- Folgoizol. A bath with such insulation will not lose heat; everything works like a thermos. At the same time, it warms up quite quickly, maintaining a temperature for a long time.
- Thermal insulation. The material is used for wrapping the chimney.
A popular solution is the use of sandwich pipes, which demonstrate a high degree of security. The insulation design consists of several sections that are easily combined with each other. This option is also suitable for saunas with a metal stove.

It is important to responsibly approach the brickwork in the bathhouse. The duration of the operation of the building directly depends on its quality. You can not save on materials or work. After all, the need for repairs in the future will be associated with much greater costs.
Metal chimney winding
“How to wrap a metal chimney pipe in a bath?” - A popular question among summer residents. After all, there are many materials used for this summer residence. The absence of flammable substances in the coating is a paramount nuance to be taken into account. It is preferable to use a quality material with all the necessary properties. It should also be completely safe to use.
The most common materials:
- Glass wool;
- Fibrous building materials;
- Mineral wool.
Insulation of a metal chimney
Insulation of chimneys of a metal chimney is a separate topic for discussion. After all, it contains a number of nuances, which will be discussed later. This is a very difficult task, therefore it is recommended to perform it during the construction of the bath. It is more difficult to work with the finished building, because it may require restructuring of the roof.
Good decision will use sandwich pipes. This design is easy to manufacture, in addition, reduced costs for specialists. However, the material itself is not budgetary. But the service life and quality fully justify its cost. Sandwich pipes are additionally insulated with mineral wool.
How to isolate the chimney, everyone decides for himself. It is important to remember that such insulation helps protect the chimney from the negative effects of combustion products, as well as moisture. If you do not worry about isolation in time, then there is a risk of destruction of the bath. After all, condensate reinforced by the action of acid slowly destroys building materials. He poses the greatest threat in the spring, when the pipe begins to thaw (in more detail: "").
Box making
About how to warm iron pipe chimney has been said before. Now you can move on to the next step. It seems to many that the manufacture of a duct for a chimney is too complicated. In reality, this is not so. It is enough to approach the work responsibly, with knowledge of the matter.
Tools required:
- Drill;
- Scissors for metal;
- Compass;
- Metal sheets;
- Self-tapping screws.

Work Stages:
- Hole preparation. At the edges, it is necessary to fix the bars, which will act as a support for the body.
- Two blanks are cut from a metal sheet. They are given a U-shaped. Then the finished parts are screwed to the ceiling using self-tapping screws.
- Again, two blanks are made, but they are already fixed to the standing sheets with a small spacing. It turns out a single frame in the ceiling.
- Now the bottom for the box is made of metal sheet. In the center of the workpiece should be a hole for the chimney, then a compass is required.
- Four fasteners in two centimeters are placed in the box. They are cut and bent perpendicular to the bottom.
- Walls are attached to the bottom. Now a chimney is inserted into the box, it is additionally fixed with clamps. The voids are filled with an insulating layer.
Chimney installation
Installing a chimney is not as simple a task as it might seem at first glance. There are many nuances that should be taken into account. If you put the chimney inadequately enough, it can lead to damage to property, as well as to discomfort of people inside, and harm to their health.
Stages of work:
- The preparatory stage, where the project is selected, materials are purchased, the form of construction is determined. There are straight chimneys, as well as designs with various bends.
- Now you can start assembling the chimney. The pipe joints, knees and tees must be fastened with clamps.
- Passing the chimney through the roof with a special tool. To begin with, the level of the roof slope is determined, based on the data obtained, a suitable place is selected. It cuts a hole for the workpiece. From above, everything is insulated with a roof cut, and from the inside - with a covering sheet. See also: "".
- A special apron is fixed on the nozzle. The pipe is extended to the required size, its top is partially insulated with a special cover in the form of an umbrella. It will prevent atmospheric precipitation from entering the chimney.
Chimney mount
The blank must be brought to the roof through the attic. All cracks, especially the voids between the roof and the pipe, are filled with waterproofing. When withdrawing a workpiece, safety precautions must be taken into account.
To fix the chimney pipe, a bend is used. It is designed to control the vertical position of the structure. To give everything reliability, the pipe is additionally attached to the wall, using suitable brackets. Usually they come in a ready-made kit. They can also be made by hand, it is best to use metal corners as the basis for them.

As soon as the insulating structure is in place and securely fixed, it is necessary to close the chimney pipe with an umbrella. It is designed to protect the structure from precipitation, poplar fluff and fallen leaves.
Replacing a brick pipe with a metal one
If the brick chimney is not enough, it can be additionally extended with a metal pipe. The task is laborious, but quite feasible. It is important to approach her with all responsibility.
To begin with, a flat steel platform with a pipe is made. Moreover, its diameter should be the same as the diameter of the metal pipe that is planned to be used. The site must be securely fixed. It is fixed with dowels and screws. Additional reliability will add sealing.
Work order:
- On the brickwork, it is necessary to mark the points at which the mount will be installed. They can not be placed on a masonry seam. It is advisable to place them closer to the center of the brick, and not on its edge.
- In marked places, holes are drilled to accommodate dowels. At the same points, holes are made on a flat platform, self-tapping screws will go there.
- Refractory sealant is applied to the brick base, then a steel pad is placed there. The screws are screwed into the dowels. It is important to monitor tightness and uniformity.
- Now it remains to wait for the sealant to completely dry and go directly to the extension of the chimney with a metal pipe.
Important nuances of installation:
- If the length of the pipe segment above the roof exceeds 1.5 m, it is recommended to equip it with special extensions that strengthen the structure (read also: "").
- You can not put a pipe whose length from the stove to the head is more than 5 m.
- Installing special plugs allows you to get rid of condensate.
- The chimney section above the roof should be longer than 1.5 m.
- Do not narrow the pipe when installing the chimney.
- Nearby structures made of flammable materials should not be heated to a temperature of 50 o C.
- The chimney must not be placed near the wiring.
The decision on how to isolate a metal chimney pipe should be made on the basis of the budget, as well as the needs of the structure. It is important to approach the task as responsibly as possible, performing work in full accordance with all norms and nuances. Then the insulation of the chimney will last a long time without complaints.