Even a one-storey residential building or an outbuilding is problematic to build without platforms or scaffolding. Some kind of elevation is still needed and will be completely correct if it is good scaffolding... They will ensure safety on the construction site and high speed of work, not to mention the convenience of foremen and auxiliary workers. It is not always profitable to rent, let alone buy, spatial structures for construction, so we will try to save some money.
What is it and why are they needed
It will not be difficult to build scaffolding with your own hands, but they can solve a lot of issues related to the construction of walls, roofing, and facade decoration. Price scaffolding made of metal is about 200 rubles per square meter. On the one hand, there is not so much, but on the other - why buy if homemade ones are three times cheaper in cost, and in terms of quality and functionality are no worse if you adhere to certain rules and regulations.
The main task of scaffolding is to provide the ability to work at a certain height. In this case, safety and convenience are considered first. Regardless of the design and height, of the material, the scaffolding should be equipped with either handrails or a net, be easy to install and compact for storage and transportation. You don't need to reinvent the bicycle, everything has already been invented before us and is described in GOSTs and regulations.
Parameters and characteristics of wooden and metal structures
Before choosing a material for scaffolding, you need to decide on their dimensions, taking into account the requirements of building codes. They should be observed, if only for the reason that, first of all, they are called upon to take care of our safety. First of all, before the direct construction of the structure, a drawing is performed taking into account the following parameters:
- the maximum height of the spatial structure should not exceed six meters;
- any scaffolding rests on racks, the distance between which must be at least two meters;
- the working space, regardless of height, should be at least one meter wide, this is necessary both for the convenience of work and to prevent the fall of tools and materials.
The following parameters considered will help avoid unnecessary waste of material. For example, in terms of ergonomics, it is most convenient to work when the working area is 40 cm below the thoracic region. Therefore, it is at this distance that the lowest platform should be installed. The platform of the second level is arranged at a height of 175 to 200 cm from the level of the first platform. It is also worth considering a system of braces or fixing to the wall, which will not allow the structure to move away from the treated surface. Now, armed with the general parameters and drawing up a drawing, we proceed to assembling scaffolding from wood or metal.
We collect metal scaffolding
Frame metal structure with wooden flooring - this is what you need for private construction. Such scaffolds are cheaper than yoke scaffolds, more expensive than wooden ones, but they are stronger and can be used many times. Frame metal scaffolding consists of sections 2x2x1 m. The dimensions can be changed within the permissible limits, which we have already mentioned. To assemble the scaffolding, you will need the following materials:
- pipe 30 mm;
- pipe 15 mm;
- edged board forty;
- attachment ladder;
- threaded fasteners;
- grinder, drill, welding, building level and the simplest metalwork tool.
The installation of metal scaffolding is carried out in several stages:
- Making spacers from 15 mm pipe. A spacer made from a thinner pipe will help maintain the rigidity of the structure, while not making it much heavier. Transverse (horizontal) spacers should be at least a meter in length, and diagonal ones - 2 m. The cut pipes are flattened at both ends, after which a hole is drilled in the deformed ends corresponding to the diameter of the hardware.
- Manufacturing of adapters. In order to be able to increase the vertical supports in height, it is necessary to make adapters that will be inserted into the racks and the continuation of the vertical rack will be worn on them. The number of adapters is calculated depending on the height of the scaffolding. For their manufacture, a 25x25 mm profile is used, the length is about 300 mm, for fixing a sleeve 6-8 cm long from a 30x30 profile is put on the adapter.
Assembling the frame and flooring
- Each vertical post is connected by horizontal jumpers, which are welded every 30-35 cm.
- Base plates in the form of a square with a side of 70-80 mm are welded to the lower ends of the support posts so that the structure does not fall into the ground.
- Each two racks are installed vertically strictly along a plumb line or level. They try on diagonal struts. A marker is used to mark the drilling locations. Drill holes in spacers and bolt uprights.
- Shields are assembled from a 40 mm thick board along the length of the section, knocked down from the back side and strengthened so that there is no deflection.
- Along the edges of the flooring, the U-shaped profile is fixed by the size of the crossbar on the vertical rack with self-tapping screws.
- The laid flooring will be fixed with a U-shaped profile, which will not allow the shield to move.
Now all that remains is to treat the new forests with an anti-corrosion compound, soil and paint if desired. The structure is completely ready to work. Happy construction to all!
When it goes, auxiliary scaffolding and scaffolding are needed for. As a rule, we use what is at hand: stools, ladders, tables. Working on such "equipment" is very inconvenient and dangerous. Therefore, somehow by itself the need to acquire scaffolding comes up. Craftsman Vladlen suggested his own design, let's consider it.
These scaffoldings are completely collapsible and therefore easy to transport. Disassembled does not take up much space in the closet or garage.
Taking into account the different purpose of the scaffolding, it was made so that it would be adjustable in height.
How to make scaffolding with your own hands
Racks made of profile pipe 30 * 30, for horizontal struts 15 * 15, diagonal struts 20 * 20, for a ladder 20 * 20.
Prof. a pipe measuring 20 * 40, so that it does not bend, is installed on the edge. A wooden ladder is laid on top of these pipes.
The principle is this: the size of the pipes was selected in such a way that there would be a pipe into a pipe. Having cut 4 pieces of 10 cm each, two profs are welded to them. pipes on the edge 20 * 40 is the top. Please note that for the site you do not need to cook a rectangle, two sides are enough. A ladder will serve for the rest of the sides. We weld connecting nuts onto the ladder. If necessary (according to the choice of height), you can screw the required amount.
For ease of movement, such scaffolding can be equipped with wheels by screwing on one side.
dimensions: height 1.7 m, width 0.7 m, length 2 m.
As a result, we got a strong, stable, adjustable, collapsible scaffold-scaffold.
Alexey Shamborsky, 01.10.2014
Before you start building scaffolding, you need to decide what material they will be made of, and what type of scaffolding (more precisely, the method of fastening) you, in fact, need.
Today there are two materials from which you can make your own scaffolding. It is either wood or metal. Accordingly, finished structures can be either metal or wood. But if we consider the methods of fastening the elements of these scaffolds, then there will be more varieties. It:
- Frame scaffolding. They are in demand when carrying out plastering work.
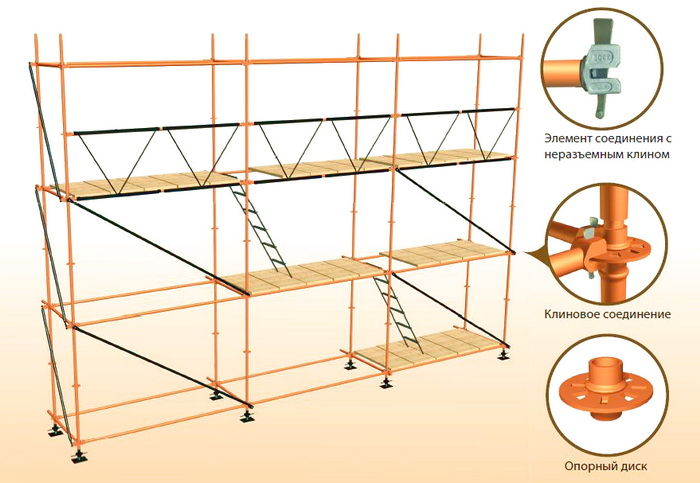
- Wedge scaffolds are indispensable when working with heavy loads and can be easily disassembled.
- Clamp scaffolding - used when working on objects with a complex configuration.
- Pin scaffolding. This variety is especially popular, as such forests are quickly assembled and disassembled.
Having decided on the varieties, you can move on to the question - is it worth building even the simplest scaffolding with your own hands, or still entrust this occupation to the masters of their craft. In the case when your solution will be unequivocally economical, you can watch detailed photos and videos of ideas on how to quickly and efficiently assemble scaffolding yourself. By the way, in the same place, you will find a hint on how to store them later, or to disassemble this structure, until the next use.
Scaffolding drawings

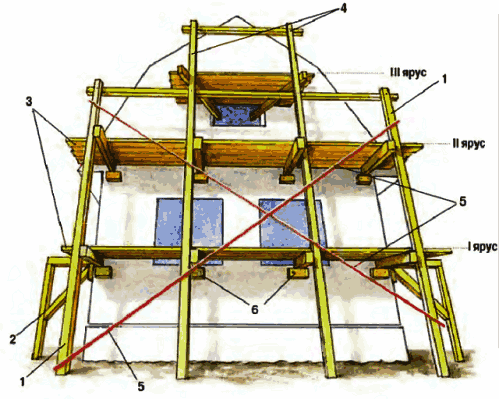
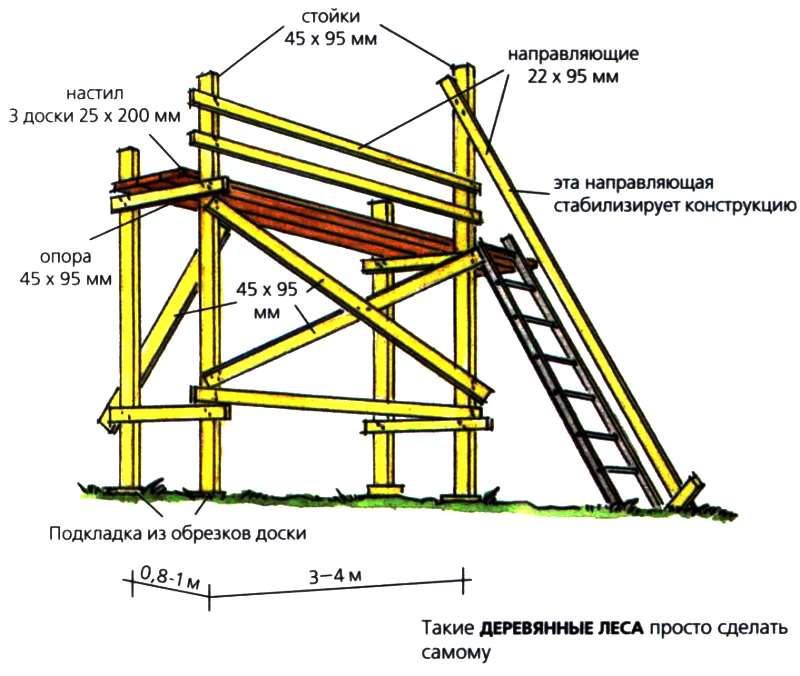
In general, you need to understand that collecting scaffolding with your own hands drawings can greatly facilitate the task. Acting according to the existing scheme, you will quickly cope with the installation. The only thing that needs to be learned is that any forest is composed of elements such as:
- main racks;
- horizontal and diagonal struts required for structural strength;
- floor lintels;
- plank flooring (support) on which a person should stand;
- reliable stops;
- mandatory fence in order to avoid falling from a height;
- stepladder for climbing to the desired height.
As you can see, it is not so difficult to master and assemble scaffolding with your own hands. But is it really advisable? Indeed, in most cases, these structures are not some kind of goats-platforms, but serious structures designed to perform heavy work at a certain height.
Scaffolding assembly instructions
In this case, the assembly of scaffolds involves the use of wooden materials, since few people would think of assembling metal scaffoldings in summer cottages, unless they are small-sized elements ready for assembly.
And wooden scaffolding, made by hand, can only be useful for work at a level not exceeding the second floor and mainly for carrying out
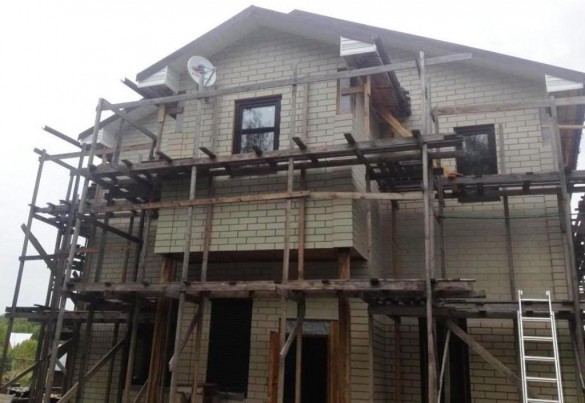
Sooner or later, the construction of a cottage comes to finishing the facade. And then the question arises: how to carry out work in the range of heights from 4 to 10 meters? After all, you need to "hem" the gables, mount the siding, and install the drainage system.
There is only one way out - to put up scaffolding or a tower-tour. But industrial forests are expensive, and the price of a tower tour with a working height of 8-10 meters bites a lot. You can, of course, rent a scaffold or a tower, but if the work takes a long time, such rental will cost a pretty penny.

Metal or wood?
Scaffolding can be made of wood or metal. The practical experience of members of the forum suggests that it is economically feasible to make metal scaffolding only if there is "free" iron. If you buy metal, fasteners, do welding works, then such forests in the end will cost more than factory and, moreover, wooden ones.
In addition, if wooden scaffolding can be carefully disassembled and put the boards into "business", then metal ones are often doomed to gather dust in the utility block. Experienced builders will say that high-quality metal scaffolding or a tower-tour can then be rented out. But how many of the private developers would want to mess with it? Therefore, most members of the forum still prefer wooden scaffolding.

HukTo member of FORUMHOUSE
Of course, metal scaffolding is better than wood, but the main trump card of wooden scaffolding is the relative cheapness, simplicity and speed of their manufacture.
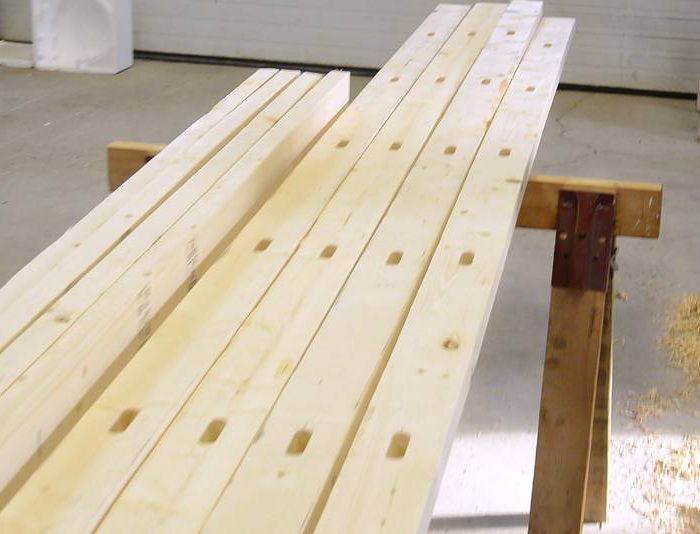
Advice from FORUMHOUSE: it is better to purchase quality lumber for forests. A quality board, unlike the junk material that has to be thrown out after use, can be put back into action.

We make our own wooden scaffolding
Before you start making wooden scaffolding, you need to decide on the scope of work. If in one case you can get by with the simplest ones - attached scaffolding (for example, for filing gables), then in other cases (finishing the facade with stone or brick, plastering, etc.), a more serious structure is needed.
Sanya2 member of FORUMHOUSE
I needed to decorate the ends of the second floor of the house with a block house. The height of the ridge is 8 meters. Therefore, I made the scaffolding out of wood, and increased their height as needed.
The dimensions of the scaffold base block are as follows:
- length - 5 m;
- width - 1 m;
- height - 3.5 m.
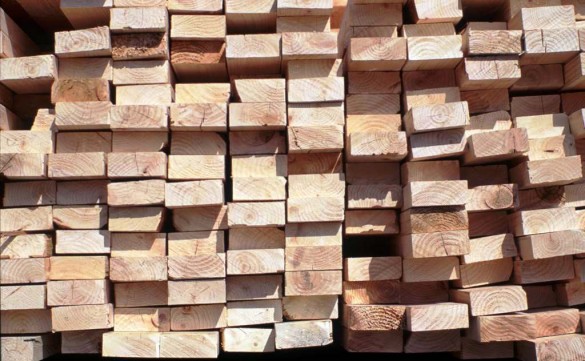
The scaffolding took 60 running meters of board 150x50mm.
Buryat participant FORUMHOUSE

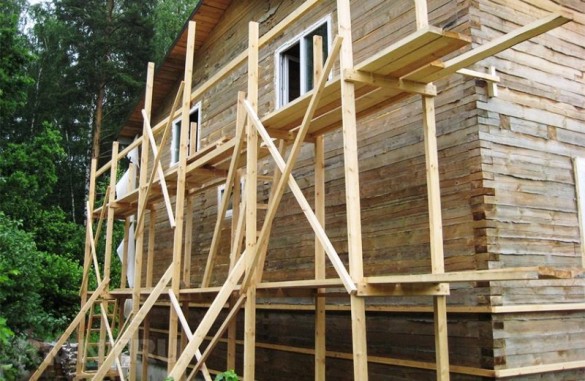
Such scaffolding is called "scaffold-envelope".
The structure itself looks like the letter G, attached to the wall. A 150x50 board is taken as a basis, another board is nailed to it perpendicularly - a support platform, on which the flooring is then laid.
One of the most important elements of such scaffolding is jibs - boards 25-50x100, with which two main boards knocked together at right angles are sheathed from the sides.
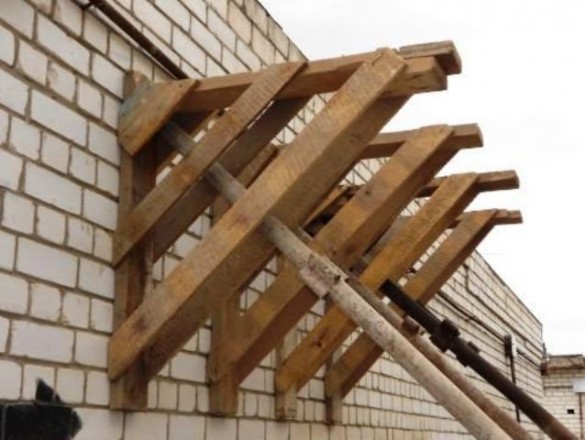
Usually, 3 jibs are nailed to each side. Thus, the rigidity of the entire structure is achieved.
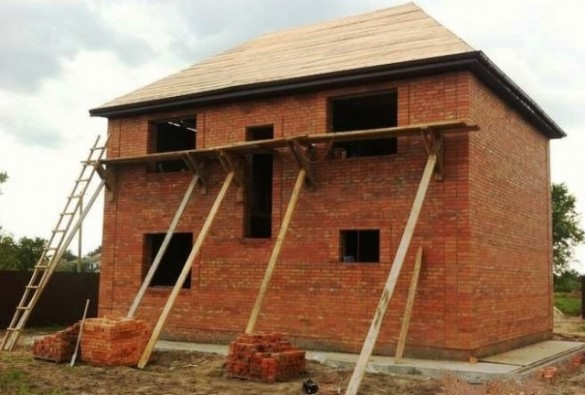
Such forests do not need a rigid connection to the home. The power load is carried by a retaining board, which at one end abuts against the place where the boards are attached, and at the other end, with a pointed end, is stuck into the ground.
If the house is wooden or frame, then the scaffolding can be nailed to the wall. If the facade cannot be damaged, then such scaffoldings lean against the wall, and the retaining board carries the main load.
When choosing the size of "envelopes", you should adhere to the following requirements. If the site is too narrow, it will be difficult and dangerous to walk on it. If the platform is too wide, then the separation of the "envelope" from the wall is not excluded. The optimal platform size is 400-500 mm.
![]()
The main advantage of scaffolding is that it does not require a lot of lumber to make.
Buryat participant FORUMHOUSE
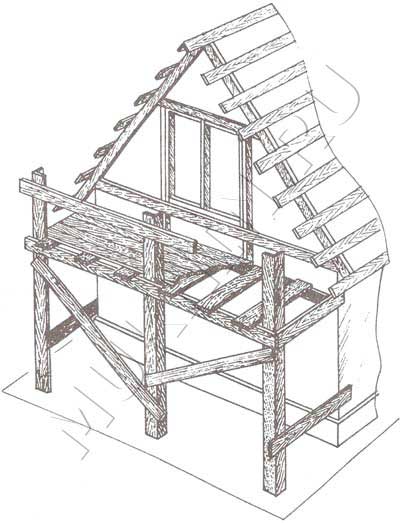
The retaining board and, accordingly, the height of the scaffolding can be increased. If the length of the board increases (more than 6 m), then for the rigidity of the structure, another board rests against the corner between the wall and the blind area, which is attached with the other end to the middle of the first - the main board.
Despite the fact that the design is widely known, at the first glance at such scaffolding, one doubts their reliability. Let's turn to the practical experience of our website users.
Zark member of FORUMHOUSE
We call these forests "Armenian". When I first saw such a structure, I was surprised - how does it hold up ?! I tried it, climbed onto the deck - quite reliably. I myself have used attached scaffolding more than once, both on a wooden and a brick house. They are convenient, quickly assembled and disassembled. Doesn't take up much space.
Drosha member of FORUMHOUSE
Forests of this type are quite safe. There is no need to fasten the boards to the walls, but the flooring must be screwed to the props with self-tapping screws (I did not knock it down with nails, so that later you could quickly disassemble it).
But such scaffolds are not suitable for all jobs - mainly for light jobs. For "heavy" work that requires working with tools, mortars, finishing the facade with stone, etc. more capital construction is required.
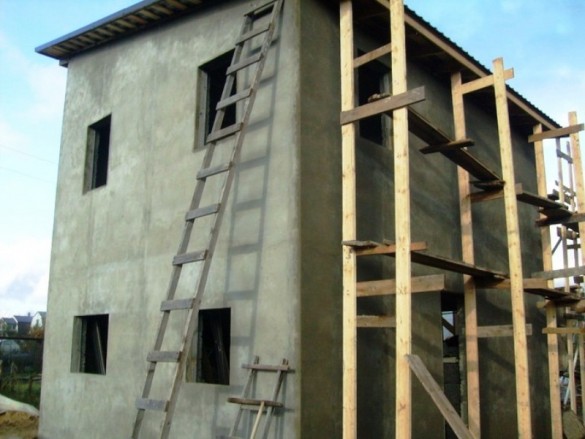
It is done like this:
- A six-meter board (150 / 200x50) is taken and placed vertically against the wall.
- A second board is placed parallel to it.
- Between themselves, they are fixed with crossbars. Further, according to the same scheme, the second support is mounted and the flooring is laid.
- For greater rigidity, the racks are propped up with additional bracing boards, which abut against the ground.
- As necessary, the scaffolding is increased in height by fixing additional vertical planks.
Standard dimensions of one span of such scaffolding:
- distance between racks - 2-2.5 m;
- floor width for work - 1 m.
diews member of FORUMHOUSE
We made such forests last summer. They were not attached to the wall. They put it on only one wall, and then moved it. The main thing is to make braces and stops, and the structure will stand as if cast.
Nails against self-tapping screws
How to fasten boards to each other when scaffolding? This issue causes a lot of controversy. The opinions of members of the forum were divided: some believe that forests can be collected on self-tapping screws, others are categorically against - only on nails.
The main argument of opponents of self-tapping screws is their fragility. The self-tapping screw does not work well under shock loading and on shear. As a result, the cap flies off, the structure loses its strength, up to self-destruction.
Igor Kokhanov participant of FORUMHOUSE
I recommend fastening everything with 120 mm nails with a mandatory bend of the tip to the beams and jibs. And no self-tapping screws! I will tell you such a case. Familiar builders made the roof. They fastened the boards with self-tapping screws. The result - the scaffolding parted, all four flew from a five-meter height. The result is one in the hospital with broken kidneys. The second is a severe injury to the leg. But they still got off easy, if the height was greater, everything could have ended much more deplorable.
Why did this happen? The nail is made from a relatively soft metal. Under load, it bends, not breaks. The self-tapping screw is made of hardened metal and under alternating and shock loads, it will first bend a little, and then break. Moreover, the so-called "black" self-tapping screws among the people, due to hardening, are much more brittle than anodized yellow ones.
For demountable wooden structures, hex bolts (for a washer) with a diameter of 8 mm or more and special metal fasteners are well suited.
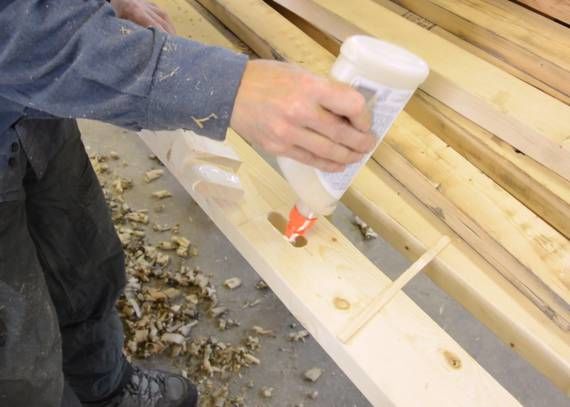
The main argument of the opponents of nails is that it will no longer be possible to accurately disassemble the scaffolds that have been knocked down on nails, and part of a good board will have to be thrown out or put into rough work. And the structural elements will be kept from shifting by a large friction force arising between the boards, if you use self-tapping screws 120 - 150 mm long. Therefore, you need to make a compromise - to use self-tapping screws to collect forests "in black". In this case, if an error occurs at the first stage of harvesting forests, they can be quickly disassembled and redone. And only then, in addition, it should be properly pierced with nails.

In order not to damage the boards when dismantling the scaffolding (in case they are planned to be put into operation again), it is possible to hammer a nail into the main board through a spacer board 25x100 in size. And at the end of the work, the thin board can be quickly split and thrown away. The freed head of the nail can be easily pulled out of the main board with a nailer.
An important point is the type of wood from which forests are made. For example, a user with a nickname dgusepebelieves that only spruce is suitable for the manufacture of scaffolding, as a responsible structure, but not pine. Because pine is a tree in which knots grow in whorls, and in these places the boards tend to break.
But there is also a diametrically opposite opinion.
Tani4ka member of FORUMHOUSE
My scaffolding was built from pine. And they perfectly withstood two adult men weighing under 100 kg and additional ladders. By the way, the woods were collected on yellow anodized self-tapping screws. Nobody fell, nothing broke.
To check the strength of the board, you can put it on two posts (for example, from three stacked bricks) and jump on it. A poor quality board (with knots) will crack or break.

Conclusion: when working on scaffolding, it is necessary to pay increased attention to safety precautions. Before starting work, you need to carefully inspect and check all the scaffolding nodes, fasteners, make sure that there are no cracks in the structure, it does not loosen, and the fasteners sit tightly. When working at high heights, safety elements should be foreseen in advance - a safety belt and additional embedded elements - for fastening safety ropes when moving through scaffolding.
Homemade wood scaffolding: photos and diagrams are. How to move a change house without a crane? The answer is. The choice of material for the construction of a wooden house is described in detail in this one. From this video you will learn about the most popular house project on - "Abode of Angels" in frame design.
Many people need to build scaffolding with their own hands. Especially this need arises during the construction, repair of the facade of a house or summer cottage. The structure is assembled from wood or ready-made metal elements.
Types of metal scaffolding
There are several types:
- Pin scaffolding or masonry. They are able to withstand heavy loads. They can accommodate pallets with bricks, troughs with mortar.
- Wedge, also designed for significant loads and can be used for masonry.
- Clamp scaffolds consist of pipes and are connected with special clamps using wrenches. To install such scaffolding with your own hands, you need to spend a lot of time.
- For low-rise construction and repair, frame scaffolding is more often installed. They are quick and easy to assemble, take up little space, and have a low weight. The scaffolding consists of prefabricated frames, beams and ties. Do-it-yourself installation does not require special qualifications, tools and drawings.
As a general rule, all scaffolds must be anchored above 4 meters.
Now many manufacturers are making lightweight frame scaffolding for summer residents. They are made of thinner pipe than professional scaffolding, are designed for low heights and are cheap in cost.
Wooden scaffolding.
 If you decide to build scaffolding with your own hands from wood, then you will have to stock up on tools, goats, materials, knowledge and carpentry skills.
Wooden scaffolds are similar in design to metal ones and are not inferior to them in technical parameters. In ancient times, our ancestors erected such structures to great heights. Many people worked for them, producing not only painting and plastering works, but also masonry.
The scaffolding, in appearance, resembles several scaffolds, connected in length and height. The difference is that the scaffolding is a single structure and the number of uprights can be higher.
Bars and boards are used as material for racks. At a height of 6 meters, the working platform will be at 4-5 meters, the rest of the distance for fastening the fence.
Beams are made of boards fixed to the posts horizontally. They must be fastened securely, the entire weight of the working people will fall on them.
The step of the racks is from 1.5 to 3 meters. If the length of the section is 2.5-3 meters, an additional cross section must be added under the flooring for reinforcement.
For rigidity, wooden scaffolding is reinforced with diagonals of 45 degrees on all sides.
When installing scaffolding with your own hands, it is important to know: boards are placed under the racks in order to exclude the pushing of the soil.