Good and a bright day! That's very soon in a month, the first flowers will appear, I suggest that it is not waiting for and to make alone flowers from paper. After all, it is possible and without reason to give such lovely gifts of nature, well, if you need a reason, do not forget to congratulate your moms, grandmothers from March 8 or with the Mother's Day, because these days are always given such crafts.
Let them be paper, but they can be so cool and super present that they will look even better than living, and even more so it can be on the table or on the shelf one year. And this certainly pleases. Take a look at this picture, like? If so, then I showed stages as you can do.
In my opinion, today's topic will always be popular, because it is the most beautiful and gentle souvenir, which you can give to any holiday. So I suggest you freeze for a long time))).
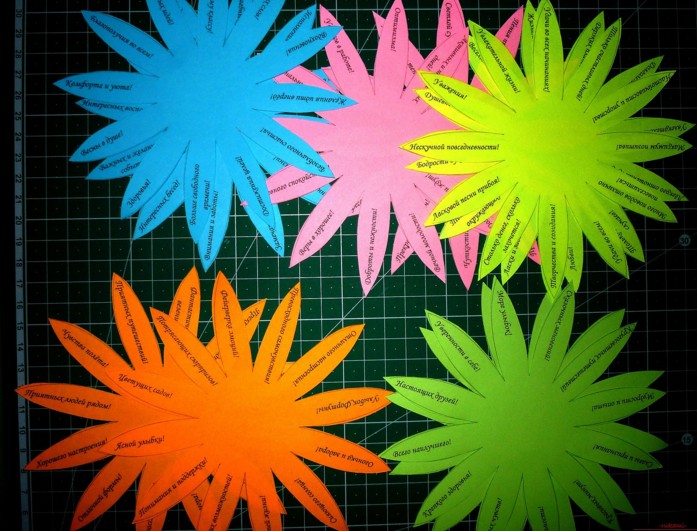
Unreally beautiful and original souvenirs that carry something unusual in themselves. I suggest starting with the most seemingly simple option, but whom, who you just look. This is a chamomile, but not simple and not fabulous, but with wishes, how nicely such will give, you do not find?
Moreover, you can download ready-made templates directly from this site and print on the printer. This is a very cool souvenir that hooked anyone. You can give it to any holiday, for example, for a birthday or on the day of the teacher.
We need:
- office sheets of different colors - 5 pcs.
- glue stick
- double sided tape
- rhinestones
- templates
- satin ribbon
- scissors
Stages of work:
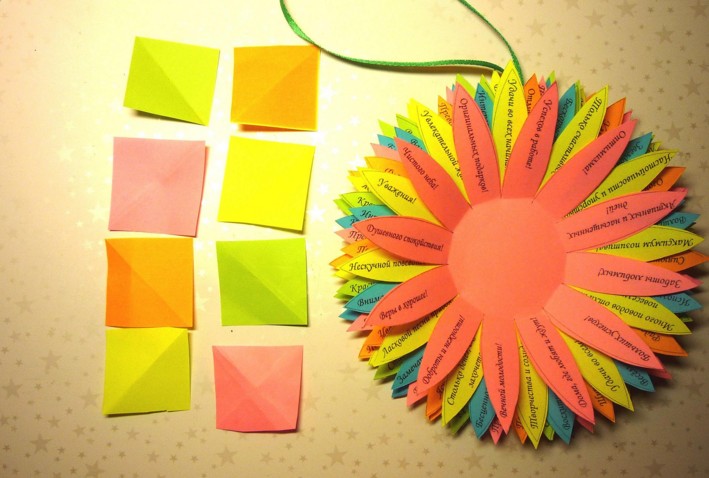
1. Start work with what you need to decide on the flower shape. I suggest to take such a seven-family flowers. Print on the printer of the workpiece. The first pattern will be the same as in this picture, everyone else I send you to your mail, just write down your comment below (there are 10 of all 10), or you yourself can come up with your words or messages.

2. Here they are handsome, now take the scissors, or you can use the stationery knife and cut down the contour.

3. These are cute and cheerful blanks will turn out.
4. Cut the circle from the cardboard with a diameter of 5 cm and put the first flower and a ribbon from the atlas and in the middle of the glue or lubricate if you use a pencil. So gradually stick everything.
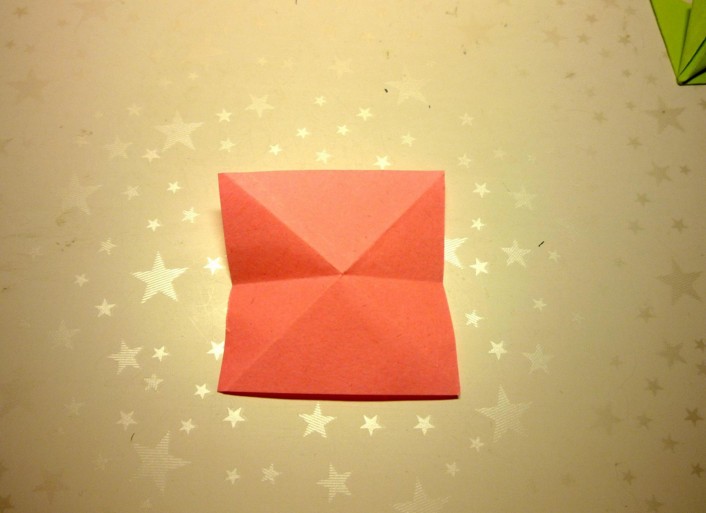
5. Now it remains beautiful to make a sir. To do this, take the square, approximately 3.5x3.5 cm. Bend it like this.
6. Then make a triangle, as if you make a frog.
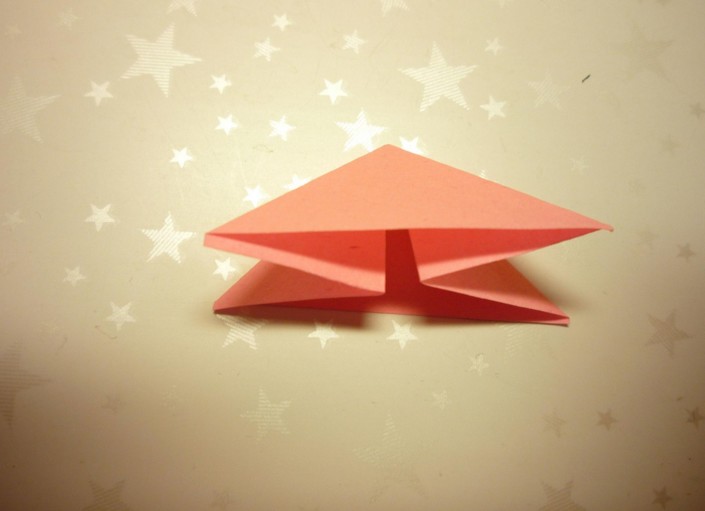
7. Generate ends forward.

8. These butterfly will turn out.

9. Which will only be connected, glue with each other, and make a middle to put something interesting, such as a bead or rhinestones. Very original and unique craftsman turned out, she will definitely enjoy the one for whom you did it.

The most common and easy especially for children is the flower of eights using holes and butt.

Undoubtedly, the king of all colors are roses, how to do them, if a honestly great many options. I somehow write about this in more detail. And now take a masterpiece as a basis.

Or such a sample, you need to draw 5 colors from more to the smallest, and then arrange this case in a vause.

Many of you I know will look for roses, because it is these flowers to be given in most cases. Well, here's the first briefing. Take corrugated paper and make petals out of it. First cut the strip, then fold it with the harmonica and round the edges. After that, you should turn on the stem, which can be a wand or something like that.

The wand also reaplates the green corrugation.
You can make such a wonderful creation from ordinary paper, but it is better to use a fixed paper or corrugation. Draw the spiral yourself in a circle, rush with a knife, and then screw the pencil or knitting hook.

Or use this usual scheme, this can be done in 5 minutes.


Their stages of work are absolutely simple. Remember how in childhood they did bookmarks, the system is approximately the same))).

Flowers themselves can also be spinning so that it looks more interesting, as if dismissed at the present.

In general, some of the paper are quite a lot of models, you can compose and do, the main thing depends on what the petal will be in form.

Notice these features themselves, and you can make dahrits, chrysanthemums, dahlias, and even cloves, take a look at the following pictures. You see patterns of petals for cutting.


Or do you prefer lily with peonies?

And what is this flower? Guess?

In the form of brook, you can make such a charming).

The first to know the snowdrops with us are well known. Moreover, you can make the flowers themselves from pumpkin seeds.

And of course, I could not pass by Foamyran, use this material too.

Followed by them dandelions. Make them from ordinary napkins using a stapler.

This is such a bright option, will also be an excellent solution to surprise everyone.

I resemble asters.

This species conquered me at all, I fell in love with him at first glance. Really look like a lively or real dahlia.

You can make a primer. You will need squares from which you need to make figures similar to triangles.

On the other hand, also turn out to be a triangle and petal for future bud. After glue them with each other. Make stem and leaves.

Great looks like the following option, as if real.

We make crafts from sheet A4
Not so often, but still you have to make such products from ordinary large sheets. Of course, such luxury crafts can be used anywhere, especially well they look if you are decorated with walls or hall, i.e. are used in the interior of the premises.
Each sheet is a large petal that you have to color in the desired color.

Large colors can be made in the form of roses. Initially, you will need to use the template.

And then gradually perform all the steps.
Video about how to make paper flowers easily and fast
You will not believe, but you can simply just twist a chic bouquet in minutes, see this video and you also learn this interesting lesson:
Master Class for Folding Paper Tulips
We all ever in childhood folded different figures and used origami. I remember in the lessons of labor I really liked this lesson. Tulip is usually performed using this technique. It turns out volumetric and similar to the original.

You can also make an open bouton.

Or take as a basis another idea of \u200b\u200bcorrugated paper, hide the candy in the bud. No one will give up such a gift, it's certain!

And now such a magnificent idea with disposable spoons. Such a gift can also be presented for the birthday and even for the wedding.

Stages of work:
1. Prepare everything you need to work, all components are depicted in this picture.

2. From corrugated paper, cut the scarlet rectangles and then wrap the spoon to turn this material, as if driving a slightly scrubbing.

3. What does it seem? Of course on the petals.

4. Missing the chopper with green paper, while putting together a spoon to each other (4 pcs.) So that it turns out the stem and bud. Then cut down a certain shape of the leaves.

5. Subscribe to a pot or a cup. You can tie a bow or some other pattern.

Step-by-step instructions for beginners how to make a flower for mom
Now let's learn how to make the easiest option, because for someone the previous ones will seem very difficult to help then this gift will come.

We need:
- square paper paper - 2 sheets

Stages of work:
1. Take a sheet and fold it in the pressure to get a triangle. Then again.

After drew such semicircular lines, as you see on this illustration. Sample cut and follow further instructions.
2. Expand, open the workpiece and glue a couple of strips to the middle.

This Varaint is suitable for the smallest, for example for preschoolers.
But with schoolchildren can be done more difficult. The meaning is the same, only the petals bend and glue differently.

You can also make a red poppy or take another color, but there will be more wire for this work.

I am very in love with Astra, and you love them?

Want to know how such you can do?
We need:
- journal Old
- scissors
- sticks for kebabs

1. Disassemble the log on the pages, turn each page in half, then again and once again.

2. Take the scissors and cut the grass. To get a fringe.

3. After this charm, screw the wand.

4. After that, wait the product. Wand laid green paper.

Something similar can be done by a teacher or such as a toet or native grandmother.
1. We also need napkins and corrugated paper, plus it will take another cup of disposable or a jar from under sour cream.

2. Since the flowers will be large, you can do and smaller, take the napkin and fold it in half, then still in half, and again. The middle will be built with a thread or stapler.

Cut the petals with scissors, give them the form.
3. Now prepare a glass, plunder it in the corrugation, inside the crumpled newspaper or unnecessary paper, cover the corrugation and release as if the grass.

4. The blanks should be 10-12 pieces, it all depends on your abilities.

5. With the help of glue, please add the resulting flowers to the base. Quite modestly, but at the same time bright and stylishly, such a present will make any, especially women or girls.

Learning to make bulk flowers
Of which they do not make such crafts in our time. Even adapted for this work molds from under eggs. For me, this is a shock, like when to whom it could come, but it came, and conquered everyone. First, it looks unspoertering, and then it turns out awesome masterpieces.

Color paint paint, dresses on a wire or wand.

A wonderful souvenir, as they say from the girlfriend and won as beautiful and happening.

Such volumetric colors, you can agree quite easily and quickly decorate any interior of the room or hall, make it irresistible and unforgettable.
You can still use such a chic floral garland.

After that, every workpiece is dressed on the line or on the thread.

From paper kules, you can also make an unforgettable creation.

Using the Origami equipment can be folded, and then glue parts.
And the coolest volumetric view that I really liked and I advise him to do everything, so this is like this:
Love Calla? Then take this master class for yourself.
You can even make a masterpiece from ordinary newspapers.

By the way you can even make pansies together with children.

An interesting idea of \u200b\u200ba rose gift with candy
Once I showed you how you can make roses and hide candy in them, remember? Now look what a chic bouquet turned out, and we presented it for Valentine's Day, if you forgot, I remind you.

I also give you to help this scheme.

You can easily go through and use step-by-step instructions.
Or take advantage of this video, without roses it is not to do without ...
I have everything on this, I wish you inspiration and excellent work. Come to visit me more often, join me in a group in contact, write your feedback and comments. Good luck to new meetings! Until!
Sincerely, Catherine Manzurova
Origami Flowers is a good option for a gentle and sincere gift made with your own hands.
The ideas of the use of flowers in the Origami style are quite a lot. They can be made separately, instead of real, and you can decorate with them a postcard or panel, make them a paper bouquet of them, decorate them frame for a photo or gift packaging. Also, often the colors of the origami declared holiday tables and halls: flowers twisted from napkins, collect them from large sheets of paper.


Master this art is quite easy. It should be started with the easy origami options, and then you can move to more complex ways. Subsequently, the newcomer, the "stuffed" hand will be able to make original compositions and objects from origami. Origami Flower will decorate the interior and tell about the feelings, and will also help beginners to get acquainted with the basic principles and nuances of this type of creativity.
Before proceeding to any MC on how to make a flower of paper, you should get acquainted with some of them. Origami Flowers can be different in difficulty performance. As a rule, the more difficult assembly, the more flowers are similar to real inflorescences.
Flower origami is made in several steps from a square sheet. As a child, many folded a tulip, a snowdrop, twisted a rose from the napkins. Make it yourself such a flower under the power even to children.
Easily collect flowers on ready-made templates. There is a separate type of assembly of volume origami on template patterns. You only need to cut the pattern, bend over the outlined lines and glue the parties. As a result, a full-fledged 3D model is obtained. For inflorescence, it is enough to cut petals and leaves and combine them together.


Most of the models of the colors of the average complexity are made up of the base forms of origami - "pancake", "double square", "double triangle", etc. The development of these forms will help in the further study of origami.
Origami is not necessarily assembled from one sheet. Some elements can be made separately from square or rectangular sheets. For example, Azalea, presented below, is collected from two parts - a large whisk and a middle (stamens). For its assembly, you will need rectangular and square sheets of paper.
Modular paper flowers consist of several modules - folded simple figures, which are then collected together. Origami, made in such a technique, looks lush and original. However, to make such a composition you will need time and experience, because each module must be folded separately, and then beautifully combine them together. Photos of modular colors options are presented:


Bouquet of flowers by March 8
How to make paper flowers
Make a paper origami flower is easy, just step by step adhere to the recommendations. For beginners and few familiar with the art of origami, it is recommended to choose simple assembly schemes. It can be a volumetric tulip or lily, a regular rose or small Sakura. Most often such crafts are made from one square sheet. More complex work is a master class with a large number of actions and modular assemblies - require some experience in origami. For a better understanding of the description, the easiest way to fold flowers, leaning in the photo and videos.
Snowdrop
Snowdrop - Spring forever. It will fit well for the decoration of the spring greeting card. Even children are folding such flowers. It is enough to prepare a square sheet.

rose flower
The most simple rose You can twist from a spiral, which you need to pre-cut from a color square, as shown in the photo:

You can also use a template blank:
Bell
Volume bell Created from the basic form "Double Square". Visual schematic instruction:
Iris
Assembly irisa Also starts with a "double square". Step-by-step instructions for creating a volume iris shown in the photo:


Sunflower
Sunflower - Symbol of the Sun - folds from a large square. It is worth noting that the core is a separate square item, which is inserted into the billet of the petals. Steptedly fold the sunflower offered according to the scheme below:
Sakura
Sakura - Spring tree with pink inflorescences. The easiest to add them from the modules. The photo shows how one petal is folded. Such petals will need 5 pieces. They stick together to get a whin.
Tulip
The brightest representative of Spring is a tulip. He can decorate any of your compassion at the same time it does not take much time.


If you want to know how to make the Origami flower for beginners with your own hands - you are here. The most interesting model will require a little diligence, but the pleasure of its fulfillment is worth it. Just an hour of exciting classes, and a flower that will delight you all year round, - ready!
Tools and materials Time: 40 minutes Difficulty: 4/10
- origami paper preferably different colors;
- pVA glue;
- beads;
- thick thread.
Our task with you is to learn how to make origami flower for beginners. And it will help us a scheme and step-by-step instructions. So, let's begin!

Step-by-step instruction
To begin with, it is worth practicing the origami flower for beginners from ordinary white paper, and then you can safely use colored leaves.
Step 1: Choose paper
If it is possible, choose paper so that each flower in a bouquet is different from others. When all components of the bouquet are ready, you can play with the distribution of color accents.
Step 2: Cut the squares
For a single flower we will need 5 squares with parties 8 cm. Cut. One move closer, 4 others put aside.
Note: In the manufacture of any origami, it is necessary to adhere to the rules - the sections of the fold must be very well surveyed (you can do it, putting the item on a solid surface and spending on the crib of the nail). And only then you can with a calm conscience begin to the next step.
Step 3: Make Kninka
Square to fold in half diagonally to form a triangle. We fold out the color side.

Step 4: Make Petals
Fold the left and right corners of the triangle base. For convenience, we will call folded parts by "petals". So, align the petals so that the slot remains between them. As a result, the square should be.

Bend the petals in half to the outer edges of the square. Do not forget to stroke the fibement of the flap.

We continue to work with petals. Place the petals along the bend lines so that they look right onto the wide side.

The corners of the straighted petals fold so that the fold line can be in a square with the sides of the square.

The outer edges of the petals sweep to the inner.

Step 5: glue the petal
Apply a thin layer of glue to the outer surface of one of the petals (in the photo the place of applying glue is highlighted blue - down, on the left), and then bending the square so that the front surfaces of the petals met. Align them and fix them with your fingers, until the glue gets up. One of the five details of the origami flower is ready.

Repeat the steps 3-8 another four times to make a total of five parts of the flower.
Step 6: Collect flower
Add a thin layer of glue along the edge on one side of the petal (in the photo the place of application is highlighted blue again), and then attach to this place another part of the flower so that they meet in the center with sharp corners. Hold on the spot until the glue dries.

Repeat step 11 for the remaining parts to glue a 5-petal flower (Tip: It's easier to first glue two and three-storey parts, then stick them to each other).

Step 7: Making a bouquet
We make a bouquet of flowers.
Kosudama Shar.
But the more original solution is the Japanese Kosudama Ball. In order to make such a beauty that combine individual flowers together in such a way that the ultimate figure gets a spherical shape. At the same time, do not forget that the flowers must be glued together. We ride beads to the thread, the thread adapt to the bottom of the ball. To the top we attach a thin rope for it to be suspended. Beauty!

The manufacture of figures from multi-colored modules diversified leisure and becomes common interest for family members. Even a novice master, having mastered the Aza Origami, can surprise those surrounding exclusive crafts.
Origami is the eastern art of creating decorative paper figures, which includes several species. Modular origami is its component.
Types of origami:
| Name | Description |
| Modular |
|
| Simple |
|
| Wet folding |
|
| Pattern |
|
Modules for origami at least 10 species. Flat are used to create a mosaics, balls and shapes form from volumetric parts. The modules in the shape of a shape of a tribal, triangle are common. Pyramid shaped blanks are used to create cowdam - bright balls.
Materials for work
Paper for modular origami choose a durable, not glossy to avoid excess slip. Paint in places of folds should not be stitched.
- office white and color, strong enough and rough;
- stickers, blocks for entries;
- kami - Japanese paper for origami;
- magazine matte;
- wrapper;
- gift (packaging);
- foil.
Color school paper is not suitable for work, it is thin and whites on bends. Modules made of cardboard are poorly folded. Newspapers are suitable for beginners, they are not durable and over time yellow.
Preparation for work
Before starting the creation of modular figures, the requirements of the required colors are reserved and modules are manufactured. Triangular modules are folded from rectangular sheets with the aspect ratio of 3: 2.
Production:
- The A4 sheet is folded in half, then 3 more times. The paper turned out 32 rectangles. Of these, the modules of popular size 1/32 are collected. If you need more details, leave 8 or 16 parts.
- Cutting paper on rectangles with scissors or stationery knife.
- Fold the detail in length, then in width. In the middle there was a control line.
- Watch the sides of the rectangle to the middle, as when assembling the aircraft and turn the workpiece to the other side.

- The extreme corners of the protruding parts are bend upstairs to the bottom of the triangle.
- The bottom of the workpiece is raised. It turned out a triangle.
- Flex triangle in the middle line. Module is ready.
Ahead of the detail 2 corners, and behind 2 pockets. With their help, the modules are connected together.
Module assembly technique
The module in the folded form is a straight triangle. The hypotenuse is called a long side, rolls without pockets - a short side.
DIY configuration depends on the module connection method:
- The angles of one triangle are inserted accordingly in the pockets of the other. So from several parts it turns out a flat strip that is used for the manufacture of tails, neck, feet of figures.
- The top of one triangle is inserted into the pocket of the second, then the top of the second is inserted into the third pocket. The compound serves to create long chains, the bases of the figures.

- To connect 3 modules, the adjacent vertices of two parts are inserted into the pockets of the third.
- The ranks are obtained by the triangle with the adjacent corners of the details of the lower row. Depending on the scheme, the module is powered by 1, 2 or 3 vertices.
The method of long side up means that the module is powered by a hypothenoise forward to the collector. A short side forward means that the triangle is rolling forward. The usual assembly method of rows is up with a long side.
Flowers made of paper
Modular origami for beginners is mastered by creating simple figures. Using this technique, you can recreate a flower or come up with your plant image. Such crafts are made of 1/32 modulesSo that the figure turns out to be elegant and approximate to the original.
They decorate a festive table, give on March 8 or a birthday. Large modules are used for the manufacture of large colors, which decorate the room to the celebration.
Lotus or Water Lily
The lotus made in the technique of modular origami consists of 6 green leaves, which hosts a two-color bud with a core. 240 pink, 126 dark pink, 50 yellow and 318 green triangles are harvested for operation.
 Modular origami for beginners: Step-by-step lotus manufacture
 Procedure:
- Start with the manufacture of leaves in the form of rhombus. In the first green module 2 elements are inserted, 1 triangle is added in the remaining rows. After a strip of 7 triangles in each next row, their number is reduced by 1. To connect two leaves, 4 additional modules are used, which insert the opposite side. All 6 blanks are bonded.
- Similarly, 6 buton petals are made of pink triangles, the longest billets consists of 5 modules.
- The finished parts are laid out in a row and connect the petals to the first dark-pink module in the middle. Then fill the rest of the space and closed the two-color strip into the ring. At the bottom of the flower lay 3 rows, alternating light and dark triangles.
- From the yellow elements fold the core, 5-6 pieces in a row. Bud is placed on the leaves and insert the middle into it.
The bud can be made in a pins or monophonic, along the edge of the leaves, lay rows of dark or light modules. If the flower remove the core, the lotus will turn into a vase.
Lily
Pencing Royal Flower will result in 230 orange and 50 brown blanks. Lily consists of 5 petals, in the middle of the flower inserted long stamens of paper or other materials. The stem is formed from 3 cocktail tubes.
 Modular origami for beginners: step-by-step manufacture of lily


Procedure:
- All petal modules are inserted into pockets long side. The first 3 rows are made of orange modules, connecting 2, 3 and 4 parts.
- In the 4th row add brown element - 1 orange, 1 brown, 1 orange triangles. Along the edges are left free at one corner of the previous row modules.
- The 5th row consists of 4 orange modules, 2 extreme parts are put on, capturing free corners of 3 rows so that the side of the petal is smooth.
- The 6th row is collected from 5 modules: orange, brown, orange, brown, orange. A row 7 is collected from 6 orange parts.
- In 8 row alternate 4 orange and 3 brown modules, begin and finish a row with yellow elements.
- The 9th row consists of 6 orange triangles, for the reduction in this and the next rows, the extreme modules are put on 3 tops of the parts of 8 rows.
- In 10 row 3 Orange and 2 brown parts are placed in a checker order.
- A series 11 is formed from 4 orange modules, 12 row - orange, brown, orange elements. End the petal with rows of 2 and 1 modules.
- Finished petals fuses to give similarity with a living flower, and connect with brown details at the base. In the stamens insert the wire and skip them through the middle of the lily.
- For stem 3, the tubes are fixed with a wire from the flower stamens and are covered with corrugated paper. On the leg placed leaves.
Tender lily will work out of white and pink modules. The flower is originally in the details of contrasting shades.
Narcissus
For the manufacture of Narcissa, 16 white modules and a strip of double-sided yellow paper 2,5 cm wide for core are required. As a stem, use a cocktail tube.
 Modular origami for beginners: step-by-step macaw
 Procedure:
- Lay 8 modules in a circle, a short side to the middle and attach to them the remaining 8 triangles. For this corner of two adjacent parts of 1 row in a circle insert into pockets of the same outer chain module. It turned out a two-row ring, these are petals.
- One side of the yellow paper strip is cut by a fringe, turn the tube and stick slightly. The finished middle insert into the head of Narcissa.
- The cocktail straw is wrapped with a strip of green corrugated paper and are lined up, 1 cm does not reach the edge of the tube.
- The free end of the tube is cut on 5 parts, lubricated with glue and insert into the flower.
- The strip of corrugated paper is twice, allowed to dry and cut the long sheet, which is glued to the stalk.
From several daffodils, a spring bouquet will be available for mom, grandmother or sisters.
rose flower
Rose makes out of 95 modules and cocktail straws. You can take tubes from juice, then they need to insert one into one to lengthen.

Procedure:
- Buton is harvested from top to bottom, gradually narrowing the shape. 1, 2 and 3 rows consist of 15 triangles. Elements of 2 rows are worn by a long side upwards, and 3 rows - a short side up. Form a three-row ring, this is the top of the flower.
- The 4th row continues in a circle, the triangles are put on 3 angle of the module of the previous row. 5, 6, 7rd rows consist of 10 elements connected to the previous one in the usual way - 1 module per 2 adjacent end.
- In the lower part of the flower insert 10 modules like petals. For reliability, they are glued.
The straw wock a strip of paper on the spirals, rushing. At the top of the stem form the thickening from the paper, equal to the diameter of the hole in the rose. Cut from paper leaves, stick them to the stem. Up the top of the stem with glue, insert into the bud, pressed for a few seconds.
White Rose
The snow-white flower will result in 110 modules of 1/32. Paper will suit the usual office.
Procedure:
- Collect the ring of 3 rows of 18 modules each. In 1 and 3 row they have a short side forward. Details 2 rows - upside down.
- In 4 row, each element is worn by 3 tails of the details of the bottom row. Then they collect 2 rows of 12 pieces and 1 row of 12 triangles, forward short.
- In the last row, 8 triangles are located a short side, inserting them at 3 angle of the previous strip.
Bud is ready, a tube for a cocktail wrapping a strip of paper, stick cut-off leaves. Rose put on the stem, lubricated with glue.
Swan
Modular origami for beginners will interest people who want to create volumetric figures of birds and animals. For the manufacture of the swan, you will need 458 white modules and 1 red, for beak. A large figure will turn out of the triangles of 1/16. For the strength of the top of the parts are lubricated with glue.

Procedure:
- The assembly starts with a bird body. In 1 row, 30 triangles have a long side outside, they wear 30 modules 2 and 3 rows to the short side. The angles of 2 adjacent modules are included in the pockets of one triangle of the next row. The strip is closed into the ring and similarly pave 4 and 5 rows. The figure turns out, it turns out a blank in the form of a bowl. Add 6 row of 30 pieces.
- Wings shape with 7 rows. Leave free 2 tops of neighboring triangles - this is a place for the neck. Left and right from the gap wear 12 modules. Rear remains free plot for tail. Wings collect, for which in each next level the number of parts is reduced by 1. The last row consists of 1 module. Wings are striking to create a bleaching bird effect.
- The tail is made similarly to the wings, reduce the number of modules in the ranks of up to 1 triangle.
- The neck consists of 31 billets, it is collected from the beak, inserting the angles of one module in the pockets of the other. So that the beak does not look double, it is sick. In the process of assembling the neck of the bird bend. Next to the beak swan gluits eyes and insert the neck into the gap between the wings.
If from golden paper to make the beak and the crown, you will get a princess-swan. A black bird with wings, edged with white stripes and a butterfly on his chest looks presentable. Children like multicolored swans.
Watermelon
For the creation of watermelon slices, 114 red, 66 green, 17 white and 16 black blanks are needed. They are inserted with a long side upwards, except for the first row - its parts are placed up with a short side.

Procedure:
- Start an assembly with 15 green modules. 2, 3, 4 rows are harvested from green triangles of 14, 15, 16 pieces.
- In 5 row: 2 green, 13 white, 2 green. 1 green triangles are located at the beginning and at the end of the 6th row, near them are inserted 1 white, the middle of the chain consists of 12 red modules. 7 row begin and finish with 1 white element, inside 13 red parts.
- 8 row consists of 14 modules, red alternate with black. A series 9 is formed from 13 red, the following rows are reduced by 1 module.
- In 10 and 12 rows, red and black parts are placed consistently by pattern. A number 11 and from 13 to 21 are collected from red modules. The last 21 row consists of 1 triangle.
Hare
To make a hare in a sweater, turning 402 white and 120 multi-colored modules. For a figure without clothes, take 520 parts of the same color.

Procedure:
- For the first 3 rows, they take 24 parts, form a trickered strip and closed into the ring. Soaked, it turns out a blank in the form of a wide vessel.
- Of the non-ferrous 24 parts are collected 4 row - the beginning of the sweater. They are not inserted not to the end, but they are fixed above and move the lower corner forward to give volume. Similarly, 4 lanes are laid.
- For 1 row of heads take 24 triangles and put on a short side forward. In the second row add 6 parts. In this and the following 6 rows, the details are riveted with a long side up.
- The ear is beginning to collect from 6 triangles. They are connected to the last head of the head with a short base forward. 2 row consists of 5, 3 - from 6 parts. Extreme triangles are stripped on the last vertices of 2 lower modules. So collect 7 rows. Ring 8 consists of 5 triangles, extreme parts are located on 3 tops of 7 rows. A number of 9 - 4 triangles, 2 medium placed above 2 extreme. Skip 2 modules of the head and collect one more ear.
Cut and glue the hare eyes and nose, collar and butterfly. Hands cut out of the cardboard and attach to the body on the sides. If the paper strip is cut into a fringe, tighten on a pencil and glue, you will get a check.
Penguin
Modular origami for beginners allows you to engage in this technique from an early age. For example, collect a penguin under the child. To assemble this bird, take 129 black, 1 orange and 76 white modules.

Sequencing:
- A series 1 is collected from 10 black and 6 white parts mounted upward side. In 2 row - 7 white and 10 black, they are placed with a long side.
- In 3 row 6 white and 10 black blanks put on a long base up. Fold the trickered strip into the ring and form a bowl.
- In 4 row - 9 black and 7 white, in 5 row - 10 black and 6 white, in 6 rows - 7 white and 9 black triangles. A number of 7 - 10 black and 6 white elements.
- 8 row - the beginning of the head, 9 black and 7 white details. In the 9th row there are 10 black and 6 white details. In 10 row - 9 black and 7 white blanks.
- 11 row - 10 black and 6 white, the next strip is similar to 10 row. In 13 row there are 11 black modules. The top of the figure is compressed.
An orange module-beak is inserted in the center of the head, black triangles are placed on the sides - wings. Cut and glue the penguin eyes.
Owl
The small two-color owl is collected from 62 white, 7 orange, 157 blue and 2 black modules.

Procedure:
- A number of 1 - 13 blue and 5 white triangles are short side. White blanks are placed between blue, this is the beginning of the chest. A series 2 is formed from 6 white and 12 triangles with a short base forward and closure a ring.
- In 3 row, there are 5 white and 13 blue parts with a short base forward.
- In 4, 5, 6 rows of details put long base upwards. A series of 4 - 6 white and 12 blue, 5 row - 5 white and 13 blue, 6 row - 6 white and 12 blue triangles.
- A series 7 is paved from 5 white and 13 blue parts with a short base forward.
- In 8 row 2, the central white modules are placed by a short side forward, 4 white and 12 blue - long base forward.
- In the 9th row in the center of the white area, an orange triangle-beak is inserted, on the right and to the left of it 2 white and 13 blue parts.
- In 10 row, in the middle there are 2 white triangles, on the sides of them are inserted 1 white and 1 black element, they continue 12 blue triangles. In 10 and subsequent rows, the triangles put forward a long side.
- In 11 row above the beak placed 1 blue element. On both sides, it is paved in 2 white modules. Finish a number of 13 blue back triangles.
- 12 A row is made up of 8 blue elements located in the center of the figure. To make ears, on this row are hanging on the sides of 3 blue parts. Then they are placed on 1 blue triangle.
Bottom insert 2 paws consisting of 3 orange triangles. Rear join 2 blue details - tail. Wings are collected from 3 modules and attached on the sides of the owl.
Crane
For the manufacture of white birds with black sheath and black neck, 118 white, 84 black and 9 red modules are needed. Details glued for strength.

Procedure:
- The assembly is starting from the bottom of the neck. 2 White parts are inserted in succession, corners in pockets. A series 2 consists of 2 modules, a range of 3 - 1 triangle.
- On the left and right of the base form wings, 3 rows of 10 modules. The torso fill, alternating 1 and 2 details. Tailing rows consist of 4, 3, 2 and 1 triangles. To get an operenim, the wings are laid 2 rows, and on the tail of 8 black items. The edges of the wings are made in three rows of 3 black details.
- The tail is made of ferrous triangles according to the scheme 3, 2, 4 and combine the bird with the body.
- The neck consists of 11 black details inserted one into one. At the end there is a white module, deployed in the other side - is a head. Add red triangle - beak. Attach the neck to the caravel in the same place.
- Legs are collected from 3 black, 5 white and 4 red modules. The lower red item for stability is put on the other side.
The caravel glue or paint eyes. Decorate the shape of a bow and hat.
Cock
Ditcher Rooster is made of 11 yellow, 34 red, 185 orange, 66 green modules size of 1/32 and 4 red sizes 1/64. So that the figure does not break down, the connection site of the billets is glued.

Procedure:
- Connect 3 rows of 11 orange parts, turn into a ring and pave another 7 rows. For breast formation and neck, a number of 6 triangles are added, then continued according to scheme 5-4-5-4-3-4-3-2-3-2-3-2-3-2-1-2-1. The neck is compressed and fused.
- For wings, green modules are collected by rows of 3-4-3-2-1-2-1 pieces. Feet are made of 3 yellow details, lowering the corners in the pockets of the next triangle. Add 2 modules that are invested by both tops in 1 pocket of the last module. Feet are inserted from the bottom of the body.
- The head is formed from 3 orange modules, connecting them successively, the comb is from 3 red. We put the crest on the head and put on the yellow module-beak, which holds the details together. A red triangle-beard is added below. Connect the head with the bird's neck.
Make 5 colored feathers of the tail, on 17 modules each. The wings are glued to the base of the rooster, the tail is inserted.
Chick
In order to get a chick, 207 yellow and 6 red modules are harvested. For beak, 1 red triangle is needed, the size of twice is less than the main parts.

Procedure:
- Collect the ring of 2 rows of 16 modules, another 5 such series adds.
- 8 row consists of 16 parts, put in a short side forward to separate the torso from the head. Put another 4 rows of 16 pieces, long sides forward.
- The last row consists of 10 modules, put on 2 or 3 corners of the details of the lower row. The top of the head is compressed to give it roundness.
- The wings are collected from two modules and glued on the sides of the chicken, a tail of 1 triangle is added.
- The paws are made of 3 red modules, the tops of one are inserted into the pockets of 2 others and attach them to bottom torso.
Printed the chick of the eye, insert the beak. Cut the paper with a fringe, form a hairstyle of a chicken.
Snake
Snake from modules make bending or straight. The head and tail are collected equally, and the manufacture of the body is distinguished by the technique of performing and the number of parts. For a direct snake, you will need 237 triangles, 251 modules will leave for curved.


Procedure:
- Start an assembly from the tail. In the pockets of the first triangle, 2 modules are inserted by both tops and then 8 rows continue, alternating 1 and 2 elements. The side angles of the tail are hiding.
- Row 9 consists of 3, a number 10 - of 2, and 11 row - from 3 modules. The straight snake continues to collect, alternating in the ranks of 2 and 3 elements.
- The bend of the snake is achieved by the displacement of the rows of modules. In 12 row 3 triangles shifted to the right so that the extreme angle of the module remains free. 13 A number consists of 3 parts that are suitable without displacement. The following 3 rows are laid with a shift, 3 modules in the chain. In 18 row there are 3 parts straight, 19 row are collected with a shift. In 20 row placed 4 modules. It turned out one twist of the body.
- Similarly shifted rows from 21 to 25 to the left, collecting 3-4-3-4-4 parts in them. Then collect shifted rows of 4 modules. Turns to the right or left are made from 35 to 38, from 47 to 50 row. The last turn from 57 to 58 row goes to mind. In 57 row - 3 modules, in 58 - 4 triangles.
- Snake heads are assembled equally. Put 2 chains of 4 modules, then according to the scheme 3, 4, 3, 2, 1. This is the bottom part, the forked paper tongue is attached to it.
- For the upper jaw on the bottom, 5 modules of pockets are placed on the top, leaving the free angle of lateral triangles. The jaw is assembled according to scheme 5-4-5-4-5-4-3-2.
The head is connected with the torso. Paste small black modules-eyes.
Stork
To make a stork sitting in the nest, you need 40 black, 222 white and 104 brown modules. The beak for the bird is cut out of red paper.

Procedure:
- Collect a chain of 3 rows, in each modules in each and closure to circular. Turn out, add more 3 rows.
- The series 7 consists of 11 elements, 4 of them are put on 1 angle, and 7 - by 2 corners of the lower row.
- Rows 8 and 9 are assembled from 11 triangles, 12 modules are placed in 10 rows.
- On the body choose a place for the chest and put on 4 details. From above, 3 rows are paved according to the 3, 2 scheme, 1. Buck the corner of the chest up.
- For the wing, 16 modules are connected, one angle is inserted into another pocket. Row 2 consists of 15, a number of 3 from 14 modules.
- 4 row of wings are collected from 12 black triangles. 5 row - 6 blacks, located three pairs at an equal distance.
- Insert a 4 black module torso in the base is a tail.
- The neck is collected from 23 white modules and bend. Print beak and eyes.
- Make a nest - brown circle of 3 rows, 26 modules in each.
The wings are glued on the sides of the body, the neck is connected to the breast. Storky squeeze on the nest.
Dog
Two-color dog can be collected from 37 white and 98 yellow modules. Eyes and nose is better to buy plastic. Modules are connected by a long side up.

Procedure:
- For the base, a ring of 2 rows is collected, 8 yellow modules in each. In 3 row there are 7 yellow triangles and 1 white to start the chest.
- 4 row - 6 yellow and 2 whites.
- In 5 row on the chest, 2 modules are added, and 4 white and 5 yellow are obtained. So they collect another 2 rows.
- In 8 row, 9 modules are put on a short side. The following 4 rows of heads are collected from 9 triangles long side up, forming a white dog face.
- In 13 row - 4 yellow modules. They are located above the muzzle puppy with a short side forward - this is a forehead dog.
- The ear is collected from 2 modules, the top of one detail is inserted into the pocket of the other so that the curved blank is obtained.
- The tail consists of 3 yellow and 1 white modules, sequentially connected. The upper paws are collected from 2 yellow and 1 white triangles.
Paws, ears and tail are inserted between the modules of the dog's body. Eye, nose and pink paper tongue stick on the face.
Peacock
Modular origami for beginners using master classes allows you to learn how to manufacture complex figures. Peacock refers to such crafts.
To create a royal bird, modules are harvested: 252 green, 128 purple, 217 blue, 45 white, 1 blue, 15 orange. The tail of the model is widely disclosed and consists of separate bright feathers.
Procedure:
- To assemble the pen, the 3 purple modules are consistently connected. Then 2 blue and their extreme tops add another 2 blue triangle. Between them glue an orange module, folded in the form of an eye.
- From 9 green modules, the arch is collected, where 2 chains of 4 triangles are connected on top of the module. The face of the pen is obtained by gear.
- The arch is connected to the pen-blank, attaching it to the two inner corners of the blue modules. It turned out a pen on a short leg, they make 7 pieces.
- Similarly, a long pen is made, only the leg and arc consist of 11 modules. 8 such billets need.
- For the trunk, 3 rows of 15 white triangles are collected and connected to the ring, turned out. Add 8 rows, 15 blue triangles in each.
- Determine the place for the paw and insert 2 green parts. The back of the back is counted the third blue row and fix 10 green modules in it - this is the place of the tail.


- Of the 3 green triangles make an angular workpiece, inserting the vertices of one into the pockets of 2 triangles. Collect 9 such parts and placed them on 10 modules of the base for the tail. From above, a row of 17 purple modules are paved with a short side to the body.
- At the bottom under this fan are attached 11 green modules, and there are 10 angular green blanks on them, as in the previous stage. From above, a row of 19 green triangles are collected. At the bottom of the back it turned out 2 Wair.
- Determine the place for the neck and put on 3 blue modules in the first row and 4 in the second. The following rows correspond to scheme 3-4-3-2-3-2-3-2-1.
- Of the 7 blue triangles, they collect the neck, lowering the angles of the next element in the pockets of the previous one. Add head - blue module and connect the neck with a torso.
- Short feathers are fixed on the first part of the tail, in purple row. Long feathers are placed on the rear wine. 2 purple modules are inserted into the head - this is a hooker.
Cut and glued with peacock eyes. The crown of paper is worn on the jacking.
Cat
To make a sitting cat, you need 386 modules of any color. All the figures are collected separately and connected at the end of work.


Procedure:
- For the base of the body, a three-row chain of 19 modules in a row and connect it to the circle, turned out.
- Add 2 similar rows, the elements are inserted with a long side to the outside. Rows from 6 to 10 consist of 16 triangles, rows from 11 to 13 contain 13 modules.
- The base of the head consists of 3 rows of 16 triangles connected to the ring. The preparation is turned and more than 3 rows of 16 modules are paved, then 3 rows of 13 elements. Printed your head to the body.
- The paw assembly is starting to bottom with 3 parts and continue according to the circuit 2, 1, 2, 1, 2.1. Make 2 paws and glued to the body in front.
- The ears are collected from 3, 2, 1 triangles. Free lateral angles are glued to get an acute form.
- The tail consists of 13 modules.
The ears are sticking on the head, the tail is glued with a flat side so that he looks out due to the cat's body. Make the face with eyes, mustache and nose. Pink language insert.
The Dragon
Modular origami offers dozens of dragon creation options. Beginner masters will be interested in the technique of making this fabulous character. The Chinese dragon will succeed in 473 red, 110 yellow and 18 black modules. A yellow strip will be held by his belly.


Procedure:
- The body assembly starts with 3 red modules located long side up. In 2 row in the center, 2 yellow triangles are shown with a short side up, and along the edges - 2 red modules, each one vertex.
- In 3 row - 3 red triangles, 4 are collected similarly to 2 rows, then a strip of 3 pieces. So alternate rows from 6 to 110, it turns out 55 tri-module and four-module rows. The body of the dragon bend.
- The paw consists of the foot and top. The top is formed according to Scheme 2, 3, 2, 1.
- In the first 6 rows of the foot in the chains change 2 and 3 parts. In 7 row - 3 modules, in 8 they are put on the black triangle. Collect 4 upper and 4 lower parts.
- 1 row of heads consists of 4 pieces, 5 triangles are put on them. Then alternate the rows according to the scheme 4, 3, 4,5,4. Row 8 consists of 3 modules located in the middle of the short side forward, and 2 blacks, which are placed along the edges for one corner, up the long side.
- In the middle of the middle there are 4 details, a short side forward, and 2 blacks around the edges. 3 central modules 10 rows are inserted up long side. On 1 and 3 elements of 10 rows form the horns consisting of 1, 1 and 2 triangles. They finish 4 modules collected by one to one.
- The bottom of the head is collected according to the circuit 2-3-4-3-2-3. 4 small white modules are folded - teeth.
- The beginning of the tail consists of 6 sequentially nested triangles, it is expanded with 7 rows, alternating 1 and 2 modules. From 15 to 22 row, the tail is collected by bimodular and three-module chains. Its end decorate with black elements by gluing them in the form of a tree. Attach the tail to the body.
- Connect parts of the head, the teeth are inserted into the jaw on top and bottom, stick their eyes. Collect 4 legs.
The head and paws are glued to the body. On the back there are 10 black modules, these are dragon spikes.
Rainbow Vase
Multicolored rainbow vase bands are located vertically and narrowed at its top. The effect of the color transition from one to another is created due to the displacement of the modules. For crafts prepare 320 triangles of red, orange, yellow, green, blue, violet color.


Procedure:
- In 1 row there are 12 modules - 2 red, 2 orange, 3 yellow and hereinafter, as on the rainbow. In 2 row, the triangles are shifted to the right, capturing the lower tops of another color. Make only 3 rows, it turns out a blank of 6 colors. 6 such structures collect and closed them into the ring - this is the base of the vase.
- Put in Figure 11 of the series, shifting each pair of modules to 1 angle to the right. The cauldron acquires the shape of a rounded vessel, its walls are neatly corrected.
- The throat of vases is formed with 12 rows, in which there are twice as long as triangles. Between the details of the same color, 1 module of the same color is inserted and made another 1 row.
- In the following rows, the number of modules does not change, but in each chain they are shifted to 1 angle left. So the vase is collected to the end.
In addition to a pleasant pastime, modular origami classes bring real benefits. A beginner master can place a room for the holiday, diversify the table serving. And his relatives and friends will not remain without the original gift.
Article clearance: Natalie Podolskaya
Video about modular origami
Modular origami for beginners - how to make a module 1/32:
The origami technique creates a huge amount of crafts. In this case, the flowers can be highlighted in one large group. They especially wonder if they are manufactured from individual modules. In this case, there are volumetric 3D flowers.
In this lesson, I will show how to make flowers Origami with your own hands with step-by-step photos. It is known that at the dawn of its origin of the origami figurines were used by the Japanese during various rituals. So, for offerings, the gods in the temples used boxes Sanbo. After some time, the origami theme expanded.
It also contributed to the fact that this art slowly moved to Western countries, where a rapid surge of origami development occurred. After all, one way or another, but this art displays the world around, even if they are not captured in bronze, but in paper.


Origami flowers - how to make it yourself
The easiest option
In this technique, you can perform a large number of varied colors - from simple to complex performed. In this step-by-step master class shows the manufacture of simple.

It will take only the paper (square) of the desired color to work.

At the first stage we put it in two diagonals.

After that, it is necessary to make transverse bends, but in another direction.

Now we fold the blank of the future flower in the form of a double square.

We take one of the folds and spread it in the middle, at the same time the triangle and combining the central fusion line.

We only turn the fold on the left side and make a triangle from the following fold.

So we go with the whole workpiece, in the end there should be 4 folds.

We bend from the resulting workpiece the bottom up in the form of a small triangle.

We turn the fold to the side and repeat the same with another triangle. So need to repeat 4 times.

Then the resulting workpiece is required to fold along.

Bend a narrow triangle in approximately in the middle.

In place of the resulting bend you need to make a fold directed inward.

Now the left hand take the narrow part, and the right start to steal the petals of the Origami flower.

In order for the flower to acquire the final look, you need to react your fingers to straighten each petal, slightly pressing them along the edges. Our simple flower in the Origami technique is ready.

Origami Rose from Paper
Lotus flower is considered to be a symbol of purity. At the same time, he personifies the light, beauty and aspiration to the sun. Most often, the petals of this flower have a pink shade. Therefore, in our master class we offer to make exactly such lotuse.

For work, prepare:
- paper pink and green;
- scissors;
- pencil;
- line;
- threads.

A blank made from rectangles will be broken as the flower base. We will need to prepare 8 rectangles of pink and 4 green rectangles. All of them are of size 7x14 cm ..

We proceed to the creation of pink blanks. For this, rectangle fold along.

Crawd its corners.

Bottom sweep up to the horizontal midline.

Similarly, we do with the upper part, turn it to the middle.

Now the workpiece is bent along as follows.

When creating a green billet at the initial stage, we repeat all previous steps.

Edges bend to the middle horizontal line.

But the last fold is carried out in another direction (unlike the pink blank).

For this principle, we need to make 8 pink blanks, which will subsequently become lotus petals.

Additionally, form 4 billets of green.

Now the obtained elements need to be folded as follows - first take green, we apply pink on top of it, and on top there are another pink element.

As a result, we received 4 billets that need to tie the thread in the middle.

We raise future Origami Flower Petals.

To give the volume of lotus it is required to raise all petals. But we will make it gradually. The first pink row should be lifted in 2 stages. First, we gently lift only 4 petals (after one).

Then we raise the remaining 4 row petals.

The second pink row should be similar to raising 2 stages. First we spread only 4 petals.

After that, we raise the remaining pink petals.

Finally, we are growing green leaves. We do it 2 times.

Our lotus flower from paper in Origami technique is ready!


How to make volumetric 3D Origami Flowers
In this lesson we will make a bulk 3D flower from individual modules.

To create a modular flower, you will need to take:
- 10 rectangular paper blanks (it is important that their parties have a 2: 1 ratio, in our case, yellow rectangles 10x5 cm were taken);
- adhesive pencil or PVA glue.

From each yellow rectangle will be one petal. Therefore, in our bulk flower 10 petals are assumed. Let's start the manufacture in the creation of the first petal. For this, the rectangle fold in half and deploy.

By turning it horizontally, the side upper corners bend to the midline.

Now the billet of the petal needs to be turned over to the other side.

The top corner of the resulting triangle will be run to the bottom line.

Again inverting the billet of the petal to the other side, bending the top corner.

Side sides of our triangle run to the middle, aligning them among themselves.

Bottom protruding corners need to be beatened to the other side.

We fold the billet of the petal along.

Now your fingers neatly straighten the petal on one side.

We need to do more than 9 pieces of such petals.

We begin to connect them between themselves, do it with the help of glue.

We continue to glue petals. You need to connect all 10 petals into the ring.

If you wish, we draw up a middle of our crafts. 3d volumetric flower is ready.

This flower is distinguished not only by an interesting form, but also a manifold of shades. Of course, it is difficult to reproduce this beauty in paper, but it is possible to do something like this. This will help the proposed master class on the manufacture of iris from paper.

For its manufacture, a square sheet of paper will be required (we took from a side of 15 cm) and scissors.

First we fold the sheet in half.

We unfold it so that the resulting fold is located vertically.

The right lower angle of our square is required to be cut so that its top lay on this middle vertical line.

I spend it and repeat the same at the right upper left corner of the square, it must be combined with the middle line.

We deploy our workpiece and see the triangle, outlined by the bend lines.

It must be cut.

We fold the carved triangle in half.

Then make another fold.

As a result, we get the resulting lines of the fold in the future work.

We fold the workpiece of the future iris in the form of a small triangle.

The resulting billet has three folds. One of them bending in the direction of the midline.

Lightly deploy the workpiece and form a fold in the form of a rhombus from it.

Similarly, it is required to do with the remaining two folds, giving them the shape of the rhombus.

Now each of the rhombuses need to bend the edges towards the center.


The edges of Iris petals bend outward.

With the help of scissors gently twisted them.

By the same principle, you can make the irises of any color and size.

Here are origami flowers from us.

What most often people wish each other? Do not be mistaken if you put health and money in the first place. As a gift, it is sometimes given the money yourself, but at the same time they always doubt - how much to put in the envelope? When a lot is sorry to give a lot, and little uncomfortable, then in this case there is a third option.
Give not just money, and flowers made from bills, with the wish of financial good luck. In our master class, we will show the process of making one flower from souvenir money.

To create such a flower will prepare:
- 3 souvenir bills of 100 dollars;
- line;
- thin floristic wire.

First, we need to find out the width of the bank used. In our case, it is 6 cm ..

We divide in half, we get 3 cm. It is at such a distance that the side of the bill is required.

We make such bends on both sides.

Now from the right edge it is necessary to perform 2 bends in the form of small triangles.

Similar triangular bends are made from the left edge of the bills.

The resulting billet fold in half along.

By the same principle, we make 2 more workpieces from souvenir money.

We add them to each other as follows.

It is a turn to use the floristic wire. She tie up folded blanks from money. Fix the wire at the bottom of the future flower.

Now we start straightening the petals, giving them a more voluminous look.

Eliminate all 6 petals, we get a flower out of money in the Origami technique.

If you wish, you can make a whole bouquet of such origami colors using a variety of bills.
Paper Lilia
There are many options for folding flowers from paper in the Origami technique. In this master class, the folding of a four-fledged flower is proposed.

For work, a square sheet of paper will be required. We make bends, folding the sheet in half in different directions. Then the bends are needed in two diagonals.

Corners of our square begin to bend to the center. After the bending of all four corners, the billet acquires a square shape, but smaller.

We fold this square diagonally.

In the resulting triangle it is necessary to heat corners. First we do on the right. Then bend the left lower corner. The workpiece of our future flower is as follows.

Side corners of this small square required to be labeled to the midline. We do it on the right and left.

We repeat the same bends on the other side of the workpiece.

We stroll just curved corners.

These bends were needed to remove the corners inside the ear earned earlier.

I remove all four corners, our billet acquires the following form.

At the bottom we make curbs to the midline. We repeat them on the other side.

At the tips of the petals, we make small folds. Make sure that they are the same on all four petals.

Our flower made in Origami technique is ready.

How to quickly fold the paper flower Simple origami

