Pipes for heating in the floor (in the interfloor or basement ceiling) are installed either during the hidden laying of the heating system, or during the installation of the "warm floor" structure. It should be noted that in these cases fundamentally different types of pipes are used and different pipeline assembly technologies are used.
Therefore, in this article we will describe the installation of heating pipes in the floor, emphasizing all the details of the process. In addition, we will say a few words about the “warm floor” technology itself.
Heating pipes under the floor: materials and requirements
Far from any pipe can be installed under the floor covering, since the future system must be strong enough and withstand both internal and external pressure.
In addition, the pipe must not corrode. Otherwise, the owner of the system will have to regularly disassemble the floor to replace the rusted area. Pipes for heating under the floor should not penetrate vapors, and especially oxygen, since it is he who leads to the development of rust, which destroys the load-bearing structures and fasteners.
Given these factors, it is possible to make a heating system in the floor with pipes exclusively from these materials:
- Copper pipes. This option is the most expensive, but such pipes are suitable for all the standards for a hidden heating installation. Copper does not corrode, is resistant to mechanical damage and does not allow oxygen to pass through.
- Polymer pipes made of vapor-tight material (polybutylene or polyethylene). These pipes are quite resistant to external and internal pressure and do not corrode at all. At the same time, polymeric materials lack hardness, they are easy to cut, so it is recommended to install these pipes in a cement screed, which acts as a protector.
- Multilayer metal-plastic pipes made of composites. These pipes are hard, durable and resistant to rust. At the same time, metal-plastic will cost much less than copper. This option can be called the most optimal of those that are currently on the construction market in Russia.
Features of fastening heating pipes under the floor
The technology of installation and fastening of the heating pipeline in the floor depends on the type of pipes chosen, their wall thickness and diameter. Indeed, in the process of installing a hidden heating system, they try to avoid tie-ins, joints and other sections connected with fittings.
In other words, the pipeline must be laid in a screed or wall in one section, and it is desirable to create all bends, corners and roundings with your own hands or using pipe benders. Naturally, such a pipe laying scheme is only suitable for flexible structural materials such as cross-linked polyethylene, metal-plastic and copper.
You need to know that the distribution of heating in the floor should be carried out according to a pre-drawn scheme. If you cannot work it out on your own, then you should use an alternative solution - the wiring diagram of the pipe system, outlined on the heat insulator or waterproofing substrate.
Pipes are attached to the floor using special strips, inside of which there are landing slots for the required diameter. In addition, you can use single clips or paper clips. The best option is to lay pipes for heating in the floor or screed without fail in the grooves cut in the panel insulation.
As a mandatory heat-insulating material, special plates made of extruded polystyrene foam are used, in which holes are pre-equipped for laying a pipe of the desired diameter. These boards are installed on bitumen waterproofing mastic. The pipes themselves are laid in grooves and bent if necessary.
Heating pipes in screed
The location of the heating pipes inside the floor covering or screed allows you to refuse the use of unaesthetic heating radiators that spoil the interior of the room. In addition, the "warm floor" in terms of its efficiency and heat transfer is not inferior to some convectors, and the entire floor covering acts as a radiator.
Underfloor heating can be installed in any room, both in the kitchen, covering the screed with tiles, and in any other functional premises, laying parquet or laminate on top of the heating system.
The process of installing a "warm floor" is carried out in accordance with the following instructions:
- Before starting installation, you need to make the floor surface even, pour a layer of self-leveling floor over the concrete screed, which eliminates all kinds of cracks and irregularities in the structure of the rough floor finish.
- After eliminating irregularities in the ceiling, you can install horizontal waterproofing. Usually it is a coating or rolled waterproofing agent. It is best to use a water-based mastic, which plays the role of an adhesive for insulation.
- Then follows the installation of heat-insulating material. As it is used any hydrophobic material, for example, extruded polystyrene foam. This substance can withstand high ceiling loads and acts as a scaffold for the piping system. The minimum thickness of the insulation is one centimeter.
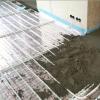
- Having fixed the insulation on the mastic, you can begin the installation of the pipeline structure. It is necessary to avoid breaks, joints and conjugations in his body. A single pipe is rolled out from the coil above the insulation, giving it the desired shape using a reinforcing mesh with paper clips. Also, bends can be formed using perforated strips or insulation with knurled channels. The optimal pipe size is 16 millimeters.
- After installing the pipes, it is recommended to pressure test them. This process is a leak test. This procedure must be performed before pouring the upper level of the screed, because the pipe can be damaged through no fault of your own, and a heavy object that has fallen on polymer pipes can cause them a serious defect.
- Having finished the pipe installation process, you need to take care of the reinforcing screed, which will hide the relatively soft pipes. Please note that the screed must be laid exclusively on top of the pipeline filled with coolant. Otherwise, pipes made of soft materials may be damaged by the weight of the concrete. For pouring the screed, you can use a standard cement-sand mixture or ready-made sand cement. The volume of the required solution depends on the area of \u200b\u200bthe room with underfloor heating and the selected thickness of the upper screed, which is usually 3-7 centimeters. You can turn on the heating system after the screed has completely hardened, this process takes about a month.

After the final screed has hardened, flooring can be installed directly on it - parquet, tile, laminate and the like. Please note that if there are no problems with the choice of tiles for installation over the "warm floor", then the choice of parquet or laminate can cause serious difficulties for the buyer. This is due to the fact that these materials must have a special marking indicating that it can be used for installation above a warm floor.
It is advisable to lay heating pipes under the floor in the warm season and good weather. If the deadlines do not make it possible to use the classic system of "warm floors", then you can use an alternative option, a flooring system, which is even easier to install.
Floor "warm floor" (water or dry)
This type of underfloor heating system has appeared on our market recently and has already received a lot of positive feedback. Water flooring "warm floor" is simply necessary in cases where the installation of a classical system is not possible for various reasons, such as the mass of the structure or installation time. One square meter of a conventional "warm floor" weighs up to 300 kilograms. Naturally, the installation of such a heavy system is unacceptable in the premises of an old building or with wooden floors.
Another obvious drawback of installing a heating system in a screed is the height of the structure, usually it “steals” more than 7-10 centimeters in height from the room. The way out of this situation and steel flooring systems. They allow you to install water heating under the floor without large losses in the height of the room and unnecessary load on the floors. In addition, this system can be used immediately after installation, rather than waiting a whole month until the screed is ready.
Of course, with water flooring systems, not everything is so smooth. They are less efficient than the traditional version and cool faster. This suggests that such a system is hardly suitable for full-fledged independent support of room temperature. However, for residents of southern latitudes, this option may be suitable with good thermal insulation at home.
If you do not live in the south, then, along with the flooring option of the “warm floor”, you need to use other heating systems, as a rule, they are radiators, and in some situations convectors. The fact that the deck structure cools down faster means that they reach operating temperature faster and spend less energy on it.
Floor dry "warm floors" are divided into two types: polystyrene and wood. Regardless of the material used, they include 2 components: heat-distributing metal strips and decking system blocks. Due to the low level of thermal conductivity of the base material, laying pipes directly into the grooves of the blocks does not provide the desired heat transfer, so they are placed in aluminum plates.
Wooden flooring systems are very popular.
Their advantage is environmental friendliness and a high level of availability, and it is quite easy to install such a design on your own. On sale you can find ready-made modular dry "warm floors" made of wood. They are blocks of chipboard or OSB, in which channels for pipes are carried out. The width of the modules is determined by the standards - 13, 18 or 28 centimeters, and they are connected by the lock method.
Polystyrene water floors are truly weightless, standard systems have a thickness of 15 to 70 millimeters. When choosing this type of "warm" floor, you can save on thermal insulation, since polystyrene itself acts as it. The slabs are laid on a clean and even base, and if necessary, a layer of heat-insulating material is first laid. Plates of this system can be rotary or simple. They are installed so that pipes can be laid in this scheme.
After the installation of polystyrene or wooden modules is completed, metal heat-distributing plates are laid out on them. They have grooves in which pipes are installed.
Regardless of the selected material of the underfloor heating system, a damper tape must be placed around the perimeter of its installation. It will compensate for the thermal expansion of the floor and prevent cracks from appearing between the wall and the floor. If there are several circuits in one of the rooms, they must also be separated with a damper tape.