Self-assembly of the water supply and heating system is no longer uncommon: with the availability of affordable and inexpensive materials that do not require equipment for cutting and joining, many craftsmen undertake such work without fear. Numerous master classes and video lessons are ready to clearly demonstrate all the steps from scratch until the system is put into operation. And yet, some moments sometimes remain outside the frame: the question is whether polypropylene pipes can be hidden in the wall in order to effectively finish the decorative finish, often remains open.
Characteristics of plastic pipes
Polymer pipes - a modern material, often used for laying household communications. In addition to fully plastic, an aluminum-reinforced or fiberglass-reinforced modification is actively used, less sensitive to temperature extremes and more durable. Unreinforced pipes are only suitable for cold water systems. For the installation of a plastic water supply or heating system, samples with a diameter of 20-110 mm are used. Custom diameter is available upon request.
Manufacturers note that one of the main characteristics of the material is the wall thickness of polypropylene pipes: a table, often applied to products, clearly shows the material requirements for water pipes and heat pipes with different loads and ambient temperatures.
Plastic pipes
Features of polymer pipes
Heating substances increases their volume, - said a school course in physics. This applies to plastics in full, since the temperature also makes them plastic. If the expansion coefficient can hardly be taken into account when laying a pipeline for cold environments, then when installing a heating system, this aspect should always be kept in mind.
It is this fact that raises doubts on the topic of whether it is possible to wrap polypropylene pipes into the wall, which, when launched, hot water will expand and lengthen. Will such a reaction damage the material into which the pipes are recessed and the decorative wall decoration?
Masters warn: indeed, metal communications, which do not expand significantly, can simply be walled up in a layer of material, then for plastic pipes will have to fully comply with the styling technology. Otherwise, the wall will crack, and the tile laid on top will most likely fall away.

Outdoor plastic pipe laying
Installation of plastic water supply
To install the system from scratch, in addition to the pipes themselves, you will need:
- fitting;
- stubs;
- tees or crosses if branching is planned;
- clips for fixing.
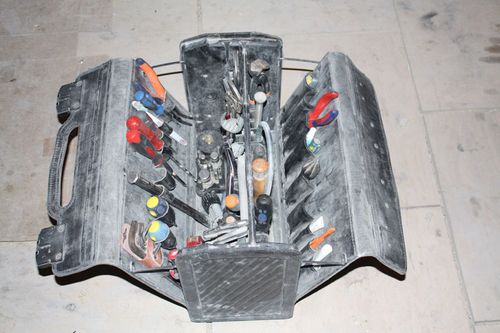
Scissors for cutting, a shaver for trimming edges and a welding machine are required.
If the question of how to properly wrap polypropylene pipes into the wall, arose after the entire system was assembled, the list is reduced to heat-insulating materials, mounting brackets and means for erecting false walls.

Gates for plastic plumbing in the wall
Plastic water pipe installation requirements
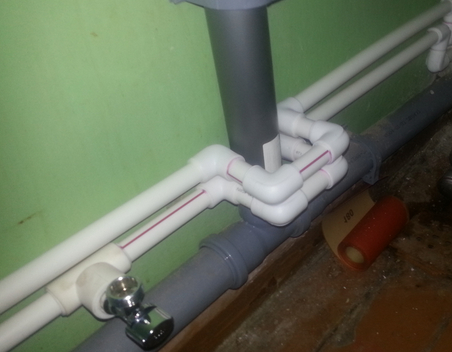
Fittings, tees and connecting elements are selected in accordance with the diameter of the pipes used. Most often, like the main knee, they are made of polypropylene. However, they are used only for branching, mounting measuring instruments and redirecting the flow: filling fittings and collapsible assemblies with material is prohibited. In the thickness of the wall there can only be a soldered, non-separable connection made by special welding equipment and checked for the tightness of this welding.
In any case, a shock-absorbing “pillow” should be created around the wall laid in the thickness, allowing the pipe to “walk”.
The technique of masking a foam pipe in the wall

When wondering if polypropylene pipes can be embedded in a wall, with a finished design, the craftsmen advise not to risk it and organize a small “cabinet” with access to the pipe instead of a blank monolithic wall. Firstly, this design is guaranteed not to collapse from plastic vibrations. Secondly, in case of an accident there will be access to the pipes. The free space in the cabinet can be used to store household items.
Video instruction: hidden installation of PVC communications
Water is the basis of life. But in order for life in the house to be pleasant and comfortable, you need to take care of a well-thought out water distribution and correctly produce it. This article will help you not to be afraid of such a task, and do it yourself.
Types of wiring.
If you plan to make the wiring from scratch or completely replace the old one, first draw up a diagram of the future wiring. At this point, you must clearly determine for yourself what type of wiring you will be, and, accordingly, what materials and in what quantity you will need
There are several types of water distribution:
- sequential;
- parallel;
- combined.
Serial wiring.
Sequential wiring implies that all water points, through tees (hence the second name "tee wiring"), are "fed" from one pipe, which originates on a riser or entry into the home, and stretches to all devices and devices - mixers, a toilet bowl washing machine and so on. This method of laying water pipes may seem easier and cheaper - the consumption of materials is minimal, installation occurs relatively quickly. However, this “barrel of honey” has its own “tar”. If several points are turned on simultaneously, the pressure will noticeably weaken. This is especially noticeable (and extremely unpleasant) during a shower, when the water gets too hot or too cold, when someone, for example, opens a faucet in the kitchen.
Sequential (tee) wiring pipes.
Parallel wiring.
Parallel wiring is carried out by separately laying pipes to each point of water supply.
Such a method can become more expensive due to higher pipe costs, and more time consuming, since more meters of pipes need to be installed. But on the face and obvious advantages:
- The water pressure at each individual included point does not change (and if it does, it is barely noticeable), even if several points are involved;
- You can set the required degree of pressure in each separate branch of the water supply;
- When repairing a site, there is no need to shut off water throughout the house.

Parallel (collector) piping.
Combined wiring.
It is clear that combined wiring assumes the presence of both serial and parallel connections. For example, if the toilet and bathroom in your house are separate, you may decide to run a separate pipe in each of the rooms ( parallel wiring), in turn, using tees (serial wiring), connecting to it all the points in that room.
Ways of laying pipes.
The budget of the entire project also depends to a large extent on the method of pipe laying that you have chosen (or due to circumstances). In fact, there are three ways to lay water pipes:
- along the walls
- inside the walls
- combined
Laying pipes along the walls.
Laying pipes along walls requires less time and effort. This method can be preferred if you do not want to spoil the wall cladding. You just need to draw a line on the wall, indicating the place to mount the pipe. Then, exactly on this line, make holes for the fasteners at certain intervals (the distance between the fasteners depends on the diameter and gravity of the pipe). After all the fasteners are installed, just fix the pipe on them.

Laying pipes along the walls.
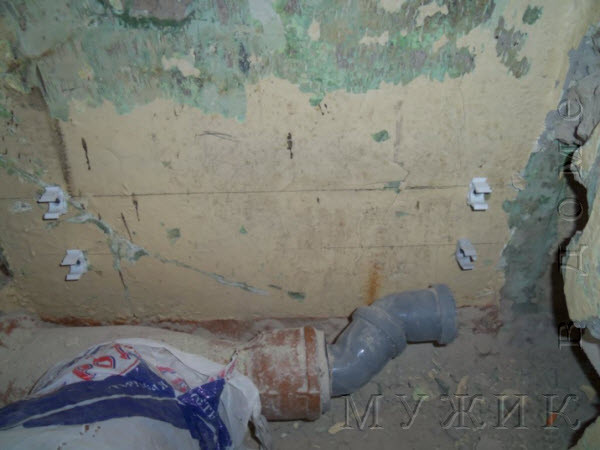
Laying pipes inside the walls.
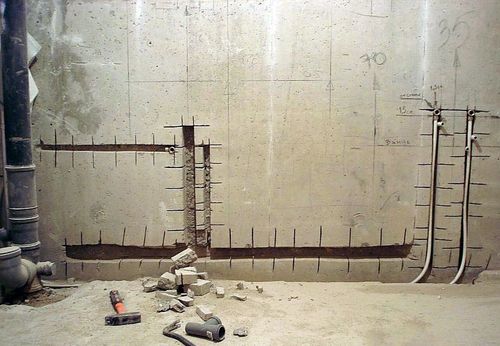
Laying inside the walls, the process is quite time-consuming, and is mainly used for major repairs of the house. You need to make recesses in the wall, sufficient to completely drown the laid communications in it. It is better if in the end the pipe is not flush with the wall plane, but a little deeper. This will prevent possible pipe damage during other repairs.
There are several ways to fix a pipe in a wall. If you plan to plaster the wall, and the pipe is not large in diameter, then it is enough to fix it with just a few fasteners or put it on the alabaster. Otherwise, when the plaster is not provided or the diameter of the pipe is large enough, it is best to fasten the pipe to reliable mountings pre-installed along the pipe laying path.


Laying pipes inside the wall.
The combined method of laying pipes.
The combined method is often a necessary measure for partial repair of an apartment or with a lack of funds, as in a situation where only the bathroom is undergoing major repairs. In this case, it’s better to hide the pipes in the bathroom in the wall. It looks aesthetically pleasing. And, if before this the pipes in your house were installed along the walls, then you will get a combined type of water supply laying. There are other options for combining pipe laying methods that will meet exactly your desires, possibilities and circumstances.
Pipe replacement materials.
The choice of materials is the basis for the correct and successful installation of a water supply system. The choice of fittings depends on the choice of pipe type. Nowadays, pipes from plasticor coppersometimes from become. When choosing the type of material you need to know about its advantages and disadvantages.
For example, pipes made of plastic are not subject to corrosion, do not affect the taste of water or its smell, are quickly mounted, and are resistant to deformation when heated. However, such pipes have clear limitations on the temperature of liquids flowing in them; connections of some types of pipes require constant revision (after a few years they may leak, such as nut joints of metal-plastic pipes); differences in the installation of different types of plastic pipes can complicate their combined use.

Pipes made of plastic.
Copper pipes have a long list of advantages, including: anti-corrosion properties, high thermal conductivity, durability, are not afraid of ultraviolet radiation, withstand high pressure. Nevertheless, such pipes are quite expensive (an order of magnitude more expensive than plastic or steel counterparts). They can collapse due to the low quality of the central water supply, the installation process is very time-consuming and is practically impossible without special skills.

Copper pipes.
Today, rarely anyone does the wiring of water supply using steel pipes, but they also have their advantages: mechanical strength, minimal expansion coefficient when heated, and relative cheapness. The disadvantages of steel pipes include susceptibility to corrosion (in connection with this there is a need for frequent painting), clogging (suspended particles easily adhere to the inner surface of the pipe, reducing the pipe clearance over time), time-consuming installation.
Steel pipes.
So, planning to lay out the water supply pipes in your house, start by drawing up a detailed diagram of the future wiring, determine its type, as well as the way of laying the pipes, select the suitable material that meets your wishes and possibilities. With all this, you will understand how many meters of pipe you will need and which fittings you need to purchase. Such a balanced approach to business will allow you to maximally accurately calculate the budget, time and effort necessary for independent wiring of water pipes in your home.
Laying water pipes. Video.
Almost always, the need arises to replace all pipelines that have clogged with deposits over many years of operation and have rusted in many places. This issue is relevant, especially in residential buildings built back in Soviet times.
In many prefabricated houses built in those years, two branches were welded to the risers - one went into the kitchen, and the second supplied water to the toilet and bathroom. On the example of one of these typical apartments, the story of the replacement of all pipelines will go.
It was decided to drown out two out of four branches. This was done so as not to install extra water meters. One branch is enough to power the kitchen and plumbing unit.
Of the tools used:
- Bulgarian. Needed to remove old pipes and cut new ones during installation.
- Thread cutting clamps. As a rule, bends from risers, or bends, as they are also called, are usually made of a pipe with a diameter of 15 mm (½ inch). Accordingly, a screw die of this diameter was used.
- Gas key.
- Adjustable wrench.

A perforator was also used for mounting pipe fittings and a mixer in the bathroom.
Pipe installation was carried out by fittings and stainless corrugated pipe company Lavita. Pipelines of this manufacturer have long established themselves as reliable in operation and easy to install.
Materials
What was needed from the materials:
- Sealing thread Tangit Unilok.
- Heat-resistant silicone sealant, preferably neutral.
- Corrugated stainless steel pipe with a diameter of 15 mm in the amount of six meters.
- Pipe mounts, they need about ten pieces.
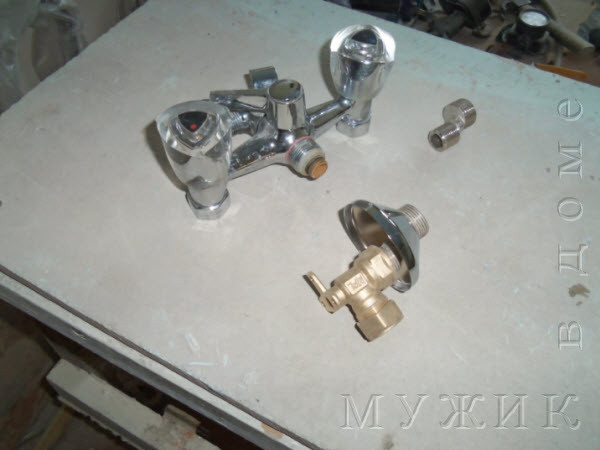
- Coupling with external thread (V / S 15 * ½) - 2 pieces.
- Coupling with internal thread (V / S F 15 * ½) - 2 pieces.
- Tee (3T 15 * 15 * 15) - 2 pieces.
- Tee (T / S 15 * 1/2 * 15).
- Water socket (angle bracket with mount and internal thread) - 2 pieces.
- End caps with a female thread with a diameter of 15 mm - 2 pieces.
Process work
First, it was necessary to pay a visit to the management company and order a blackout. When the pressure in the risers was relieved, we cut off all four drives as close as possible to the risers with a grinder.
At the bends, threads were cut with the help of screw clamps. Plugs with an internal thread with a diameter of 15 mm were screwed onto the overhangs going to the bathroom. To seal the threaded connection used thread Tangit Unilok and sealant. Ideally, it would be good to weld them. So reliable, but the plugs are also good if everything is done correctly.
Spherical shut-off valves were screwed onto the overhangs extending into the kitchen. Then, coarse filters were first installed on the taps, and then counters with check valves were installed. Water distribution pipes have already been connected to the check valves.

During operation, one nuance arose. At first it was planned that the installation of the kitchen sink would be carried out in the corner of the kitchen. Then it was decided to move the sink to another location. Therefore, I had to disassemble the assembled distribution assemblies, deploy the direction of the pipes and install tees on them in order to take consumers in the right direction.
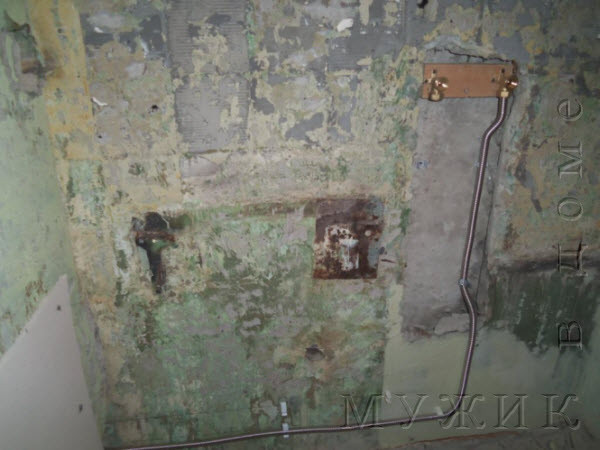
After which it was necessary to hold pipes to the bathroom. Using the construction level, we drew a line along which the pipelines will be located. At intervals of approximately 0.6 m, pipe fittings were installed along the line.
Then pipes from tees were passed through the toilet to the bathroom. On the cold water pipe in the toilet a tee was threaded with a thread and a ball valve mounted on it to connect the toilet. 
I would also like to dwell on the mixer in the bathroom. When dismantling old pipes, a deep niche in the wall formed.
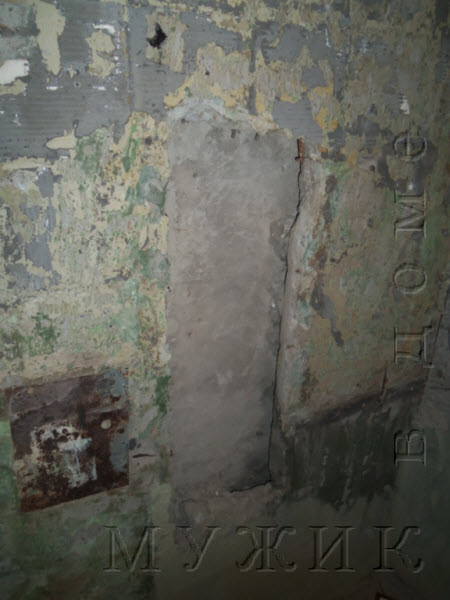
It was necessary to install the mixer so that in the future, when laying the tile, the mixer did not protrude, but was also not heavily recessed into the wall. For this purpose, a bar of the required size was used. All this was selected empirically.

It so happened that the bar should be recessed into the wall by 20 mm. Its width was within 170 mm with a mixer width of 150 mm. The bar was firmly fixed to the wall. Mounted squares with mounts and internal thread for the mixer (water sockets).
For accurate installation of water outlets, an old mixer was used. Squares assembled with it were screwed with screws to the bar.  The whole process was controlled using a level.
  Tile was also used to control the distance between the mixer and the wall.

Pipes were brought to the set squares.

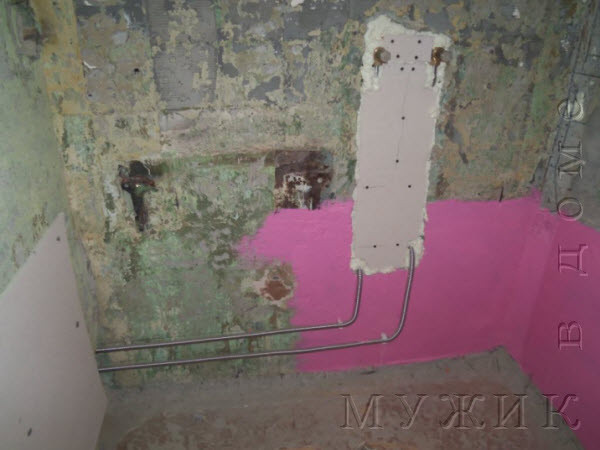
 Further, the niche was closed with a piece of gypsum fiber sheet and carefully sealed with mounting foam. The void between the gypsum sheet and the wall was also filled with foam and then plastered.
Then all pipe joints were carefully tightened with a gas and adjustable spanner. As for trimming pipes from corrugated stainless steel, it is more convenient to cut it off with a pipe cutter, but if there is none, then you can use a hacksaw for metal and a grinder. The main thing is the obligatory deburring after file cutting. And still it is necessary to remember that the pipe is cut along the hollow, and not along the ridge.
How to connect pipes and fittings? Slightly unscrewing the nut on the fitting, the pipe is inserted into it until it stops and is tightened. Everything threaded connections, as mentioned above, were sealed with Tangit Unilock thread and heat-resistant sealant.


When all pipes and fittings were connected and all consumers connected, water pressure was applied by slowly opening shut-off valves. With a sharp opening of the valves there is a danger of water hammer.

After a thorough check of all compounds, the work was completed. After installing the pipelines in the bathroom, ceramic tile was laid.  Almost all the pipes were hidden in boxes made of a metal profile, gypsum-fiber sheet and tile.
Pursuing repairs in the bathroom, many are wondering how to lay pipes in the wall correctly and with their own hands? After all, at first this task seems overwhelming for independent implementation. However, upon reflection, understanding, you can understand that everything is not so scary.
We will be convinced of this, having examined the procedure in detail, using photos and video materials - for clarity.
Necessary tools
To begin with, you should prepare all the tools and materials that will be required to complete the operations. We will give this list, given that we will lay plastic pipes in the bathroom:
- FUM tape;
- a cutter for cutting plastic material;
- apparatus for welding pipes;
- bulgarian;
- adjustable wrenches;
- hammer drill;
- stopcocks;
- fitting;
- pipes.
Stages
To hide the pipes in the bathroom wall, and to lay them qualitatively, you need to understand well what steps you will have to go through.
Probably, for a high-quality arrangement, it may be necessary to make grooves for laying pipes, which can then be closed, for example, with tiles. You can also hide the pipes under the sink and bath. For vertical pipes, you can build a box of plastic, specially treated wood or drywall and tile.
Doing operations with your own hands, you should remember:
- the fewer connecting elements a system has that will hide in a wall, the better;
- the material of pipes and fittings should be the same;
- it is better to wrap pipes with thermal insulation so that they do not fog;
- before installing pipes, you should consider arranging access to the joints.

Dismantling
So, the first stage is the dismantling of the old system. It is necessary to free not only the wall from unnecessary elements, but also the entire space. So that nothing interferes with the procedure. Do not forget, the first thing to do is to shut off the supply of both cold and hot water to the room. To cut metal pipes, you can use a grinder with the appropriate nozzle. If there are walled up areas, you will have to use a hammer with a chisel or a powerful punch.
Need to replace the input taps. If they are not there for some reason, the outlet pipe must be cut and then threaded to install new taps.
From old pipes you need to disconnect the plumbing, washing machine, dishwasher and other appliances. Strobes for new pipes can be cut using a grinder with a stone disc.
Pipe installation
When installing communications, you should install the coarse filter. It is installed after the tap and counter. By the way, the latter is placed where there is sufficient lighting for periodic reading. During installation, the direction of the arrow must be taken into account, which must coincide with the movement of water.
To connect plastic pipes, a special apparatus is used, which can be called either a welding or a soldering iron. To create connections, in addition to pipes, you will need the corresponding elements.
The procedure is as follows. On the device, more precisely on its nozzles, elements are put on that need to be interconnected. Further on the device we set the required temperature. In our case, 260 degrees. By the way, the connected elements must be clean and dry, otherwise defects may occur. The necessary piece of pipe is cut with a cutter, and possible burrs are cleaned with a sharp knife.

The heated parts must be in the apparatus for the time allotted by the instruction (4-17 s, taking into account the diameter of the products). If the elements are overheated, deformations are possible, otherwise insufficient melt and contact.
When the elements are interconnected, they do not need to scroll, otherwise defects are provided.
It is better to fix the pipes on the wall with special clips (how to look, you can see in the photo), which will allow the material to expand if necessary.
Carrying out the installation, it is worthwhile to provide for each plumbing fixture a separate valve, which will turn off the device without harming the others.

Quality must be high!
When the connection and fastening of the pipes is completed, it is necessary to take up the penultimate stage - checking the quality of the work performed. To do this, perform the following actions:
- pour cold water through the system for fifteen minutes - special attention should, of course, be given to the connection zones;
- if there are defects, they must be removed immediately;
- when the cold water test is completed, you can proceed to the hot test;
- if there are defects in these pipes, they must also be repaired.

Finish
When the fixation and verification is completed, you can proceed to the last step - to finish. A lot of materials can be used to equip the bathroom, however, the most common is ceramic tile. Tile in our case will effectively hide the pipes. Therefore, even at the stage of preparing the base for the installation of pipes, the depth of the groove should be provided so that the protruding piece of the pipe is so small that the thickness of the glue on which the tile will be laid is minimal.
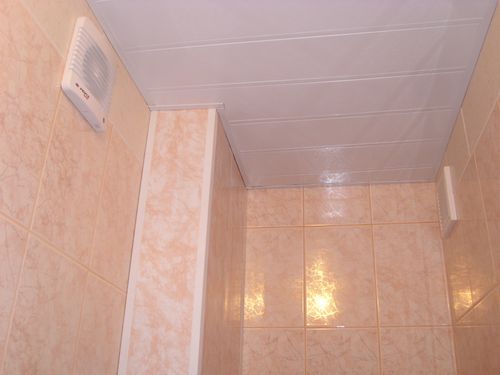
Laying a tile is the right decision, but not the only one. If you use a drywall design, do not hide the pipes in the walls - they will be hidden by a drywall sheet with a frame. The same applies to PVC panels, for example.
Additional features
In the end, it is worth noting that the detailed video will complement the instructions given, as well as several important photos. As a result, even a novice will understand how the procedure is performed. So, the result should be high-quality and durable.