There is a lot of information on the Internet on the technique of making flowers from fabric with detailed description and video. But I still decided to add my efforts here too. Our website already has a couple of MKs on this topic, but suddenly you forgot about this type of needlework. I hope it will be useful to someone))) So, we will need:
- Fabric made from artificial fibers.
- Patterns of flowers or petals.
- Pins and needles with threads. ()
- Chalk, soap or disappearing marker. ()
- Various beads, rhinestones, buttons, stamens.
- Candle and matches.
- Scissors. ()
- Patience.
 The fabric must contain synthetic fibers so that it can be further processed by fire. It can be silk, satin, chiffon, organza. You need to prepare templates for the petals in advance - cut them out of cardboard or thick paper. The shape of the template determines how the finished flower will look. The shape of the template is limited only by your imagination. To do this, draw several five-leaf leaves of different sizes, or individual petals of different sizes.

 If you need a large number of identical petals, then the fabric must be folded into 4 or 8 layers. Attach the templates to the fabric and trace. Secure each piece with pins and cut out. There is no need to try to make everything as smooth as possible. After all, there are no identical petals on a living flower.

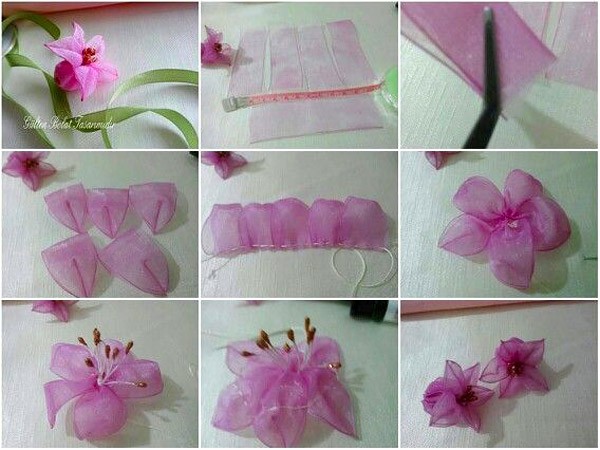
 After we have traced and cut out the required number of petals, we begin firing. Carefully bring the fabric to the candle flame, smoothly passing it. Due to the action of fire, the edges are melted and slightly curled, giving shape to our petals. This is how we process all the details. Some particularly large petals can be slightly cut to create a ragged effect. You should end up with such “clumsy” blanks.

 Then we start assembling We arrange our blanks according to size. We thread the needle and stick the needle, eye down, into something soft. This could be a piece of polystyrene foam, foam rubber, or, for example, a pincushion, like mine. Then we begin to place our blanks on the sharp end of the needle.
 Five-petal blanks
gather in turns from large to small. You determine the number of tiers yourself, depending on the desired result. For example, you can assemble it like this: 4 large blanks, 3 smaller ones, another 3 blanks of the next size, and 4 very small ones. The center of the flower can be assembled from a different color. You can also leave space for beads or add tiny petals to the middle.
Five-petal blanks
gather in turns from large to small. You determine the number of tiers yourself, depending on the desired result. For example, you can assemble it like this: 4 large blanks, 3 smaller ones, another 3 blanks of the next size, and 4 very small ones. The center of the flower can be assembled from a different color. You can also leave space for beads or add tiny petals to the middle. 


 Heart-shaped blanks
corresponds to one petal in a flower, unlike the previous version. We will need from 5 to 8 petals of each size. We will collect one petal at a time - we string each petal by the “tail”, starting with the largest ones in a circle. We string each subsequent petal onto the previous one with an overlap.
Heart-shaped blanks
corresponds to one petal in a flower, unlike the previous version. We will need from 5 to 8 petals of each size. We will collect one petal at a time - we string each petal by the “tail”, starting with the largest ones in a circle. We string each subsequent petal onto the previous one with an overlap. 


 It is not necessary to use all the blanks. Determine the filling of the flower according to your taste. The orange flowers below are made using this technique. After you have collected the flower, you need to fix it. Carefully pick up the flower and pull the needle through. Then secure with a few stitches in the center, catching all the petals. If the flower is not very dense, you can sew several beautiful beads into the middle. Sew the fastening on the back side. This can be a regular safety pin, a hairpin, or a special clasp purchased in a store.


 The finished flowers look like this:


 You can decorate anything or anyone with these flowers. I wish you creative success!
The uniqueness of the image does not depend on the cost of the outfit, but on the exquisite little things that make it perfect. Organza flowers purchased or made with your own hands will be an ideal addition not only to wedding or evening dresses, but also to children's dresses.
Can be used as decoration for curtains, decorations for postcards and for many other small things. The use of these cute compositions depends only on your imagination. To make flowers, you need to understand how the fabric will lie in the finished product. First, let's look at the properties of fabric and types of organza.
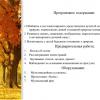
Organza - fabric description
Organza was previously made from silk, then from viscose. Modern manufacturers use polyester thread - the fabric is transparent and weightless, but at the same time rigid and holds its shape well.
This is ensured by tightly twisting two threads together, and depending on their thickness and color, the results are different kinds fabrics:
- matte or shiny,
- gradient or chameleon,
- plain or rainbow
- with spraying of various colors,
- with jacquard pattern or embroidery;
- tape of various widths.
Not every fabric is suitable for making flowers. For example, organza with embroidery is used to sew curtains or dresses. Matte and shiny plain fabrics are the most popular among needlewomen.


Shiny organza is a favorite material for flowers on bows,
hair decorations and brooches
Spectacular flowers for bright outfits are made from coated organza.

Sprayed organza looks festive, and flowers made from this fabric would be appropriate in a bride’s outfit
For romantic looks, fancy flowers made of gradient organza, chameleon or patterned fabrics are suitable.

Gradient organza is great for fantasy looks

Organza chameleon - for complex, iridescent colors

Gradient colored ribbon produces charming flowers that can be used to create bouquets, including embroidered ones.

A cute summer look will be complemented by a patterned organza flower.
It’s easy to create organza flowers with your own hands – the main thing is to know the basic techniques. For this purpose, Krestik has prepared a review of simple master classes.
Basic principles of creating organza flowers
The creation of any, even the most exquisite, flower or complex composition begins with preparing the parts and connecting them in a certain sequence. Needlewomen have come up with several techniques that help create floral masterpieces:
- classic with buns,
- with heat treatment,
- kanzashi,
- from ribbons.
It is easier for beginners to master the technique using heat treatment of petals, while experienced craftswomen create their masterpieces using several techniques.
Classic floristry

This technique is called silk floristry or Japanese technique. The ancient art of creating flowers from silk came from Japan. However, it is also applicable to other fabrics: viscose, cambric, organza. To make flowers you will need a soldering iron and a set of special brass tools on a handle. It includes round balls various diameters– boules, as well as smoothers, knives, heels, hooks, dies and special tools for chrysanthemums, lilies of the valley and fancy flowers.

The petals are cut out according to the pattern, starched or kept in gelatin and dried - due to this, the edges will not fray, and the petal will keep its shape.
YOU WILL NEED IT
The archive will be useful when creating them. Free download!
To give natural bends, the blank petal is placed on a special pad and passed over it with a hot tool. Then a flower is assembled from the finished petals on a thread.
MK on making flowers using Japanese technique:
Simple flowers with heat-treated edges
The preparation of the petals is similar classical way: It is necessary to cut the blanks exactly according to the template.

To prevent the edges from fraying and fraying, they must be processed. This will require a candle. Since organza is made of synthetic fabric, it does not burn, but melts. This is simplicity and complexity at the same time: the petal easily takes on the required shape, but it must be melted carefully, otherwise you can ruin the workpiece by melting the excess. The peculiarity of the melted edge of organza is a rounded edge of a darker shade. Thanks to her, the petals look especially charming.

The flower is assembled onto a thread, and the core is decorated with beads, beads, and sequins.
The flower will look more organic if the petals are not connected directly in the middle, but each one is moved a little.

Kanzashi
This technique is universal because it allows you to make flowers both from blanks cut from fabric and to use organza ribbons. The point is that each petal is a fabric folded many times. Individual elements can be fixed with a thread or the edges can be melted over a flame, thus gluing them together.

The technique is most suitable for creating small flowers intended for decoration, photo frames, cards, decoration gift boxes and to realize countless creative ideas.
Instructions for making organza flowers using the Kanzashi technique:
Ribbon flowers
This technique is the first step in and an excellent option for beginning craftswomen. The organza ribbon has an edge, so the petals look neat, and only the edge needs to be treated with fire. The width and length of the ribbon depends on the intended size of the flower. Creating flowers using this technique is an excellent option for joint creativity with children.
Exquisite organza flowers for special occasions
In the techniques discussed above, the edges of the petals are subjected only to heat treatment. You can add chic with a special finish instead of melting or on top of it. This flower will become an exquisite decoration for a wedding bouquet or a delicate decoration for clothing. Let's learn how to create elegant flowers from organza, and the master class will help us with this.
For making this type of flower, organza is an ideal option, since it is quite rigid and will withstand the load of glitter or small beads glued to the petals.

To make flowers we will need:
- organza,
- transparent fabric glue,
- white or silver glitter,
- scissors and pins,
- sewing needle and thread to match the fabric.
First step. Cut out petals according to the template. The required quantity and size depend on your idea. For a delicate cup stand, two petals are enough.

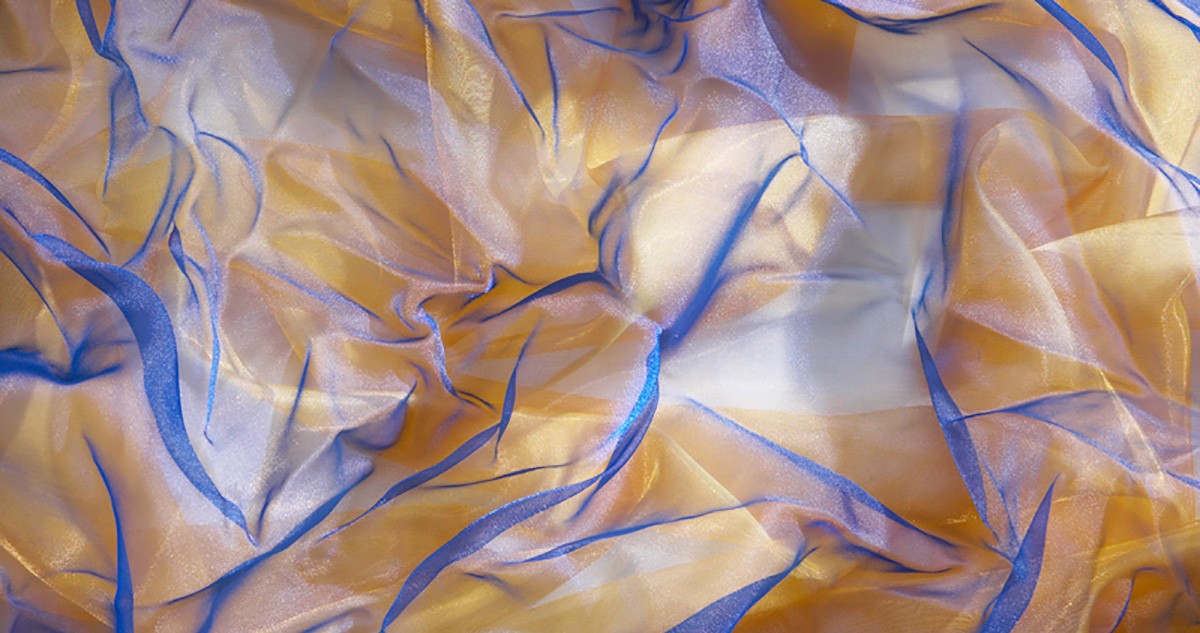
Second step. Gently coat the edges of the petals with transparent glue, sprinkle them with glitter and dry.
If you are creating a flower to decorate clothes, then it is still better to melt the edges over a candle - this will prevent the threads from fraying, and then decorate with glitter.
Third step. Using a thread to match the fabric, sew large stitches into the middle of the petal. When pulled together, folds are formed that need to be secured with additional stitches. If you are making a napkin for a cup, you just need to slightly tighten the folds and then straighten them, giving the flower some airiness.
If you are new to flower making, first practice on scraps to select the appropriate fold size.

Fourth step. Connect the finished petals into a flower with a needle and thread. The middle can also be decorated with glitter or beads. The finished flower head is glued to a wire or a wooden stick, which, if desired, is decorated with floral tape.

Here you will find the original of this master class, from which you can download the part templates!
Flowers that are more sophisticated and interesting are made more difficult, but careful adherence step by step instructions will help you cope with the task!
Master class on creating a dahlia from organza:

Master class on creating organza lilies:
Original examples of using organza flowers
As a rule, fabric flowers serve as decoration for wedding and evening dresses, hats, clutches, romantic or in the form. But mini-compositions have a special charm.
Used to decorate the groom's suit, and from separate small flowers It will make an excellent decor or photo frame.

An accordion is assembled from a strip of organza onto a thread and a needle. Then a crown is cut out of felt.

Using transparent glue (or thread), the crown is fastened into a ring and sits in the center of the organza skirt.

The final decor is optional: beads, lace, sparkles, pendants. The crown can be attached either to a hairpin or a clip-on clip. Your little one will be delighted!
Decorating wedding dresses is a limitless field for imagination. You can use large beads and a narrow organza ribbon to crochet a necklace or bracelet.

Organza – grateful material to create delicate, elegant or chic and bold colors. A variety of techniques will allow even novice craftswomen to create masterpieces.

Too formal a sheath dress for a party - complement it with a rose made from handmade fabric. Too boring for everyday use - decorate it with an original contrasting flower. If you want to stand out from the crowd of brides, add a bright flower made from ribbons to your dress.
Small or voluminous, simple or multi-layered flowers become an extraordinary highlight of an outfit, attract attention and add a considerable amount of romanticism and charm to the image.


The most important thing is that such a decorative piece can be made independently from scrap materials.
A little imagination, knowledge of small tricks that we will tell you about, and step by step creation simple fabric flowers will help you create your own unique masterpiece.


Stages of creation
Pattern
If you haven’t found ready-made petal templates, you can draw them yourself using a ruler and pencil.
An ordinary circle can also serve as a pattern. It is done with a compass or by tracing a glass, cup or any round object.

There is another unusual one and therefore few people known method- taking measurements from a living flower.

- Take the most beautiful flower and carefully disassemble it into petals.
- Trace each of them on cardboard, then cut out along the contours. Difficulties may arise with very convex petals. In this case, circle them with a slight deviation.
- The leaves are also outlined in this way, only at the base of the leaf blade you need to make a small protrusion if you are attaching them to the stem.
- The cut out elements are cut on the fabric “on the bias”. It is recommended to use a ballpoint pen to trace the templates, since the pencil often leaves a dirty mark. When cutting, the mark from the pen remains behind the outline.


Fabric selection
Almost any fabric of any density is suitable for a flower (organza, silk, satin, chiffon, crepe de chine, velvet, linen).
It is advisable to choose natural material, as it will stretch well and corrugate easily.
The same cannot be said about synthetics. It undergoes rapid overheating, which leads to deformation of the flower element. In a word, it requires more experience, strength and patience.


Petal coloring
Coloring is used when it is necessary to achieve maximum naturalness of the flower. Aniline and confectionery dyes, Rainbow ink, gouache and photo paints are suitable.
A piece of fabric can be completely dyed, or the petals can be painted separately.

The petals are moistened with water and laid out on glass. Using a brush, apply the desired shade. To make the shade bright, the paint is diluted with cologne. The alcohol base also allows the product to dry faster.
Preparation of material
To keep the flower in shape, the fabric can be starched or treated with a gelatin solution, which is very simple to do. In glass cold water dilute 2 tbsp. spoons of gelatin and let it swell, and then heat it in a water bath.

Dip the fabric into the prepared hot solution and wring it out. Dry on a line. When it is dry, iron it with a warm iron.
It is important to note:
- starching is done after dyeing the fabric;
- Thin fabrics are starched heavily, dense fabrics are starched less. Velvet is smeared with the solution only from the wrong side;
- if the material rustles, then it is ready for use. Otherwise, it will be difficult to form petals due to a weak solution or sticking of tools if the solution was overly saturated. It's easy to fix. Wet the cloth, let it dry and repeat the process from the beginning.


Shaping
The petals are curved in different ways, depending on the fabric:
- The contours of elements made of light material are burned with candles or a lighter. Only during work there should be no drafts.
- You can use the bulla tool. The petal from the heated instrument will become rounded. Curl the edges with a curling knife and a special hook. The heel will give the petal a convexity.


Making stamens and pistils
The resemblance to a real flower is achieved precisely due to the stamens.
They are made from threads that are impregnated with a solution of starch or gelatin, and about 30-40 paint colors. The latter can be replaced with melted wax.
For the pestle you need wire wrapped in paper and cotton balls painted in the appropriate color.

Flower core
The very heart of the flower is decorated with buttons, cotton wool, beads and everything that may be at hand.


Making flowers with your own hands
Now let's move on from theory to practice.
Having a small piece of dense fabric in an interesting color can be the beginning of creating such a cute flower.

- Cut out circles of the desired diameter.
- Fold each element in half several times.
- Secure the bottom edge of the resulting petals with a seam.
- Collect all the elements into one flower.
- Attach a piece of lace or knitted border to the center of the flower.
- Attach a button to hide the seams.


Rose
It is not for nothing that the rose is considered the queen of flowers - a symbol of beauty and love. Not decorating your dress with such charm is simply a sin.

We will need a red or pink ribbon 35 cm long.
Fold the edge away from you and begin wrapping the rose. Secure the base with thread, not reaching the fold line.

Sew the end of the ribbon on the wrong side, securing all layers.

Made from satin and chiffon

- Cut circles of different diameters, at least 5 pieces.
- Burn the edges.
- Collect the petals into a flower, starting with the largest one.
- Carefully pin all the layers together.
- Sew on the decor, pinning the petals together.


From organza
The pattern for a lush organza flower will be a stencil in the form of divided petals. The fabric can be selected in different tones and textures.

- Fold the material in several layers to make a square. It should be larger in size than the template.
- Trace its outlines and carefully cut it out. The number of petals depends on the size of the flower and the thickness of the fabric.
- After placing the cut out shapes on top of each other and aligning the layers, use a thread to fasten all the petals in the center.
- You can decorate the middle with beads and seed beads.

From tapes
We would like to share another option for creating a flower from ribbons.
Of the required material, you only need ribbons of different colors, which can be pieces of any fabric, thread with a needle and beads for decoration.
Please note that the wider the ribbon, the larger and more magnificent the flower will be.


Flower using kanzansha technique
This technique requires perseverance, but the originality of the fabric colors compensates for this shortcoming. Sizes and colors can be very different, as well as methods of their application, while material costs are minimal.
Flowers are created from satin ribbon, using Moment-Crystal glue, decorative elements, cardboard, scissors and thread with a needle.
Eat different ways creating flowers using the kanzashi technique. We'll look at a few.


Aster
To make a beautiful aster, cut the ribbon into pieces 7 cm long. The number of future petals is optional.
Fold each piece in half and cut at an angle with a soldering iron to form the top of the petal.

Fold the bottom of the petals in the opposite direction and singe the edges, thus connecting the ends of the ribbon.

From thick paper, cut out a circle corresponding to the diameter of the flower. Glue the petals, starting from the edge of the circle, gradually filling the entire space.

Convex flower
A convex large flower is made as follows:
- Cover the ball with a plastic bag. The size of the finished product depends on the diameter of the ball.
- Make petals.
- Connect 7 petals into a circle with thread and secure. A small flower will come out, which needs to be attached to the center of the ball.
- Glue the second row of petals between the parts of the first row.
- Glue the petals in rows, forming a flower of the desired size.
- When the glue sets, carefully remove the ball and plastic bag.

It is difficult to imagine a wedding ceremony and celebration without flowers: they are an obligatory component of the bride’s bouquet and the groom’s boutonniere; they are used to decorate cars and the banquet room. But sometimes living plants are not able to withstand too hot or cold weather, and temperature changes negatively affect their appearance. In the article you will learn what an alternative is, how to make flowers from fabric with your own hands so that they look beautiful on your wedding day and are preserved in memory of the joyful day without losing their original appearance.
Master class on making artificial flowers from organza
Artificial flowers made using organza look charming. This is due to the frequency of use of the material when sewing a wedding dress, which means that the accessory will go perfectly with the bride’s outfit. In addition, the fabric is very comfortable and pliable to work with, which will facilitate the process of creating a masterpiece, and the variety of color shades makes it possible to choose colors that best suit the decoration of the celebration.

Necessary materials
To make organza flowers you will need:
- Organza. The color of the fabric depends on the preferences of the bride and the theme and style of the wedding. For creating interesting composition materials of different shades can be used. If it is impossible to find organza, chiffon or satin will do.
- Sewing accessories - needle, thread, wire.
- Beads, beads for decoration.
- Candle, matches.
- Paper needed for drawing patterns and sketches.

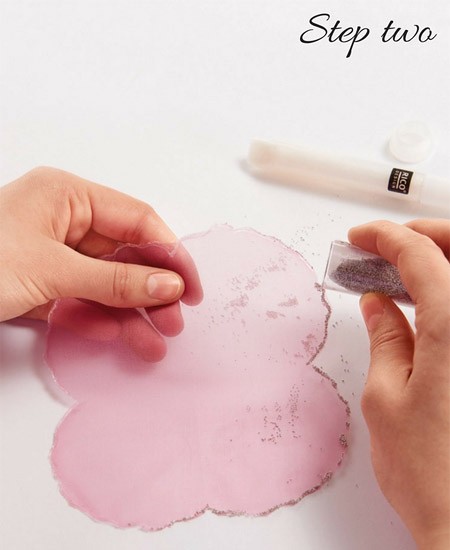
Stages of creation
A detailed master class will help you learn how to make fabric flowers with your own hands:
- We are preparing patterns for future buds. To do this, draw several circles of different diameters on paper. To make the circles as even as possible, you should use glasses of different sizes or other objects round shape. After drawing, we cut out the elements and transfer them to the fabric. Using ready-made templates, we cut out several circles of each diameter from organza - we get blank petals.

- Light a candle. As you hold each petal, melt the edges a little. In order to determine at what distance from the fire to keep the fabric, practice on unnecessary sections. Small parts should be scorched, holding them with tweezers so as not to burn your hands.

- Let's start assembling. It is better to start with the large lower petals, gradually adding the rest. The middle needs to be decorated with beads or seed beads, sewing them on or stringing them on wire. The organza peony is ready.

- To create a rose from organza, during the first stage you need to make five shallow cuts on the finished fabric mug. When processing parts with fire, it is important to ensure that all the petals curl in one direction, then the bud will look neat and beautiful.

Simple decorative flowers made from ribbons
Many brides on the eve of the wedding are thinking about how to sew and make flowers from fabric so that they look beautiful, complement existing accessories and decorations, and blend harmoniously with them. Often the problem is the lack of necessary materials, skills and experience in creative work. But in order to create amazing exclusive flowers from ribbons, you don’t need special equipment or great skill. The main thing is a little patience and imagination, and a detailed master class will help you realize all this and create a real masterpiece with your own hands.

Necessary materials
In order to make buds from ribbons, you will need:
- Satin ribbons of two colors (main and for leaves). Particular attention should be paid to the width of the ribbons - the wider and longer it is, the larger and more voluminous the product will be.
- Threads, needle.
- If desired, beads or rhinestones can be used for decoration.

Stages of creation
Let's look at two options for how to make beautiful flowers from fabric, both are simple, but the result will definitely please you, and the finished accessories will serve as an excellent decoration. Master class No. 1:
- Cut a satin ribbon of the required width, 50 cm long. Fold one edge to form a triangle.

- We fold a small corner and secure it with a needle and thread.

- We collect the ribbon onto a thread, folding it to form a beautiful “accordion”. How to do it correctly, look at the photo.

- Having collected the entire ribbon, it must be wrapped around the base, forming a beautiful rose. Secure everything with thread so that the composition does not fall apart.

- To create a leaf, cut a ribbon 10 centimeters long, fold both ends into the middle, forming a triangle. Sew and tighten the triangle at the base. The leaf is ready. To create a beautiful composition, you need at least two leaves for one flower.

- We combine the flower with the leaves - the masterpiece is ready.

Master class No. 2:
- Cut a satin ribbon 35 centimeters long. We bend the edge away from ourselves and begin to twist the flower. We secure the base with a thread, not reaching the fold line.

- We bend the ribbon towards itself, forming a petal. We continue to twist the rose, wrapping the ribbon towards ourselves.
- We sew the end of the ribbon from the inside out, fastening all the layers with thread so that they do not fall apart.

- By analogy, we make the required number of flowers, from which we will make an accessory or decoration. Such textile accessories are perfect for creating a wedding topiary.

Large flowers made of fabric using the kanzashi technique
Fabric flowers made using the kanzashi technique are original and beautiful. Such accessories can be small in size and used to decorate a wedding dress, a headband for the bride’s hair, or boutonnieres for guests. If desired, in this way you can make a large flower, which will decorate the wedding procession or banquet hall. The advantage of this technique is the ability to make a flower of absolutely any color, size, without spending a lot of effort and money.

Necessary materials
To make a flower using the kanzashi technique you will need:
- Satin ribbon. For a large flower, a wide ribbon is needed. In order to get a multi-colored masterpiece, it is worth buying material of different shades; the golden elements in the product look good.
- Glue gun, Moment-Crystal glue.
- Threads, needle, scissors.
- For decoration - beads, seed beads, rhinestones, small decorative ornaments in the form of insects (butterflies, ladybugs).
- Cardboard or ball, plastic bag.
Stages of creation
To create large flowers in the kanzashi style, two methods can be used; we will consider both so that everyone can choose the most suitable and simple option for themselves. Master class No. 1:
- We cut the satin ribbon into 7 cm lengths. Fold it in half and cut it at an angle using a soldering iron.

- On the other hand, we wrap the tape in the opposite direction, singe the edge, due to which the two ends of the tape are connected. We make the required number of blank petals, which depends on the desired size of the flower.

- We take cardboard and draw a circle along which we will glue the petals. The larger the diameter, the larger the resulting accessory. Glue all the petals in a circle.

The second option for creating kanzashi involves creating a large, round, convex flower:
- Cover the ball with a plastic bag. The size of the finished product depends on the diameter of the ball.
- We make petals that will serve as the basis of the product.
- Using a thread and a needle, we connect the seven finished petals into a circle and secure them. A small flower comes out, which we attach to our ball in the center.
- Next we glue the petals, placing them between the elements of the previous row.
- We glue one more element to the petals of the first row, and two on each side to the parts of the third.
- By analogy, we glue the remaining petals until we get a flower of the desired size.
- We remove the ball and plastic bag, our masterpiece is ready.

There is nothing easier than making flowers from fabric. Such crafts can serve as independent decoration or as an addition to clothing, hats and interior elements. To make them you need very little: fabric, patience and desire. As a result, it will be possible to create truly unusual and beautiful products.
There is nothing easier than making flowers from fabric
Roses made using this simple method are difficult to distinguish from real ones. They look as natural and original as possible. Ready-made flowers can later be used as a part of more advanced crafts, used to decorate pillows, floor lamps, clothes, for example, hats or a baby cap. A voluminous large flower made of knitwear can decorate a headband, large flowers can become details of decorative panels. You can make patterns and diagrams yourself, or if you are a novice needlewoman, download them from the Internet.
What is necessary:
- scraps of fabric;
- scissors;
- hot glue.
Step-by-step instruction:
- Cut the fabric into strips about half a meter in length.
- Fold the strip in half and coat it with a little glue.
- Roll the workpiece into a roll.
- After the fabric bundle becomes dense, begin to form the first petals. Fold the strip so that it protrudes slightly upward and wrap around the center.
- Using this principle, form all the petals, periodically fixing them with glue.
- The tail that remains must be lowered to the base and secured there with glue.
Cut a circle from the remaining fabric and glue it to the bottom of the product.
Gallery: fabric flowers (25 photos)


Fabric flowers for beginners (video)
How to make flowers from fabric circles
This technique is best suited for beginners just learning this craft. In this way, you can make flowers from different materials, but fabric ones look the most impressive.
What is necessary:
- felt;
- threads;
- scissors;
- needle.

This technique is best suited for beginners just learning this craft.
How to make a flower:
- Cut out circles from felt.
- Sew the prepared parts together, twisting the petals as tightly as possible.
- Twist the last circle into a tube.
- Sew it in such a way that all stitches are covered.
DIY textile flowers
Materials such as fabric make original decorative products. Each flower is beautiful in its own way. Their production is simple and quick. It only takes about five minutes for the craft to be ready.
What is necessary:
- textile;
- needle;
- threads;
- scissors;
- beads;
- iron.

Each flower is beautiful in its own way
Progress:
- Cut the fabric into strips about thirty centimeters long and up to ten centimeters wide.
- Fold the workpiece in half lengthwise and iron it clearly along the fold line.
- At the bottom, baste the tape with fairly wide stitches.
- Gather the fabric into an accordion, carefully tightening the thread.
- Close the workpiece in a circle, making an additional couple of stitches and tying a knot.
Attach a bead in the center.
Artificial flowers made of gelatin fabric
Fabric treated with gelatin is ideal for handicrafts. It is from this material that simply perfect crafts are made. And work also brings a lot of positive emotions.
What is necessary:
- white chiffon;
- yellow and green fabric paints;
- gelatin;
- scissors;
- pliers;
- glue;
- wire;
- pencil;
- cardboard;
- gauze;
- newspapers;
- white corrugated paper;
- awl;
- beads.

Fabric treated with gelatin is ideal for handicrafts
Progress:
- Draw templates of future petals and leaves on cardboard.
- On another sheet, draw a circle, and in it there are five cloves, visually reminiscent of tongues of fiery flame.
- Cut out all templates.
- Dilute the gelatin in water and place the cloth in it, place in a water bath and leave for about five minutes. After this, remove from heat.
- Dilute the paints in a separate container and place the gelatin-treated fabric in them, immediately remove and place on newspaper, dry.
- Cut out all the necessary parts from the dried material.
- Fold the petals in half, and the prepared piece of gauze diagonally.
- Place a petal in the gauze, then hold this structure with one hand and with the other, move the gauze clockwise, twisting it a little.
- Repeat this manipulation with each of the petals.
- Pierce the backing with an awl in the central part and make a cross-shaped cut.
- Cut the corrugated paper into strips and wind it onto a wire.
- Bend the paper-wrapped wire at the tip into a loop and wrap the first petal around it.
- Coat the workpiece with glue.
- Attach all the petals to the stem one by one, twisting each of them slightly.
- Wrap the upper petals on a match to give the flower a neater appearance.
- Pull the gluing through the stem and secure it with glue.
- Glue the leaves a little back from the top.
Decorate the product with beads and straighten all the petals.
How to make petals from fabric
There are a huge number of ways to make flower petals from fabric. Having mastered one technique, mastering others will be quite easy.
The simplest of them comes down to the following actions:
- Cut circles of different sizes from a piece of fabric.
- Using a candle, melt the edges, causing them to become curved.
- Connect the petals together with glue or thread.

There are a huge number of ways to make flower petals from fabric.
To create more sophisticated colors, you can pre-treat the fabric with gelatin and find a suitable template. In this case, the petals need to not only be cut out, but also corrugated in any convenient way.
Another equally popular method is rolling the tape. In this case, the petals are formed by lifting and bending the strip at certain intervals.
Skilled needlewomen cut out each petal separately. In this case, the shape is given using wire or thread. Such flowers look the most natural, but the work requires some skill. It will be difficult for beginners to create such masterpieces, but if they want, everything is possible.
Making flowers to decorate a hat
The best decoration for a headdress is, of course, a flower. To make it you will need very little time and materials. A hat with such decor will become stylish and fashionable, and its owner will become perfect.
What is necessary:
- scraps of fabric;
- scissors;
- rhinestones;
- needle;
- threads
Progress:
- Cut circles of the required size from the fabric.
- Fold all but one into triangles.
- Sew the blanks to the remaining unfolded circle.
- Attach rhinestones in the central part, with the help of which all seams will be hidden.
- Attach the finished flower to the headdress with threads.
Tip: you can further decorate your headdress by attaching several small green feathers to the flower.