- How to make clamps?
- Convenient 90 ° welding
- Welding with a non-consumable electrode for twisting
- Homemade electrode holders
- Several important secrets
The information below is aimed at lighting fixtures that frequently break down or have manufacturing defects. These are the smallest "wise things" that help welders do their job efficiently. Therefore, one should not be surprised if nothing is said here about magnetic angles or even prisms. These gadgets are most often purchased at the store.
Almost always, during the welding process, there is a need for mounting and fixing devices.
Welding attachments can be of two types:
- installation;
- fixing.
Since welding methods are progressing very quickly, the described fixtures may seem somewhat rare. But on the other hand, this means that it does not give way to more progressive and safer methods of connecting pipes in different conditions.
How to make clamps?

The clamp is a fixing device when welding various products.
The clamp is a fixing device. It cannot be unequivocally attributed only to welding accessories, because it is used:
- carpenters;
- locksmiths;
- turners;
- welders.
For different purposes, different strengths of this product are required. Sufficiently strong clamps are required for welding pipes and other metal things. Those that can be bought in a store very often do not withstand heavy loads, break down at the most inopportune moment. Therefore, it is worth trying to consider hand-made devices.
It is not difficult to make such a device with your own hands, this will require:
- steel sheet 10 mm thick;
- three nuts;
- several washers of large diameter;
- threaded pipe outside the size of the nuts.
For direct manufacturing it is necessary:
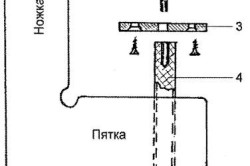
Clamps diagram: 1 - body; 2 - round timber; 3 - steel washer; 4 - steel rod clamping screw.
- Cut a strip of steel sheet 50 cm long and 4 cm wide.
- Cut out two strips and some additional small details:
- for static holding at the bottom 25 cm;
- movable bar 10 cm;
- two rectangles 5 cm each, for attaching the movable part (c);
- a small piece (d) that will support the static part of the clamp.
In welding, such a device allows you to keep the pipe structure in a stationary position. You do not have to worry that from the very first pulse of welding, the pipes will fall apart and the work will have to start anew.
Back to the table of contents
Convenient 90 ° welding

Welding magnets allow you to hold the work piece at an angle of 90 °.
In order to not weld pipes too troublesome and do without an assistant, they came up with welding magnets that hold pipes at an angle of 90 °. Previously, devices for this kind of work were made without the use of magnets.
This will require the following materials:
- metal square with a side of 20-25 cm;
- a piece of a square pipe;
- 3 small bolts and nuts for them;
- a thick bolt with a diameter of 4 cm and a nut 35;
- drill, drill;
- a small metal cylinder with a diameter of a ballpoint pen;
- the holder for the cylinder, in fact, its handle;
- welding machine.
Pipes 20 and 15 cm long are welded onto the square, on replaceable sides, in the very corners, so that the ends of the pipes are on opposite sides of the square.
Craft two accessory parts. Weld a U-shaped figure from the same pipes, about 10 cm long. Using the same pipes, weld the second in the form of an isosceles trapezoid with bases of 11.5 cm and 5.4 cm.
Calculations must be performed more accurately, the angle formed when the side parts intersect should be 90 °, so the lengths of the bases will exactly depend on the width of the pipes.

On the sides of the square at the corner where the pipes are not welded, make an isosceles triangular cut. Weld a U-shaped figure to it, having previously drilled a hole in the center of the upper rectangle for a small bolt. A 4 cm wide bolt with a nut should be placed in the gap between the square and the figure.
Attach a handle to the bolt; as it you can use a nut with a hole in which a thin rod moves freely.
In a small cylinder with a length of the smaller base of the trapezoid, thread for the taken small bolts. Thread along the tip of the large bolt, centering it.
This blank of the device has already been almost completed, it remains to drill a hole 5 cm above the center of the square, moving diagonally to its uncut and only free corner.
At the point of intersection of the diagonals of the trapezoid, make a hole in both such parts. A cylindrical part will be inserted between them, in which a thread was previously made and a hole was drilled in the center. For further assembly of the device, it is necessary to prepare a 35 nut for a bolt 4 cm wide; for this, make a through thread on one side of it, without affecting the opposite faces.

a - for the assembly of the corner joint, b - for the assembly of joints with various combinations of details; 1 - corner magnet, 2 - clamp, 3, 5 - magnetic elements, 4 - lever.
All further assembly consists in the correct sequence of attachment of parts. On the bolt with the handle already attached, put a threaded nut, turning until almost to the base. Attach the cylindrical part to the end of the bolt, with the drilled hole to the female thread, and fasten it with a small bolt. Next, we fix the trapezoidal figure using bolts, one of which is recessed in the thread of the cylindrical part, the second fixes the configuration from above, through the thread of the same cylindrical figure. A bolt with a prepared part at its top is pulled under the U-shaped support, adjusting a threaded nut under it. Fasten the bolt with a bolt that passes through the center of the U-shaped figure and is screwed into the special thread of a special nut. The device is, in fact, ready to use. By turning the handle of the bolt, it can be loosened. By inserting the pipes at right angles, fixing the fixture, you can weld.
Devices of this kind are a good substitute for welded magnets, which can be too expensive for simple household use.
Back to the table of contents
Welding with a non-consumable electrode for twisting
As you know, pipe welding is not the only type welding works, it is often performed to connect metal wires at junction points, perform twisting, and for repair or manufacture of homemade thermocouples. To make this device, you may need to understand what welding is and how exactly the law of electromagnetic induction works.
Therefore, the welding device is often assembled by hand. There is a small "but" here, wishing to make such a device, it should be borne in mind that the cost of the finished product is lower than the total amount for the purchase of all components. But if old transformers, switches from other devices, for example, already unnecessary pliers, will be used to create a fixture, then it is really worth trying to make fixtures for soldering or connecting.
The connection method used is referred to the types of welding with a non-consumable electrode. As an electrode, you can use graphite, which is easily removed from a simple pencil; liquid flux is sold in electronics stores. Homemade flux can be made from a mixture of boric acid and water, made into a slurry.
To make the device, you will need a 20-50 V transformer, one connecting wire for entering the network, two for connecting, one for connecting the electrode. As an electrode holder, you can use any available means, it depends on the capabilities and availability of items available in the arsenal, for example, a pharmacy syringe, a school tripod, cylinders or bolts.

In the process of making non-consumable electrode welding, a transformer coil is needed for twisting.
A 20-20 V transformer coil can be easily bought in a store, as well as a frame for a welding machine. But knowing the device of the transformer coil, having an extra, already unusable transformer, it can always be corrected by adding the required number of turns. Using the standard circuit of the welding machine, connect all wires according to the instructions. If the fixture is to be used by an electrician for welding twists, it is recommended to use work wires at least 3 m long so that there is freedom of access to work on the ceiling.
It is worth mentioning the observance of security measures. There are some ways to protect the face, especially the eyes from welding. Of course, this method of making a welding mask is very primitive, and in no case should it be used during pipe welding, but only for thin wires. Take the dark plastic bottle from any drink, cut out glasses with very long arms from it and connect it at the back of the head with a clamp or clip. Suitable for short-lived odd jobs. Still, it is worth recalling that the eyes are protected not only from the bright glow, but also from the accidental hit of red-hot pieces of metal. Therefore, replacing the mask with cardboard boxes and newspapers, a person is at great risk.
In the process of manufacturing welded structures, the relative position of the parts to be joined and the conditions most favorable for the formation of a high-quality joint, specified by the technological process, must be ensured. This is achieved by using technological devices and equipment.
Technological devices are divided into assembly ones, designed for assembly for welding and fixing parts using tacks or simple mechanical devices; welding, designed for welding pre-assembled parts with a fixed relative position; assembly and welding, allowing to combine assembly and welding operations.
The type of technological device is chosen depending on the production program (single, batch or mass production), product design (sheet or lattice structures, machine parts, etc.), technology and degree of precision in the manufacture of workpieces (machining, gas cutting, etc.). ) and assembly and welding technology (the need for gaps, their permissible changes or permissible excess of edges, etc.).
Welding fixtures should allow free movement of individual structural elements due to heating and subsequent cooling of the welding zone, and, if necessary, reduce or, if possible, eliminate deformations that occur in the welded product and in the device itself due to temperature effects. When welding large-sized structures with low rigidity (frame, lattice, sheet), fixtures must ensure the fixation of individual welded edges, and not the entire product as a whole. When designing a device, it is necessary to provide for access to welding and tacking points, quick heat removal from places of intense heating, assembly of the unit with a minimum number of installations, free access to check the dimensions of the product and free removal of the assembled or welded product.
Technological devices can be specialized (for welding a certain type of product) or universal. As an example, Fig. 8-58 shows a dedicated stand for assembly and welding of a frame structure. A universal fixture for similar purposes (Fig. 8-59) contains a row of slotted slabs. Depending on the configuration of the product to be welded, devices are attached to the plate for basing the parts to be welded (clamps, etc.) and for pressing the parts to the base surfaces (clamps, ties, spacers, etc.).
In some cases, the weight of the parts to be welded can be used for clamping.
Rice. 8-58. Specialized stand with permanent clamps for welding frame structures
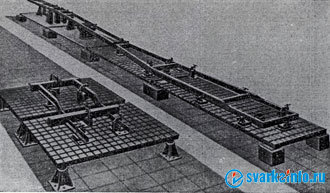
Rice. 8-59. Universal assembly and welding stands made of normalized elements
Retainers... These are elements that determine the position of the workpiece to be welded relative to the entire fixture. The clamps (Fig. 8-60) include pockets (a), stops: permanent (b), removable (c) and folding (d); locating pins and pins: permanent (d), removable (e); prisms; rigid and adjustable (g) and templates (h).

Rice. 8-60. Retainers
Removable stops They are used in devices that are customizable by the type of parts or when welding parts that cannot be removed due to stops. As a rule, the stops also serve as support bases, and in some cases as templates for welding mating parts. Pins or pins provide more accurate positioning of parts and are used when there are machined surfaces in the parts. Adjustable and rigid prisms are used for welding pipes, profiles, etc.
Templates are intended for fixing the parts installed during assembly by other parts in this unit or by some supporting contours of the product. In this case, the product itself is the supporting element of the device.
Clamps... These are the elements of the devices that ensure the clamping of the parts to the clamps or other bearing surfaces of the devices. There are mechanical, pneumatic, magnetic and hydraulic clamps.
Mechanical clamps are the most simple and therefore the most common (Fig. 8-61, a-e). Wedge clamps (Fig. 8-61, c, d) serve to press one element to be assembled to another, to align edges, etc. Eccentric self-braking clamps act similarly. The most universal screw clamps (Fig. 8-61, a, b). However, they are mainly used in hand tools. This is due to the fact that the screws work against the stop and that they are not fast acting. An increase in the pitch of the screw can destroy its self-braking properties and require large forces to clamp the part. Spring clamps are mainly used for clamping small, thin parts.

Rice. 8-61. Clamps
Along with the above, combined devices are used (screw with a wedge, screw with a spring, etc.). Lever clamps are levers of the 1st and 2nd kind or their combination and are used as amplifiers of the clamping drives. An example of such a lever clamp is shown in fig. 8-62. On the axis 2 of the rack 1 there is a driving lever 3 and an intermediate link 4, acting on the power lever 5. The workpiece is clamped by the stop 6.

Rice. 8-62. Lever clamp
Pneumatic clamps in comparison with mechanical ones, they have a number of significant advantages, including speed, the ability to control a number of clamps from one place, the ability to supply compressed air to the clamps that occupy different position in space (through the trunnion of the device or along flexible hoses), etc. The pneumatic clamp has a certain elasticity, which compensates for the deformation of the parts being welded.
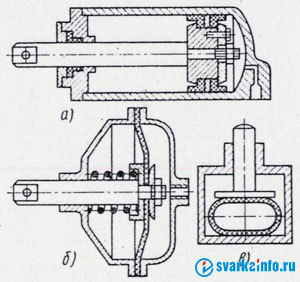
Rice. 8-63. Pneumatic clamps
Pneumatic cylinders, pneumatic chambers and pneumatic hoses can serve as a working member of the clamp. Pneumatic cylinders (Fig. 8-63, a) can be single-acting or double-acting. The cylinder rod can act directly on the part to be clamped or through a lever. The disadvantages of pneumatic cylinders include wear of seals and bulkiness.
In cases where the stroke of the rod is small, preference is given to pneumatic chambers (Fig. 8-63, b), equipped with a rubber diaphragm on a fabric basis instead of a piston, sandwiched between the cover and the chamber body. Often, a hose clamp is used in welding devices (Fig. 8-63, c). When air is supplied to the hose, the latter acts on the supporting surfaces of the rocker lever clamp. Pneumo clamps are used mainly in mass and large-scale production and in highly mechanized installations.
Magnetic clamps are distinguished by speed, simplicity and maneuverability. They are used to level the edges (Fig. 8-64, b) and press them against the flux cushion (Fig. 8-64, b). The most common are electromagnets, although permanent magnets have also been used recently.
Hydraulic clamps used in welding devices quite rarely. Presumably, hold-downs built on the basis of hydroplastics - viscous mixtures with a sufficiently high fluidity - are promising. Unlike hydraulic clamps, clamps with hydraulic plastics do not require complex and expensive seals, ensuring an even distribution of the pressing force between the plungers. They allow pressure up to 500 kgf / cm 2.

Rice. 8-64. Electromagnetic clamps:
a - general view of the magnet;
1 - magnet body;
2 - core;
3 - bottom;
4 - winding;
5 - switch;
b-d - application schemes;
6 - bracket;
7 - electromagnetic stand;
8 - emphasis;
9 - screw clamp
Tightening and spacer devices (ties, spacers and jacks). They are intended for tightening when assembling two or more parts or assemblies, for aligning edges and dents, for unclamping cylinders (Fig. 8-65).
Assembly and welding fixtures can be universal or specialized. In fig. 8-59 show a universal fixture for welding bulky and complex spatial structures.

Figure 8-65. Tightening (a) and spacer (b) devices:
1 - main lever;
2 - bracket;
3 - nut;
4 - tightening screw;
5 - lever;
6 - clamping screw;
7 - spacer screw;
8 - base;
9 - thrust bearing
For assembly and welding of flat sheet structures are used electromagnetic stands, which are a flat or curved bed with built-in electromagnets, between which there is a flux-copper or flux cushion with a pneumatic clamp. Electromagnets located along the seam tightly attract the edges of the joined sheets to the assembly stand and perceive the reaction from the pressure of the flux cushion. The location of magnets and flux pads is determined by the cutting of sheets and their number in the section.
In fig. 8-66 shows a jig with screw clamps used to assemble I-section elements 400-1800 mm high. Welding of elements in this jig is carried out by an inclined electrode welding tractor.
![]()
Rice. 8-66. Beam welding jig
Every welder knows that for quality work, it is necessary to properly prepare for it. A variety of welding devices will help to correctly install and secure both the entire structure and individual parts. The final quality of your work directly depends on this. But it is not always possible to take ready-made devices, or right now it is easier to do or repair yourself than to look somewhere.
- Installation;
- Fastening.
The setting device is designed to install the parts in exactly the same position in which they will be in the final work. Depending on their functions and design, they are divided into stops, squares, prisms, templates.
Fastening devices are designed to secure parts in the desired position, in which accidental shifts or deformations are not allowed. Such devices include clamps, clamps, clamps, ties and spacers.
Do it yourself
Some of the tools used by the foreman during the welding work break often enough or have the wrong functionality. Yes, most things can be bought at the store, but sometimes it's easier to do it yourself and specifically what you need.
Electrode holders
To make a homemade electrode holder, you need to take three pieces of wire, ten centimeters each, eight millimeters in diameter. Bend two of them to the side (it will look like a fork) so that the parts of the wire are directed in opposite directions (left and right). The remaining wire should be located between them, bent towards the top from the side of the connection with the metal rod, up to approximately 0.5 of its length. First of all, the side parts are seized by welding, after the central part is applied, then everything is finally welded. You may need to add extra winding to the wire to keep it from overheating.
Clamps
The clamp is a fixing device. The need to make them yourself may be due to the insufficient strength of those models that are sold in stores. For example, when welding hardwood or other metal things, sufficiently strong clamps are needed. And store models may not withstand the required load.
For manufacturing you will need:
- Steel sheet 10 millimeters thick;
- Three nuts;
- Large diameter washers;
- Pipe with an external thread to the size of the nuts.
Manufacturing process:
- Cut a strip with sides of 50 cm and 4 cm from a sheet of steel;
- Cut a strip for static holding at the bottom with a length of 25 cm;
- Cut a 10 cm long sliding bar;
- To attach the movable part, cut two rectangles 5 cm each;
- Cut out the part to support on the static part of the clamp (1);
- Weld the auxiliary part to the base of the clamp. They must form the letter G among themselves;
- Weld the part (1) flat on the short edge;
- Weld three nuts together;
- Weld washers with each other;
- Weld the nuts with an edge in relation to the movable part so that the screwed-in rod runs parallel to the base of the clamp itself;
- If necessary, a handle can be attached to the rod, securing it with a nut on top;
- Weld parts along the outer edge;
- Insert between parts of the clamp;
- Weld along the inner edge of the parts by attaching the bar;
- Weld washers on the edge of the rod.
For assembly, you can use a rod from a store clamp, if available.
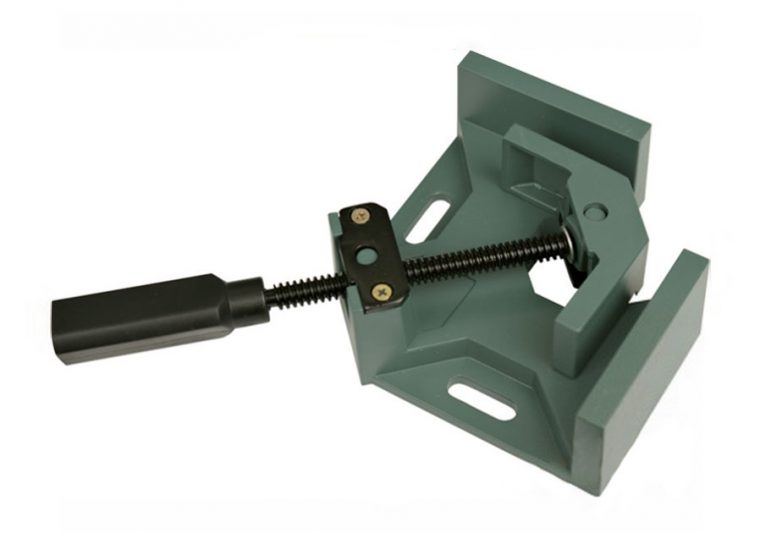
The angle clamp, just like the usual one, secures the parts for their subsequent welding. However, parts of the product do not always have to be straight. Sometimes at an angle. It is for such moments that an angle clamp should be in the welder's arsenal. They are sold in stores but have the same disadvantages. You can easily make a right angle welding tool yourself. The set of materials is the same as for conventional clamps, plus nuts and stud.
Non-consumable electrode welding
An apparatus for connecting metal wires, twisting, or making thermocouples is quite often made independently with your own hands. But it should be borne in mind that the price of a finished product purchased in a store may be lower than the total sum of all components if purchased. However, as a rule, parts can be found during disassembly, and, perhaps, they can be obtained by disassembling old equipment.
To manufacture the device, you will need one transformer for 20-50 V, four connecting wires (two for connection, for connecting the electrode and connecting to the network). The electrode can be graphite, which can be easily obtained by removing the rod from a pencil. Anything that you can adapt for this is suitable for the role of the holder.
The assembly of such devices takes place according to the standard scheme, which can be easily found in many sources and, by and large, consists in the correct connection of the wires and packing it all into the case.
Justification
Variants of homemade welding fixtures can and have practical application in real work. However, it should be remembered that it is advisable to manufacture self-assembly fastening mechanisms or other devices. You must clearly understand what you want to achieve: increased strength, higher rigidity of fixation, or make the option as convenient as possible.
The welding attachment allows you to do quality work quickly. And the more convenient you make or select the tool, the faster you will achieve the required quality of work.
Depending on the type of structure to be assembled, the welder needs to constantly monitor the size holding. This includes: compliance with the equality of diagonals, the distance between the axes (posts), the longitudinal and transverse plane, the corners of individual elements that are not included in the main perimeter. If you miss any of the listed indicators, then the design will turn out to be defective and the product will have to be redone. For fast carrying out of monotonous work, practical welding devices have been created, which ensure fixation of the structure in the desired position, observing the previously set dimensions. This optimizes the entire process and allows more quality products to be produced in a shorter time.
Conductors are assembly and welding fixtures used in the manufacture of towel warmers, intricate wrought iron patterns, and door frames from industrial safes.
The metal structure has two cone-shaped supports on the sides, between which a rotating plane is fixed. The latter has adjustable longitudinal beams, with a number of screw clamps. Thanks to the numerous holes in the beams, the clamps can be installed along their entire length, depending on the size of the product. Thanks to the divorce or the reduction of the beams themselves, the width of the assembled structure is adjusted.

Thanks to the conductors for welding, the distance between the sides of the product, its longitudinal and transverse planes, is immediately set and maintained. The welder checks only the diagonal, and you can start working. The device rotates, so there is easy access to welding both external and internal seams. To fix the tilt during rotation, a circle with numerous holes on one side of the plane is used. An emphasis is inserted into it. More complex mechanisms include an electric motor and a gearbox.
The sliding mechanisms of the conductor allow it to be used as a universal tool for welding large and small items. When working with stainless steels To prevent scratches from screw clamps, the latter are provided with felt stickers on the "lips", and the mass is broadcast directly to the product. Such a conductor device can be assembled by yourself from a profile pipe. You will need bearings and long bolts to secure the moving parts.
Templates
Simpler right angle fixtures are installed in the form of templates on a flat surface. The exact angle of future products is determined in advance. This is done by welding the stops, two on each side of the corner. The welded element is laid in the template, tacks and welding are made.
"Advanced" versions of the templates have fold-down stops to facilitate the extraction of the welded structure. To prevent the product from leading when exposed to high temperatures welding arc, instead of stops on one side, screw clamps are added, which rigidly fix the sides in the template, and do not allow them to rise up. After the end of welding, the screws are loosened and the structure can be freely removed. So, you can weld at an angle profile pipes, corners with different width of the shelf. It is convenient in the production of frames for doors and gates.
Centralizers
There are not many assembly welding ones. The main feature of working with such parts is to ensure the alignment of the sides. If the difference is more than 1.5 mm, then it will be noticeable to the naked eye. On critical products, where aesthetic appearance is important, this is unacceptable.

Centralizers bring the sides to be welded together, aligning them either mainly along the upper and lower parts, or around the entire circumference. They are screw, the girth of which reaches all sides of the pipe, and clamping - with semicircular legs. The equipment centers the pipe and welding takes place. After which the adaptation is removed.
Magnetic inventions
They make it very easy to install the sides of the product in the desired position. The simplest is the magnetic square. It rigidly fixes the two parts of the product due to the force of attraction, and sets an angle of 90 degrees between them. There are more universal versions of the device, where different degrees are set. This way you can weld the sides at sharp and obtuse angles.

Even more versatile inventions with magnetic frequencies allow you to grip a metal element and attach it to either side of a surface. This is very helpful when there is not enough third hand, and there is no one to help. A homemade welding device with similar functionality can be made from two squares of metal 30 x 30 mm, to which one magnet is attached. On the squares "ears" are welded to which, through a bolted connection, two or more "elbows" can be attached (strips of metal with a wall thickness of 3 mm, and dimensions of 100 x 20 mm). Such an invention can be bent and bred as desired. On one side, it will stick to the main product, and on the other, it will grip and hold the welded element.
Clamping and sliding devices
Among the welding devices, there are many small helpers who provide fixation, mixing, or spreading of parts for welding. Here are the main ones.
Clamp
This is a C-shaped frame, at one end of which there is a “lip” for gripping the product, and at the other end there is a moving stop. With this device, the sheets are pressed to the base, observing the general plane of the product. The stop moves on a screw or on a cam mechanism along a toothed rack. The latter option is more practical, since it saves time on sliding for different thickness of the structure. The throat (the size of the C-frame) can be small or large, depending on the dimensions of the materials to be welded.
Gon
The easiest element to help you set 90 degrees between shaped pipes is a square. If manipulations are regularly performed that require quick installation of 90 degrees and fixing the position, then you can make a simple structure for welding with your own hands. You will need two clamps, fixed "lips" which are welded from below to a strip of metal. On top of the strip, two small corners are attached. With the help of a square, the desired degree is set and they are scalded. These are stops. It is not required to bring the corners close to each other in order to maintain access to fillet weld on future products.
Spacers
To squeeze out the sagging sides of the structure, expanding devices are used. This can be the edges of the side sheets, diverging in the plane, or the sunken side of the joint of a large capacity. To bring the edges to one plane, a cylinder is used, inside which a coarse thread is cut. Large bolts are screwed into its edges, and stops are attached to their caps that fit the inside of the product (if the tank has smooth walls, then the stops are flat, if the walls of the tank are round, then the stops are rounded). The cylinder has several holes for lever mounting and rotation. In this case, the bolts are unscrewed and the total length of the device increases. This pushes the sagging side outward to the required level. If the length of the spacer is not enough, a wooden insert is placed under one of the stops.
Clamps
Sometimes, you have to work very quickly, and there is no time to press the product with clamps. If the thickness of the parts to be welded is small, you can use clamps. These are small claws with a spring that attracts both halves. The "lips" of such devices can be wide or curved, for specific products. They have a small range for adjusting the working width, but unlike clamps, they are set in one second.
Screeds
When it is required to bring the sides along the joint line in order to cook without a large gap, then screeds are used. In the case of flat products, it can be two corners with holes, which clutch opposite each other and bring the sides together with a long bolt, tightening the nut. The device will fully realize its tightening effect if the bolt has a long thread (under the head). If the structure has sides that you can hook on, then instead of welding the corners, hooks with holes at the top are used.
Various accessories make the welding process much easier and faster. By making these elements yourself, you can save a certain amount.
All welding devices are divided into two groups: fixing and setting. There are also universal devices that perform both functions.
Installation elements
Installation devices include devices whose purpose is to fix parts in a specific place, in the way it should look at the end of welding.
Installation elements differ from each other in design and functional features. These include:
- square;
- sample;
- emphasis;
- prism.
A template is a tool that helps to assemble the connected elements without additional marking, and fix them without using clamps.
The stop is designed to secure the parts to be welded to the base. There are several types of devices: folding, removable, permanent stop. Permanent parts are most often bars or plates. If it is necessary to put a temporary stop, then in this case, removable or folding structures are used.
The square is an indispensable device when it becomes necessary to install parts at an angle. The most functional are rotary devices.
Welding cylindrical elements is rarely complete without a prism that fixes the parts in the desired position.
Fixing parts
Fastening devices are devices that serve for reliable fixation of parts, which eliminates shifts, deformation, and cooling of elements during welding. These include:
- clamp;
- clamp;
- clamp;
- spacer;
- screed.
The quick-release clamp is one of the most common fastening elements when working with metal. The part has various shapes and dimensions. The size of the clamp can be adjustable or fixed.
With the help of the welding clamp, the part is easily and securely fixed in a certain position. The advantage is the simplicity of the process: the elements are fastened using the handles that the clamp is equipped with.
There are several types of clamping devices: lever, eccentric, wedge, spring, screw clamp. The latest model is the most in demand when carrying out welding work.
The tie is used to connect and fix large-sized products. There are several ways to fasten with a screed.
The spacer serves to align all joints, give them the required shape, and correct defects.
The most convenient for welding work are universal devices that have installation and fixing functions. The principle of operation of such devices is easy and simple: the desired part is inserted into the product, after which the eccentrics and screws are tightly tightened.
The main disadvantage of assistive devices is the fact that they wear out quickly and often break. To reduce the costs associated with the purchase of devices, you can try to make your own welding fixtures. Moreover, this is not difficult to do.
Clamp making
The clamp, a fastening device used in welding, is also used in locksmith, carpentry, turning. This requires different strength of the fasteners. For example, to connect metal pipes you need clamps that can withstand heavy loads. Store-bought fixtures are not reliable enough, so welders often use homemade welding fixtures.
It is not difficult to make a clamp, you will need:
- steel sheet, the thickness of which is about 10 mm;
- nut - 3 pcs.;
- washer with a large diameter - 4-5 pcs.;
- a pipe equipped with an external thread that matches the size of the nuts.
During the manufacture of the device, it is necessary to adhere to a certain algorithm. The fixture diagram will greatly facilitate its assembly:
Strips are cut from a sheet of steel, the width of which is 40 mm, and the length has different meanings:
- length 500 mm for the base;
- length 250 mm for static holding at the bottom of the structure;
- length 100 mm to create a sliding bar.
Next, you should cut out two 50 mm rectangles (A), which serve to fasten the movable element, and a part (B), which provides an emphasis in the static part of the product. Next, an auxiliary device should be welded to the base of the clamp, having received an L-shaped. Attach part B to the short edge. Three nuts are welded together. Washers are also welded together.
Next, you should lay the nuts with an edge to the movable element and weld so that the rod that will be screwed in is parallel to the main part of the clamp. The rod can be taken from a previously purchased fixture. To it, if necessary, are added wooden handles fixed with a nut.
The weld is made along the outer edge of the components A, between which a clamp strip is inserted. Further, a movable element is attached to the inner edges of parts A and welding is performed. Finally, flat washers are welded to the edge of the metal bar.
The resulting product will allow you to keep a sufficiently large structure of metal pipes without shear, rupture and slope.
Welding at an angle of 90 °
Magnet installation diagram: 
Welding magnets holding the pipes to be joined at an angle of 90 ° are intended to facilitate welding work. But how to make a neat seam if such a device was not at hand? For this you need to take:
- square metal sheet with a side of 20-25 cm;
- a section of a pipe with a square section;
- small bolts with nuts - 3 pcs.;
- a bolt with a diameter of 4 cm, a nut to it - 3.5 cm;
- steel cylinder diameter about 5 mm;
- welding machine, drill, drill.
Two pieces of pipe with a length of 20 cm and 15 cm are welded to a metal square (in the corners, on opposite sides). Next, you need to make a couple of auxiliary elements from these pipes: P - shaped, from segments 10 cm long; and an isosceles trapezoid (base 11.5 and 5.4 cm).
All calculations must be performed with maximum accuracy.
Clamps with permanent magnets are assembled according to the sequence of connecting the elements. They perfectly fulfill the functions of welded magnets, which are quite expensive products for domestic use.
A homemade electrode holder is a fairly common product that has many shapes and sizes, depending on the type of work: welding oversized pipes or soldering twisted wires.
Simple electrode holder made of d¾ ”tube: 
Experts recommend that for the manufacture of a durable and reliable holder for pipe welding, preliminary draw up a diagram that takes into account all the features of the product. You can save money on equipment by contacting a school workshop, which is usually equipped with machines for threading and drilling. For a household welding device, it is advisable to make a rack where small items necessary for welding work will be stored.

